[XMOD] FOLDING WITH STYLE: The LAW-300

This project has been in development for a while. It was finally classified as part of the XMOD column due to all of the inherent modifications of existing parts required to get it done. I wanted to make sure I got this thing as right as I could before I did the deep dive on it; should Allan Zitta (the “Z” of Z-M Weapons, designer and manufacturer of the cult classic LR-300 rifle of late 90s to early 2000s fame) see this article, I would want for him to feel honored by this tribute to his innovation, rather than put off by a half-assed presentation. Though earlier versions have been shown on Instagram, now it’s finally ready for primetime and now I can map out how it was done in case you want to replicate it.
“Why didn’t I think of that?”
The idea for the LAW-300 occurred to me when LAW Tactical sent me their 1913 Rail Adapter Plate (RAP) meant for use with their ARIC BCG— something I’d mentioned was coming when I first spoke about the ARIC. I slapped it onto an SBR stamped lower I wasn’t using with a random short upper and put an MCX stock on it just to put it together and get an idea of how it functions and what sort of configurations it provides for. And it seemed… boring.
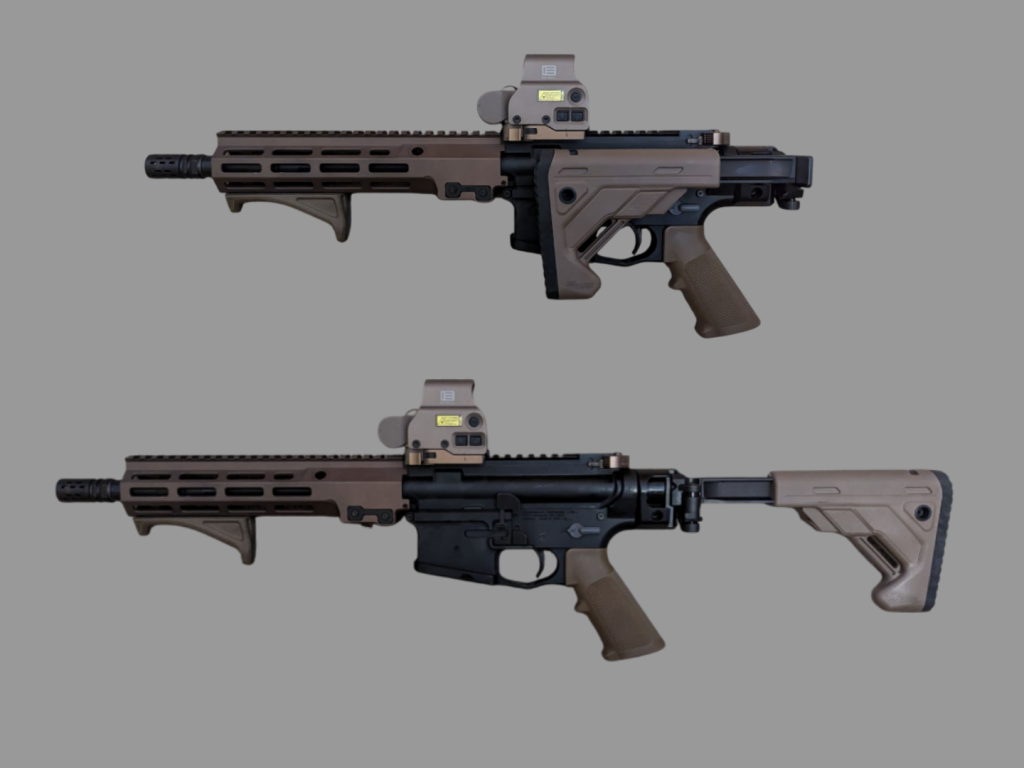
“This is exactly what anyone writing a review of this thing for some fluff publication would do, slap an AK or MCX stock on an AR and call it a day.”
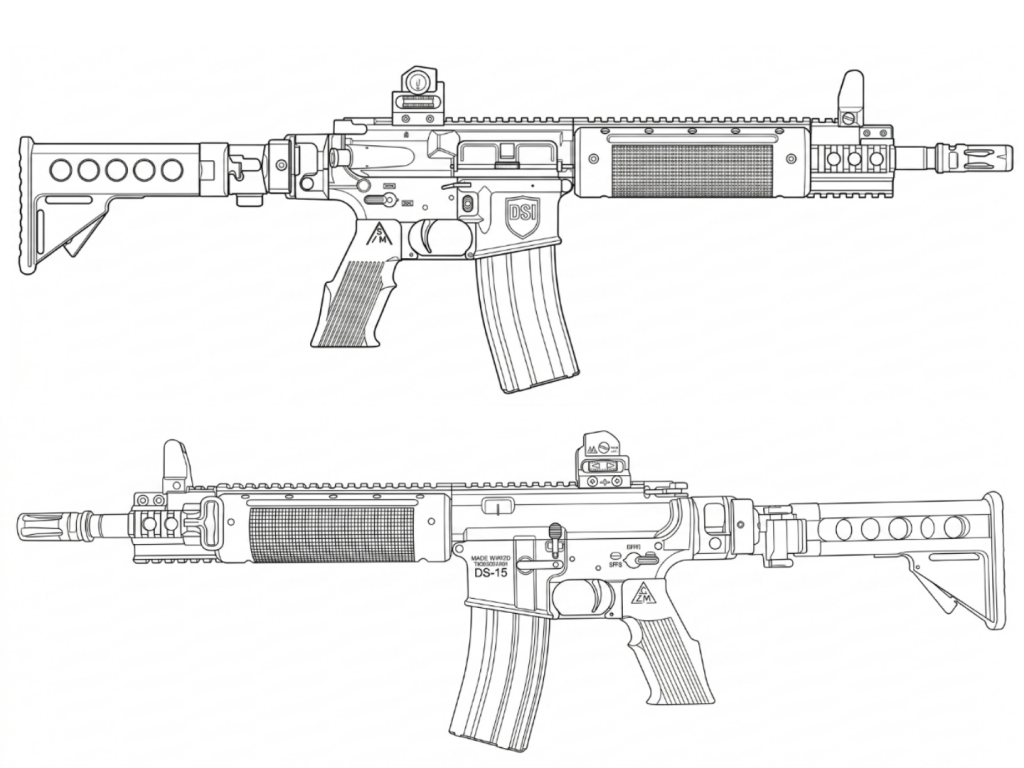
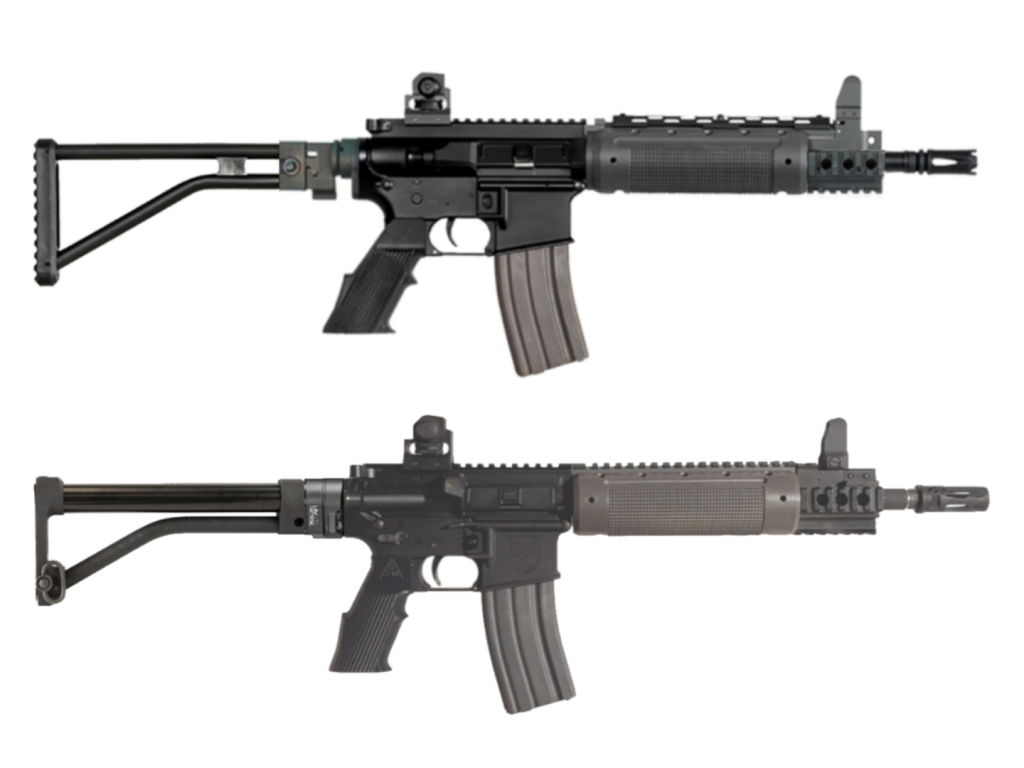
So I thought, what’s something different that I can do that nobody else would have thought of? Then I remembered the LR-300: The first AR platform rifle with a folding telescoping stock. And I said, “Ah, yes. There it is. That’s what I’ll do.” So the name “LAW-300” is a portmanteau of LAW Tactical and LR-300; it has nothing to do with the .300BLK cartridge— though it could, if I had wanted it to.
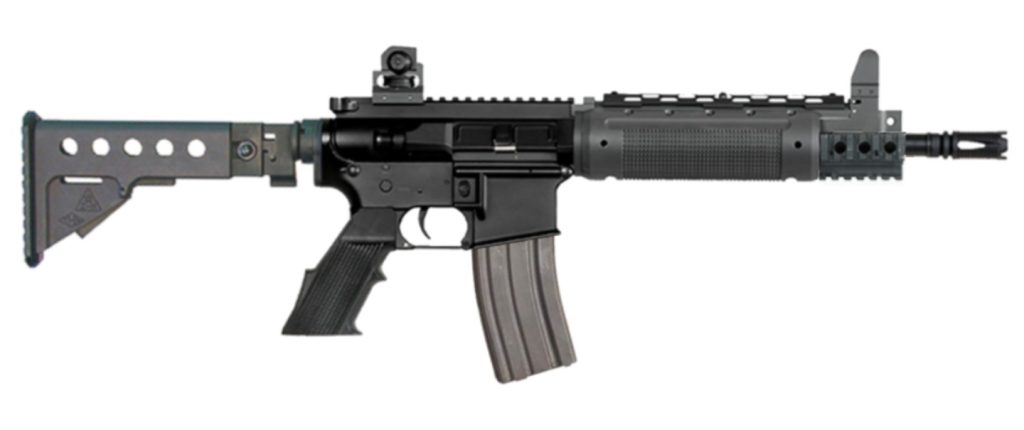
Last time I covered the ARIC I went into a brief history of the LR-300, so I won’t repeat myself. The important thing to remember here is that the LR-300 relied on a bolt carrier that looked like half of a standard AR-15’s. Along with this, it utilized internal buffer springs to bypass the requirement for a receiver extension tube that housed the buffer and buffer spring (not unlike the AR-180, likewise designs, or the ARIC); thereby permitting the weapon to fire repeatedly with a folding stock. This upper receiver (slightly taller than a regular flat-top AR-15) mated to a standard AR pattern lower receiver.
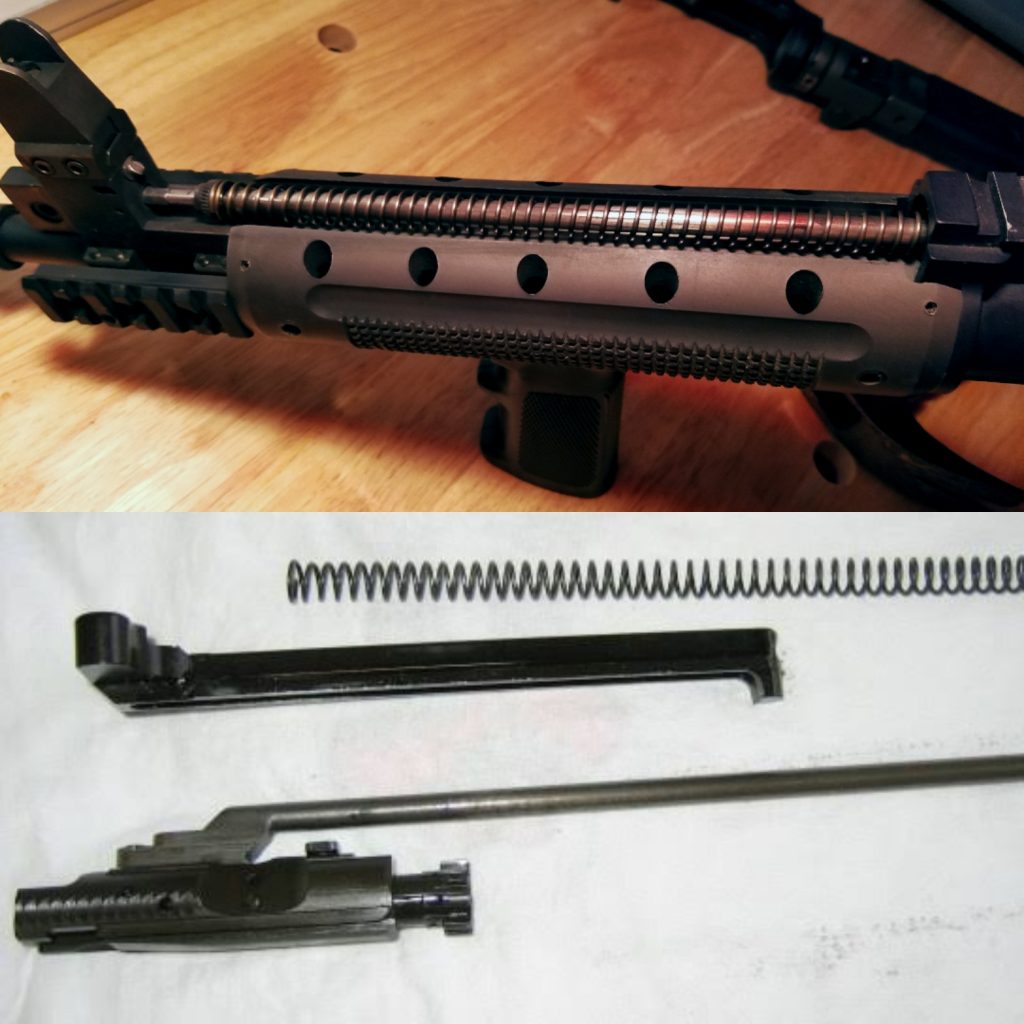
Unfortunately the LR-300 was ahead of its time; in the mid-90s during the dark times of the 1994 Federal Assault Weapons Ban, innovation and development weren’t the only things that were hamstrung by the draconian law. Imagination also suffered, both among those that would conceive of such innovation, and those who could utilize them for myriad applications. As cool as it looked, what it enabled went unappreciated by the industry, and so the rifle remained relatively lesser known and never hit stride.
MAKING IT HAPPEN
So around Jan 2025, here I sat with an SBR’d ADM4 lower receiver, an ARIC and the RAP. I had the heart of this project figured out (less the actual upper and barrel, but those were easy— standard AR-15 components), so now I had to figure out the most noticeable (and unfortunately hardest to replicate) details— the aesthetics. Namely that of the handguard, and the stock, the two most iconic visual details of the LR-300.
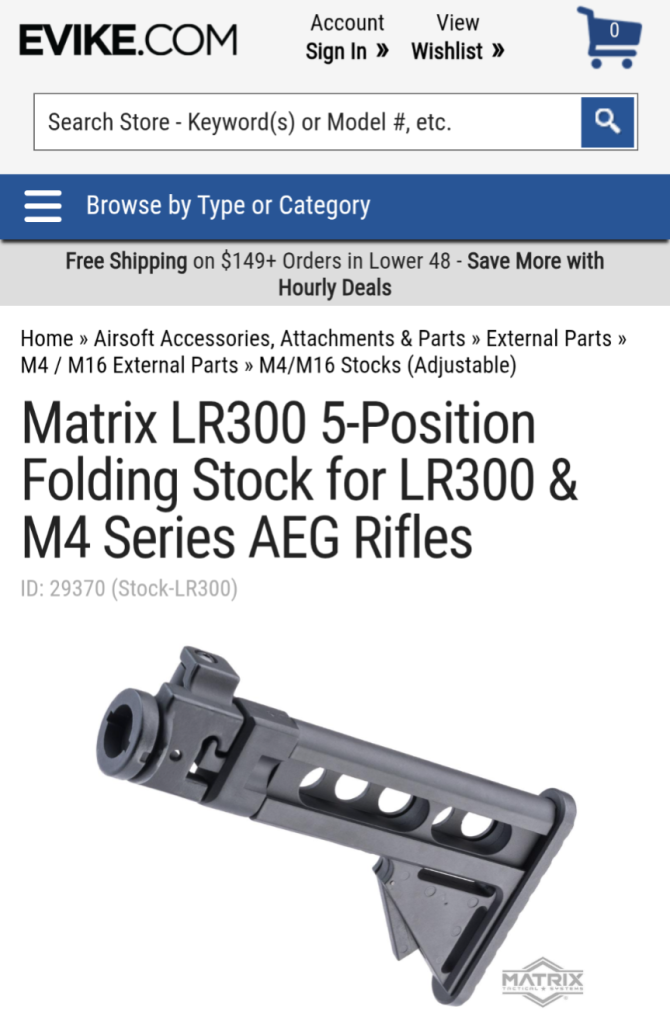
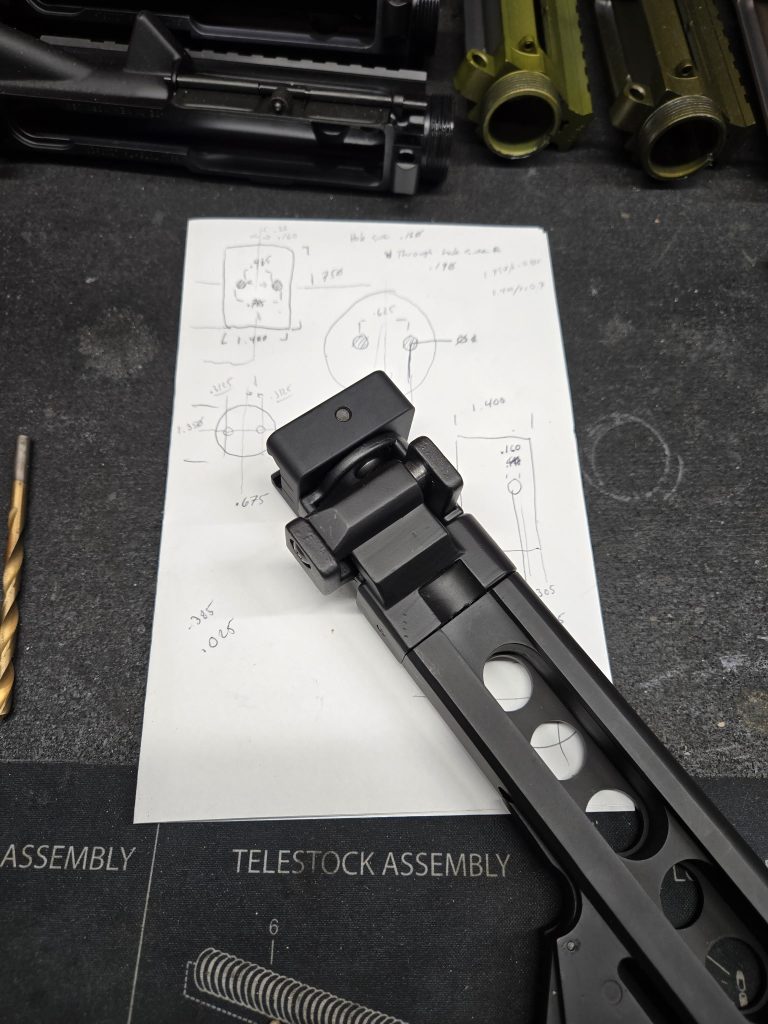
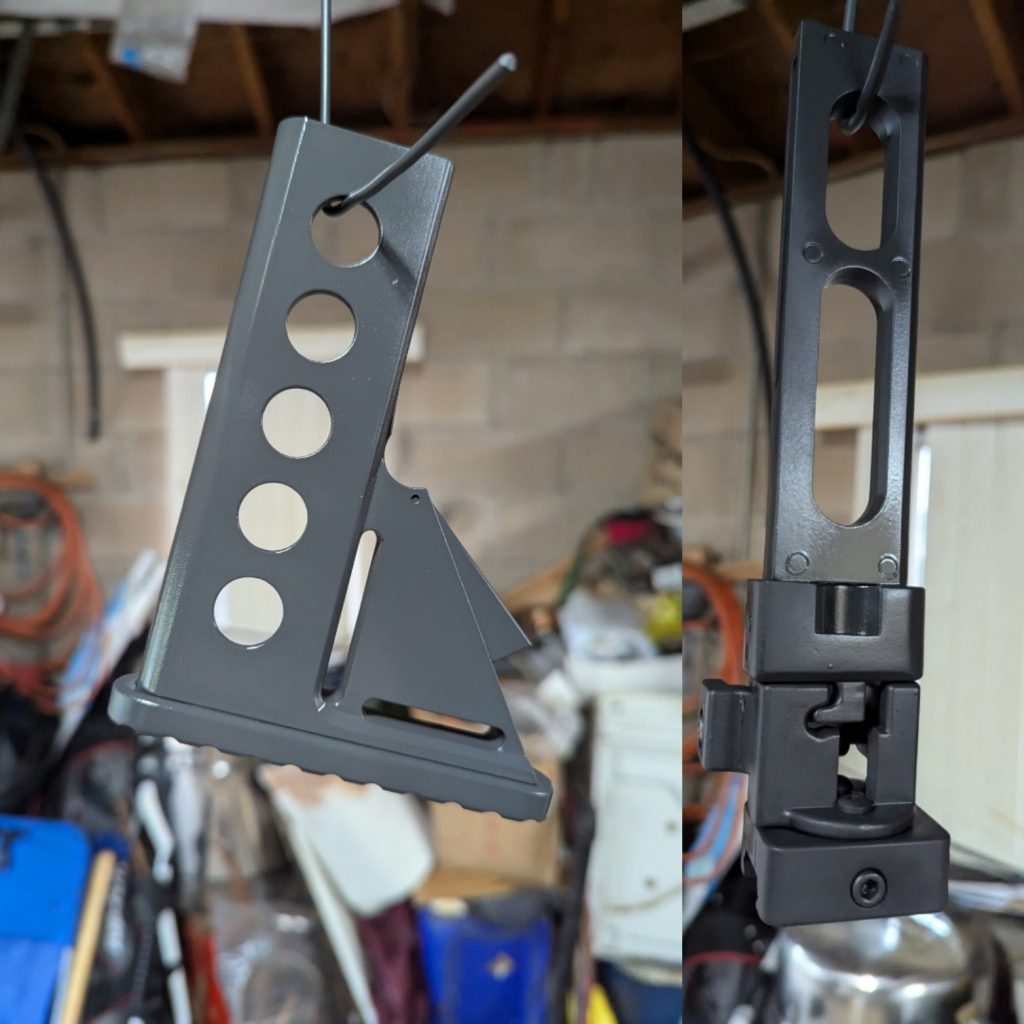
The stock was the easier of the two to tackle. I found an airsoft replica of the LR-300 stock made of aluminum, and it felt pretty hefty for what it was. It came with the required folding hinge. I just needed to figure out how to give it a 1913 adapter interface. It came with a fake castle nut modeled after the actual LR-300 stock; that was in the way and needed to go. With the flat round plate that would remain after cutting away the fake castle nut and exposed threads, I would have a flat surface to press up against something else— the Lage Manufacturing MCX 1913 adapter.
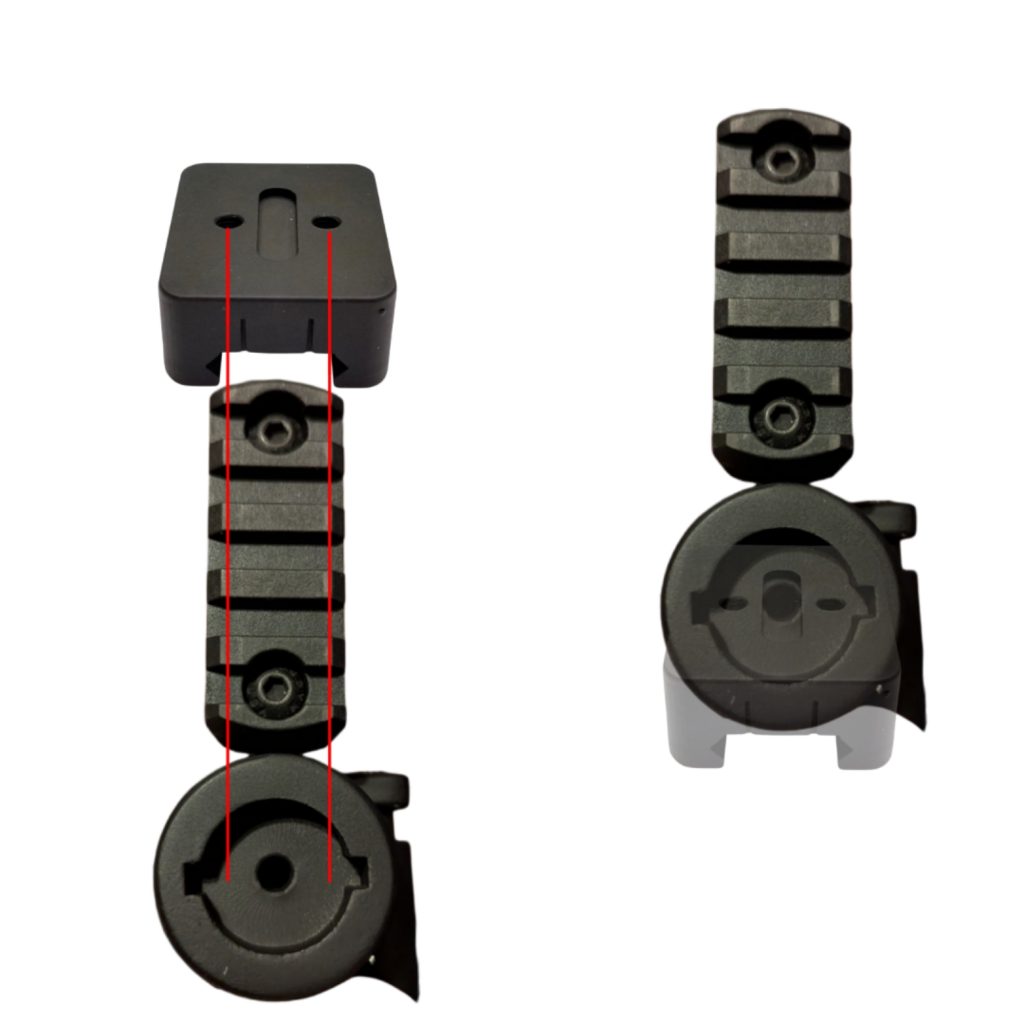
This 1913 adapter (female face to attach to the male face of the LAW ARIC 1913 adapter) had two threaded holes running through its face. After doing some parts scaling to make sure everything would fit and line to the way it needed to, two points were identified that would be drilled through to run the screws into the Lage adapter, securing the two parts together and now providing the ability to mount this LR-300 stock to the ARIC 1913 rail.
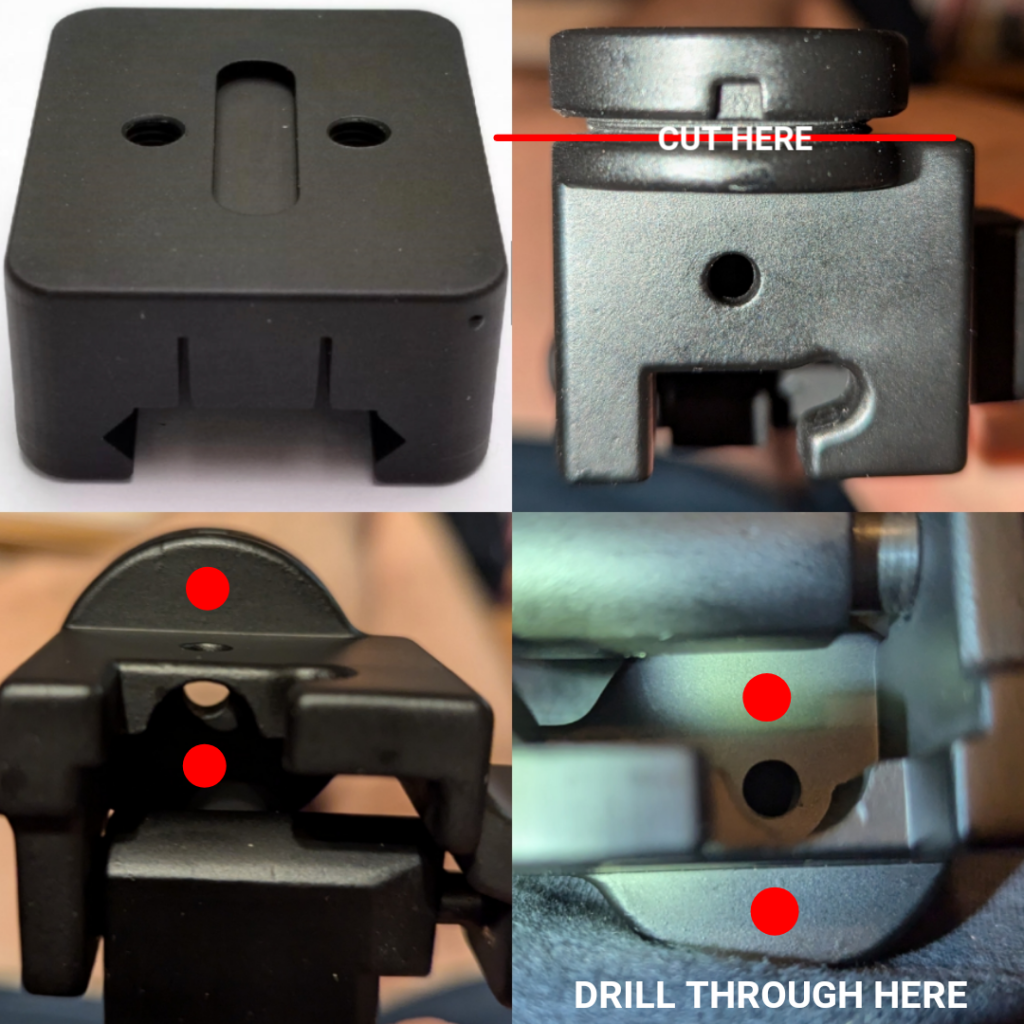
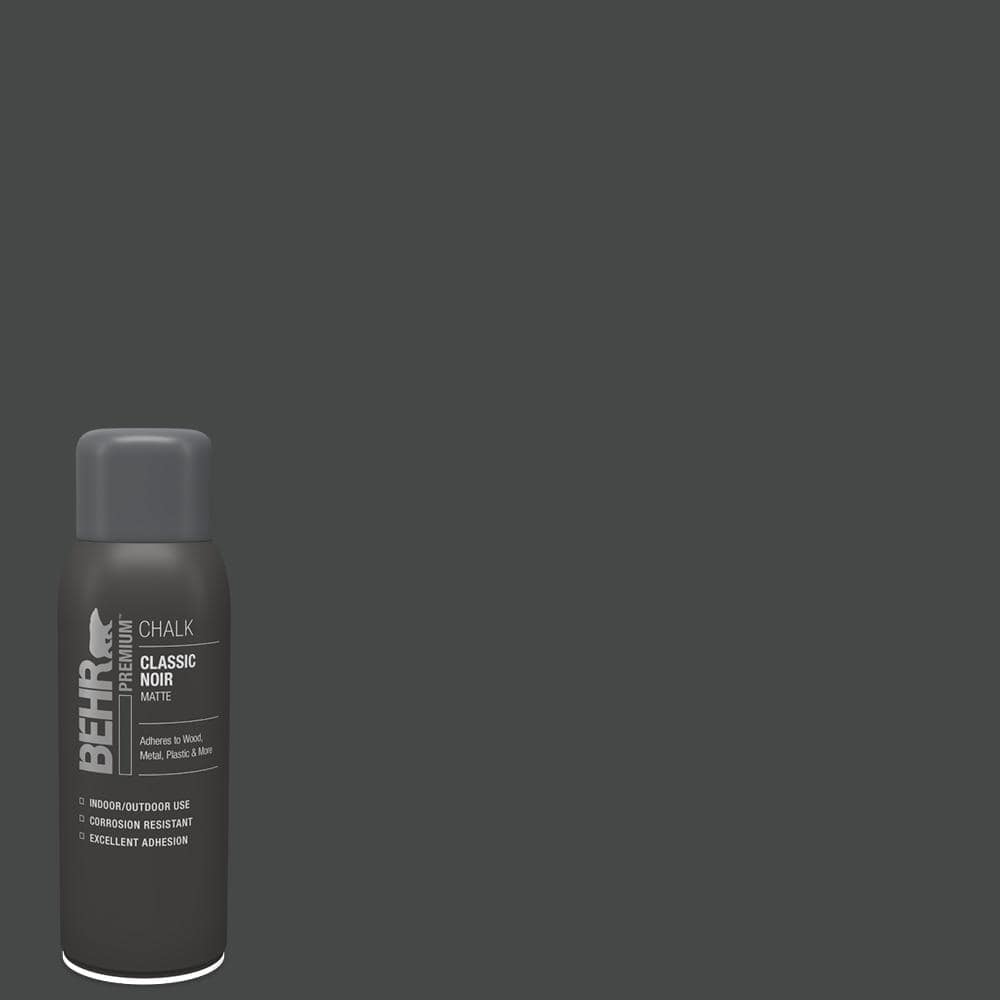
Once I provided the parts and the concept to my gunsmith friend Orion (who’s helped me with a number of projects previously), he looked at everything and said yeah we can do that. So he did it. After a test fit to make sure everything functioned as intended, I hit it with a few coats of gray spray paint that looks remarkably close to the gray receiver color of the old M16A1s and CAR-15s to match the gray color the LR-300’s stock had. The stock was now finished.
The handguard was an entirely different ball of wax but prior experience led to my thinking up a quick solution. Ricky Kelly of ar180parts.com had about two years prior come up with a cool way to give the BRN-180 a more retro AR-180 like appearance by developing a 3D printed sleeve made of ASA filament that slid over the exterior of the M-LOK rail and secured using standard M-LOK t-nuts in conjunction with a washer-like plug made of the same ASA material.

He’d also developed some AR-180 profile AR-15 compatible grips. I purchased one from him along with the handguard sleeve and it’s held up pretty damn good. Since finding an LR-300 grip was impossible, I figured that it would be no large feat for him to replicate that grip with his 3D printer.
So the solution for the handguard I came up with was for Ricky to do the same thing he did for the BRN-180, only for an AR-15 rail with a different external design. I asked Ricky if he’d be up to it, with the bonus that he’d be able to produce and sell as many of these sleeves and grips as he wanted after the fact. He agreed and thought the project was cool, so the next thing I needed was a mounting platform for the sleeve.
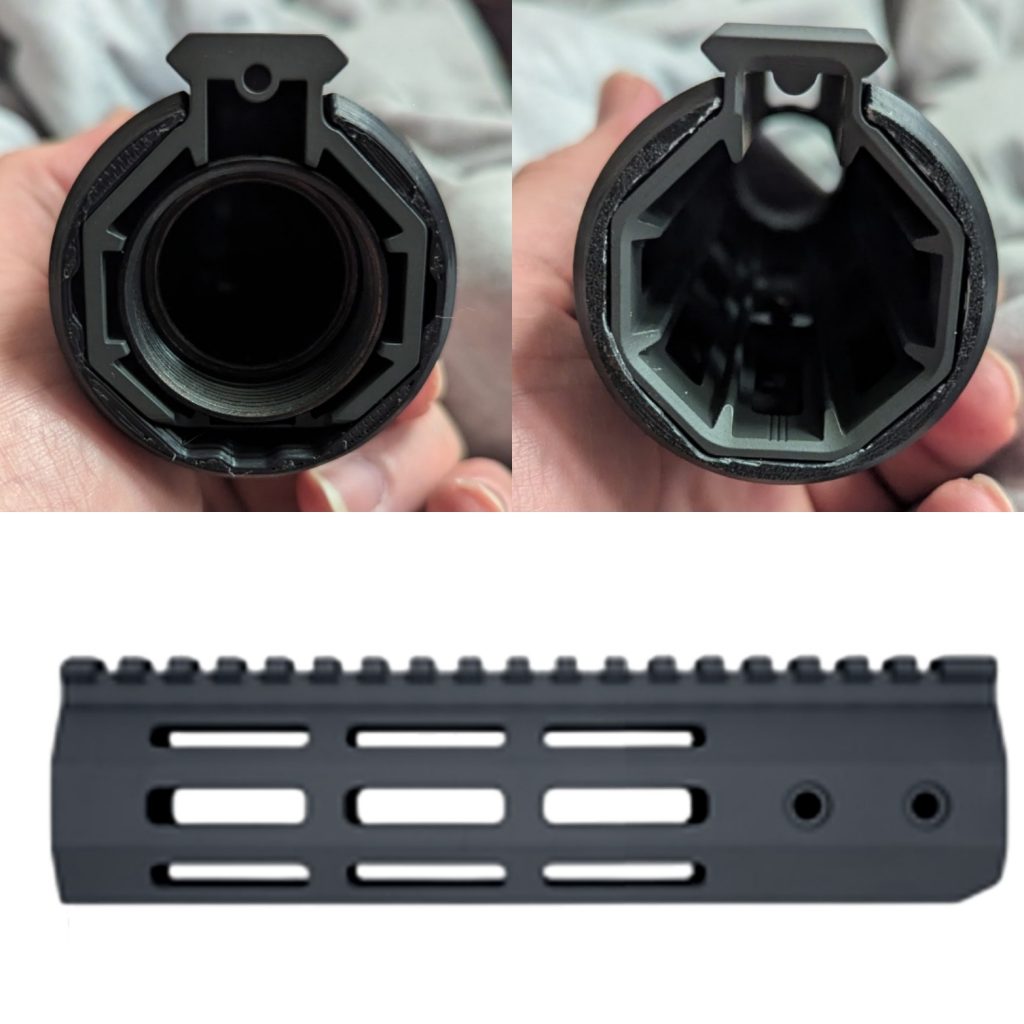
I shopped around for a 7″ M-LOK rail of octagonal shape and discovered the Stubborn Mule Mfg octagonal rail. It was the right shape, it was the right length, I even got it in the right color (gray) and had it delivered direct to Ricky for him to measure and get the dimensions of. He plugged those into CAD and worked up the sleeve made to replicate the LR-300 handguard, and sent both back to me. But before I put everything back together, I needed to acquire an upper receiver, and then figure out how to replicate the other unique part of the LR-300: its front sight tower and tri rail.
I grabbed the tri rail off of eBay after following an image search rabbit hole that led me to something that looked exactly like the LR-300’s: the same length, the same amount of holes, just a different attachment method, but one that was conducive to what I was trying to do. The part where the screws that provide clamping force to secure the tri rail to the barrel replicated the look of the gas block key protruding from beneath the LR-300’s front sight tower. Now it was just a matter of figuring out the right gas block and front sight.
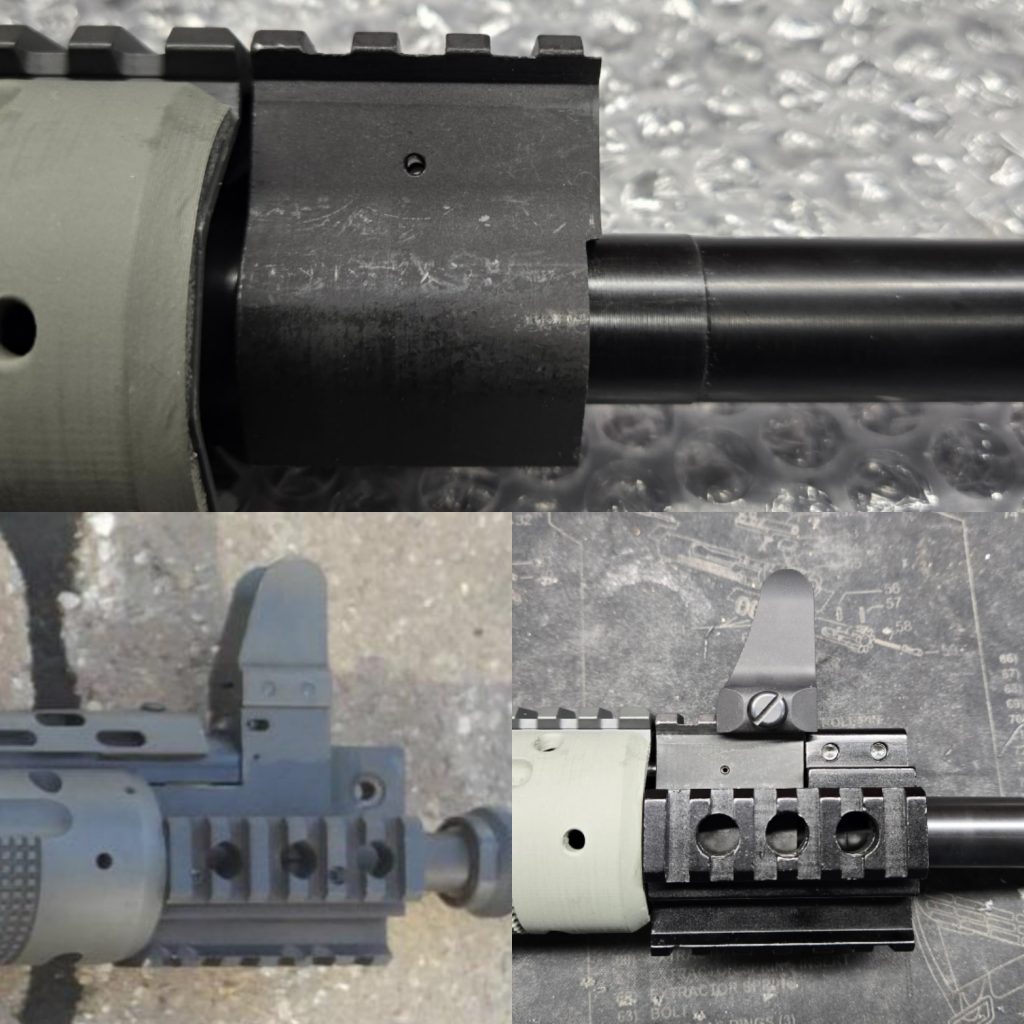
The front sight is a Daniel Defense fixed front sight; the closest in shape to the LR-300’s front sight profile. It only required minor reshaping to get that LR-300 front sight tower look, which in no way hindered attachment or function. Given that it’s a pic rail mounted front sight, it necessitated a railed gas block. Normally I avoid these like the plague but given what I was trying to do here, it was what needed to be done.
Obviously the rail height of the gas block needed to be the same height as the handguard rail and upper receiver, to ensure that it would align with the rear sight for proper zeroing. I found one somewhere, but it had a problem: it was too long by the length of one pic rail notch and valley, and wouldn’t allow the tri rail to snug right up to the front of the handguard the way it does on the LR-300.
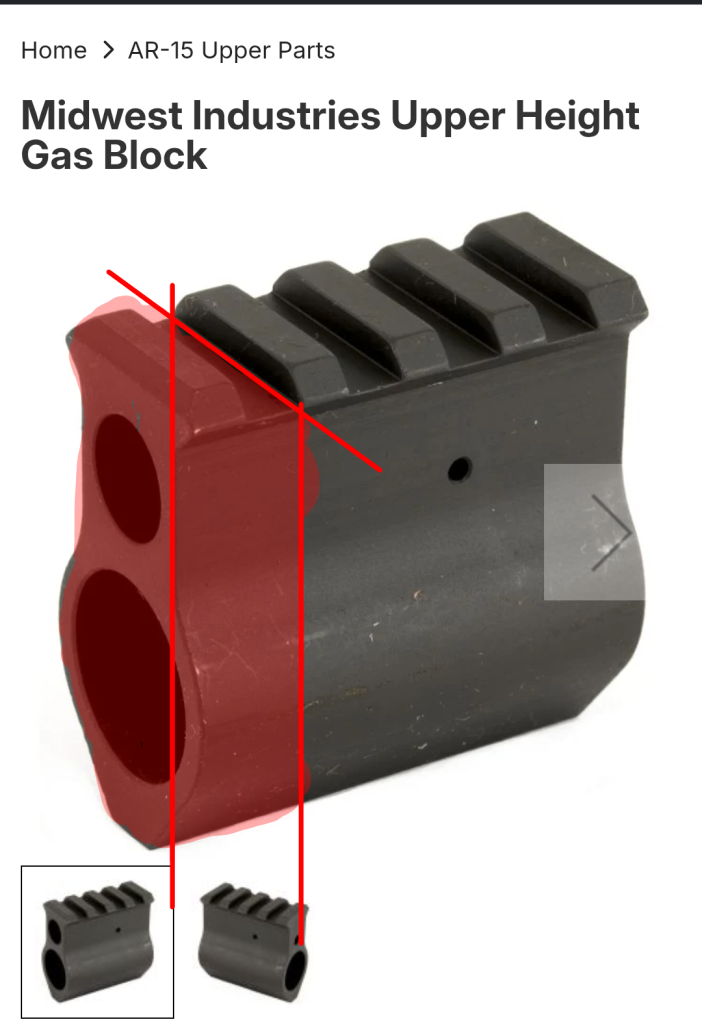
Figuring out which end of the gas block to slice a layer off of was simple; the gas port of the gas block could not move, it needed to be in the same place relative to the gas port in the barrel. Since this is dictated by the gas block resting up against the shoulder of the journal on the barrel, that meant the front end of the gas block was where the cut would need to be made. I whipped up a diagram to illustrate my thinking to Orion, he agreed with my calculation, and made the cut.
By this point, I had already given the gas block, tri rail, M-LOK rail, and 3D printed sleeve to Orion to modify and assemble all at once. Along with this was an upper receiver kit I grabbed from TNTE off of GunBroker; I asked them for an upper minus the parts I didn’t need, with an 11.5″ barrel (as specified by Allan Zitta in this video). They gave me what I asked for except the barrel; I would later determine that they accidentally sent me a 12.5″ barrel instead, and nobody realized it until the rifle was fully assembled and I noticed my barrel looked longer than it should have relative to the actual LR-300 in a scaled side by side comparison. But I ended up fixing that later.
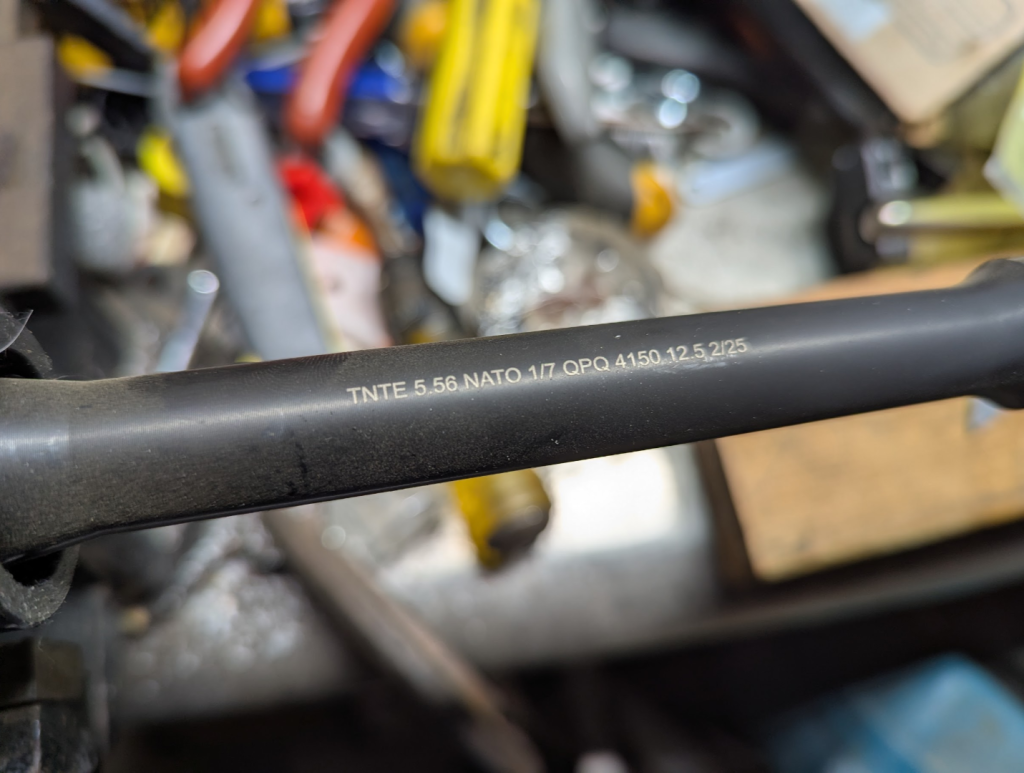
Orion had modified the components as required and put everything together. I had originally painted the handguard foliage green-ish, but later decided to go with the darker gray color I was seeing more commonly in pictures of the actual LR-300. All I had to do was install the muzzle device. I went with a spare Surefire Warcomp I had, to ensure standardized suppressor compatibility with the rest of my 5.56 rifles at the time.
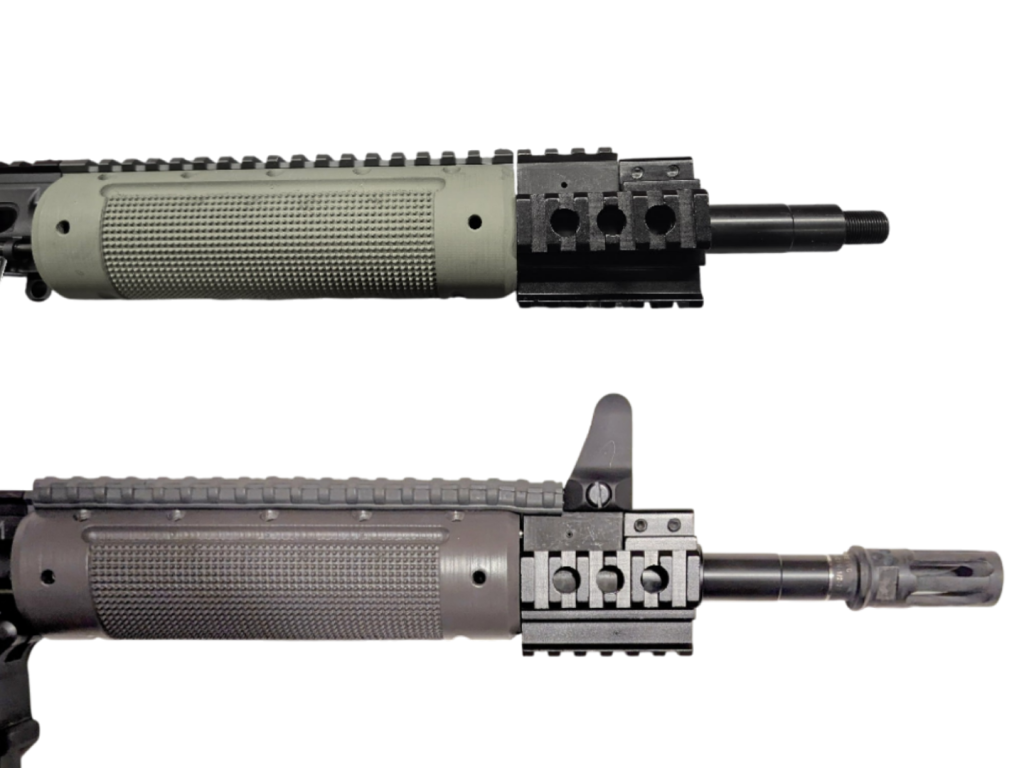
Along with this I put the unmodified Daniel Defense fixed front sight and an LMT style fixed rear sight on the top rail (since YHM discontinued the fixed rear sight used on the actual LR-300; totally lame move on their part but not one I couldn’t get around). To “complete the look,” I added Manta rail covers on the front must end of the rail up to the front sight to replicate the look of the removable vent on the top side of the LR-300 handguard, though this would later be removed during a later revision.

With the rifle now fully assembled and everything installed where and how it needed to be, it was ready to take to the range to zero… and this is where I ran into teething issues.
REVISIONS
The first glaring issue I encountered with this rifle was when shooting suppressed with my Surefire RC2 suppressor, it would not lock back on empty. I was using the ARIC-M, the right variety for a short barrel suppressed 5.56 rifle. I had used this ADM4 lower with my short HK416 upper and RC2 successfully countless times in the past so I couldn’t figure out why it was failing here.
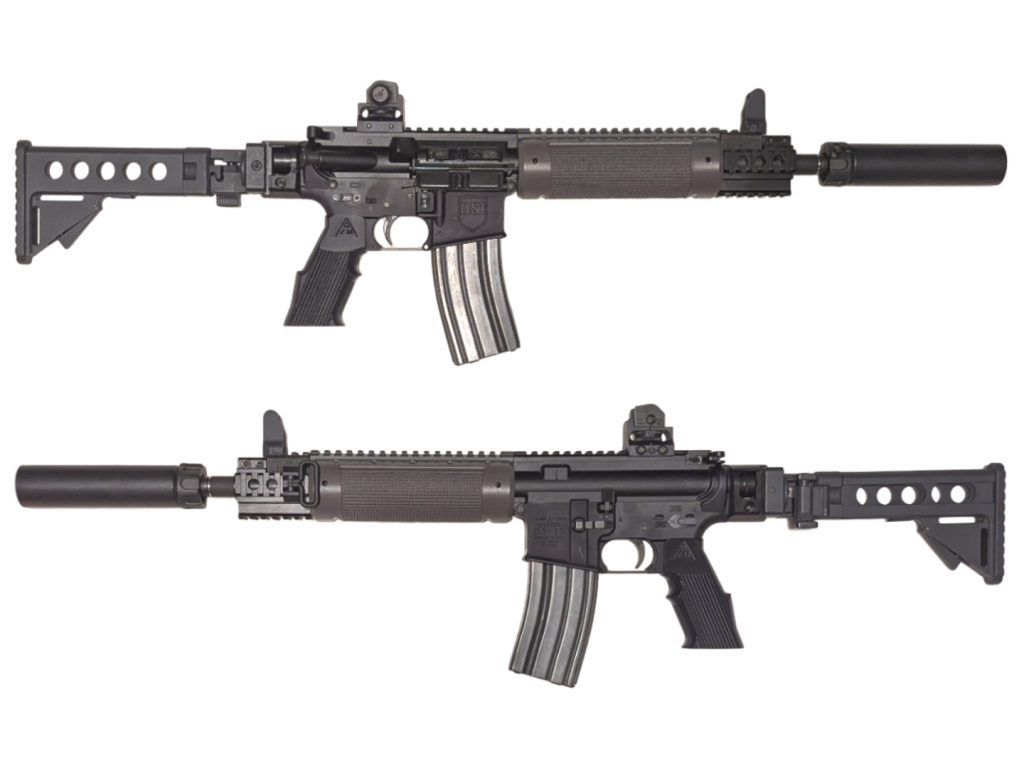
Reflecting on my experience with the similar issue I had with my GPR-K, I decided to try a different lower, and one that more closely replicated the look of the LR-300’s Plain Jane USGI lower— a DSI MFR lower receiver. For all intents and purposes, it’s a USGI/mil-spec lower only with DSI’s HK-style ambi bolt catch lever. I bought one, and did a test fire going through a circuit of magazine varieties with two rounds each to get a full cycle and a lock cycle out of it. This lower with the ARIC-M BCG and the RC2 suppressor was a total success, so it was decided that this would be the lower receiver for this rifle.
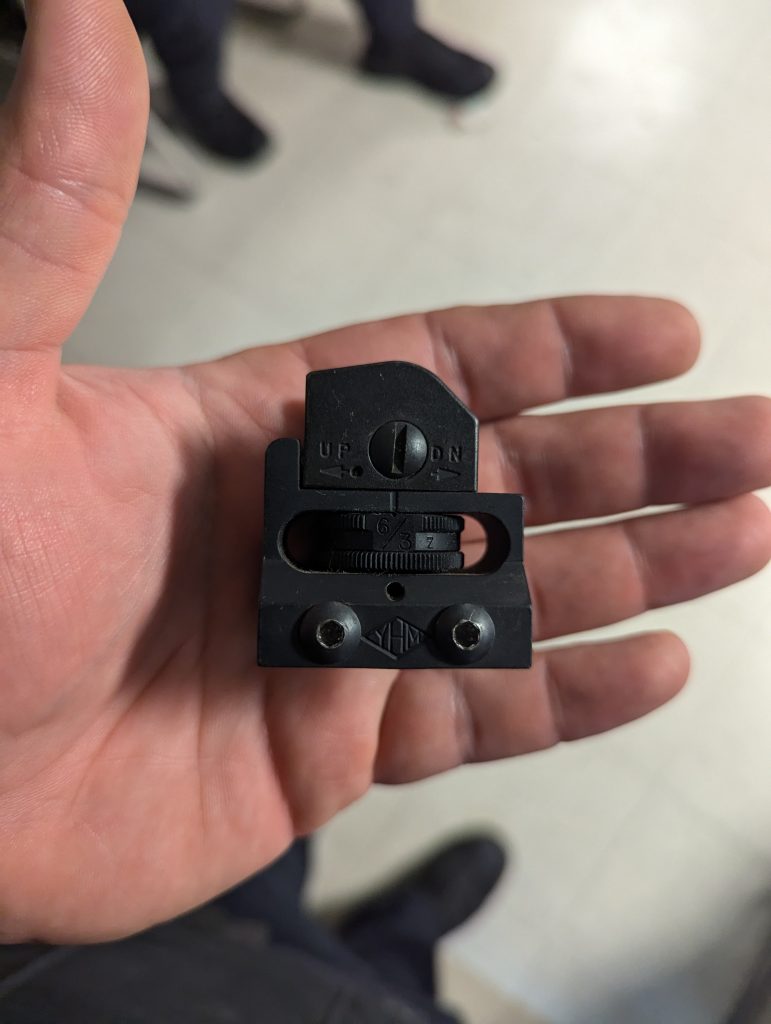
The rear sight was an easy fix. I asked a Hollywood armorer homie if he had any laying around that he wasn’t using. He did, so he handed it off to me at work one evening in downtown Manhattan, and that was the end of that issue. YHM lost a sale on that one, but they might want to reconsider reviving the rear sight once this goes live and people want to clone it.
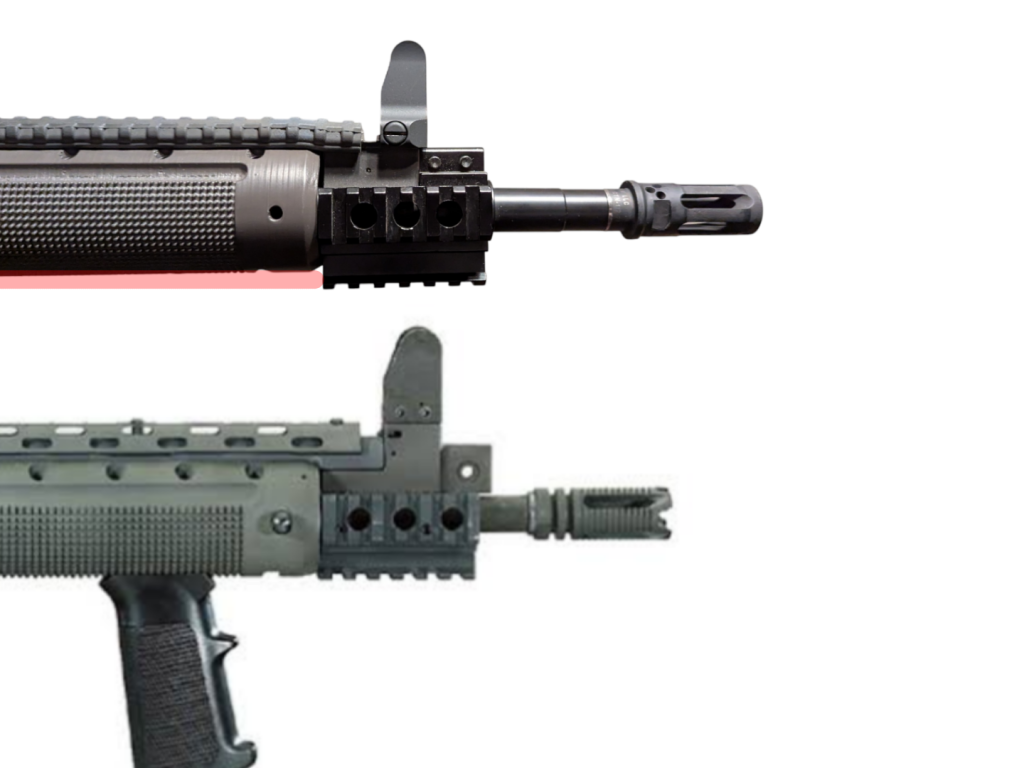
Then there was the handguard sleeve that I noticed an issue with. In short, it was too small in circumference. I could tell when I noticed the way the bottom of the tri rail extended past the bottom surface of the handguard; they looked about even on the actual LR-300. I pointed this out to Ricky and he agreed, it should probably be bigger. But instead of just increasing the girth to fill the 6.5mm of dead space, I pitched lowering the centerline axis of the handguard sleeve to avoid making it too wide as the height increased. This would also provide more clearance along the underside of the top rail and make it actually useful for any attachments that needed to go up there.
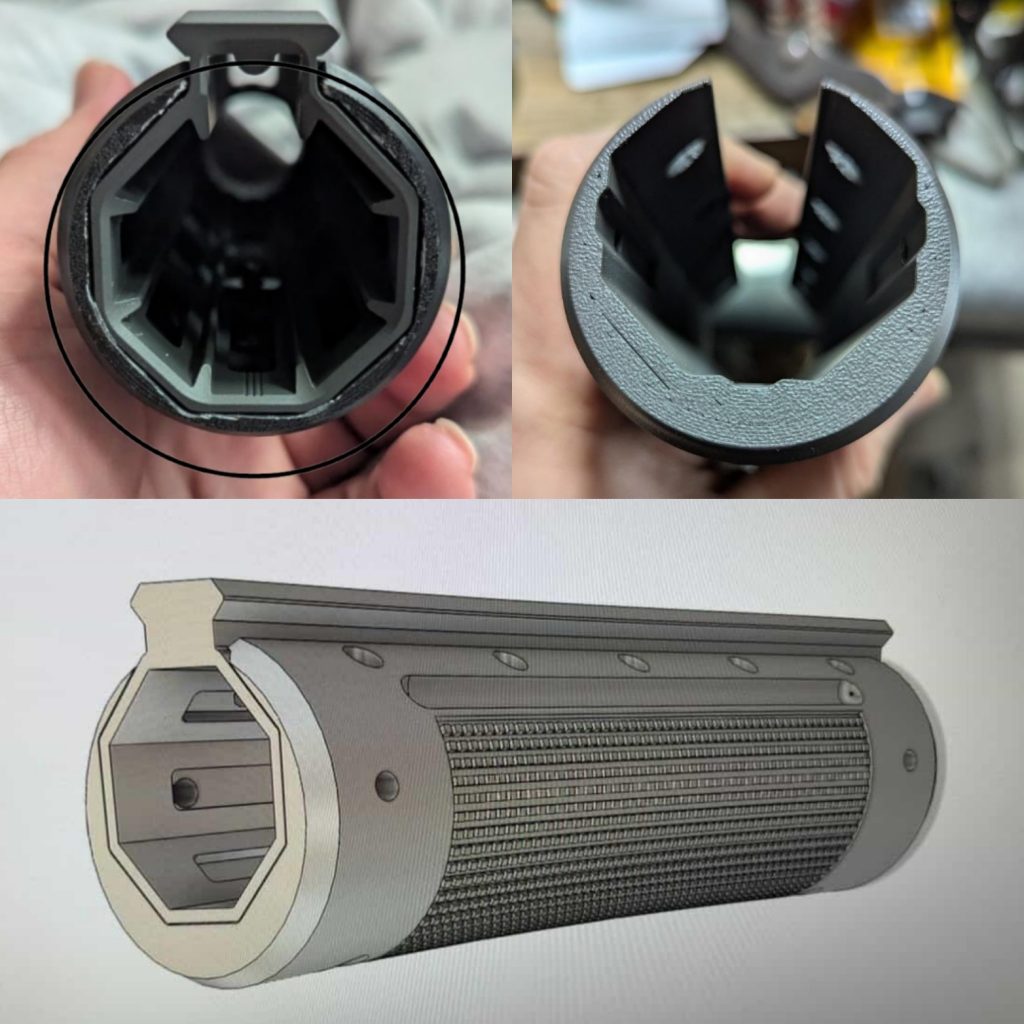
So long as the M-LOK rail was within the area of the circumference, it should have checked out. I also suggested adding a second anchor point along the bottom of the rail to make it more secure when I noticed the one screw in the existing sleeve had become loose enough for me to pull the sleeve back on the M-LOK rail about a 16th of an inch. I whipped up a hasty diagram to illustrate the idea, and Ricky said the math checked out. He redesigned the sleeve dimensions, printed the new version, and sent it my way; it was perfect. It looked right, it felt right, it was right. I painted it and set it aside after a loose install for a fit check. It would have to wait before it was fully installed.
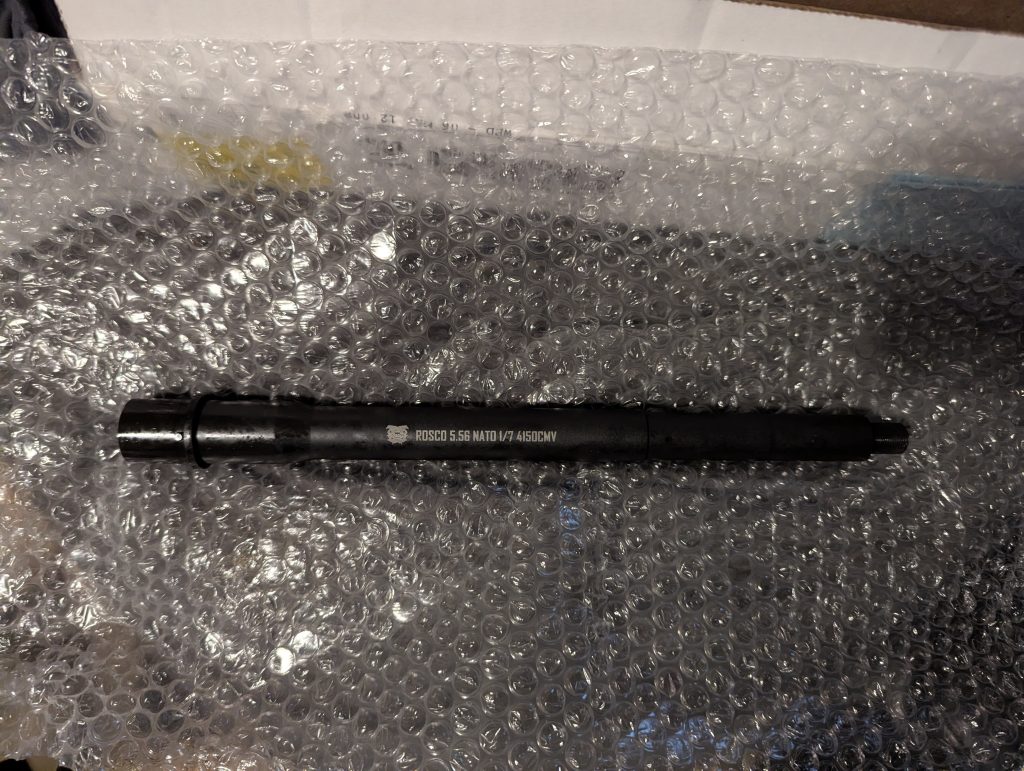
The reason it had to wait was because I had ordered a new barrel that was actually 11.5″ by that point. I looked around and found the Husky barrel by Rosco; it caught my eye because it came with a phosphate finish, like older barrels more common when the LR-300 came around before melonite/nitride/QPQ finish became the current standard. Plan A was to just cut the TNTE 12.5″ barrel down an inch, but Orion AND his lathe were out of commission.
Go figure, every tool I own is pretty much because I had to buy it for some gun related reason; a quick trip to the hardware store to acquire a wrench big enough for the Stubborn Mule Mfg barrel nut was in order. The barrel swap was quick and painless. Now the barrel to handguard proportions were aesthetically correct.

The next problem was with the stock. It uses a spring to put pressure on the latch and keep the stock secured in whatever position it’s in, until the spring is depressed by squeezing the release lever portion of the latch (it’s all one part) to lower the peg and show the stock to slide forward and back on the rail. If you’re familiar with the Magpul F93 & UBR stock, it’s sort of a similar setup mechanically speaking between the main structural components of the stock. It should be no surprise that since this stock came from the airsoft market, the spring that puts pressure on the latch is a cheap piece of shit.
I’m sure it handles the recoil of an AEG just fine, but apparently the recoil impulse of XM193 (already decreased by the ARIC) is just too much for it to handle; eventually the spring gets crushed to a point where it loses enough strength to keep the latch closed. After a range trip (perhaps the first one, I don’t remember), I could pull the stock all the way open, and completely off of its track rail, if I pulled hard enough) without even touching the latch. There was no resistance from the spring pushing the retainer peg on the latch up into any of the holes drilled into the bottom of the track rail.
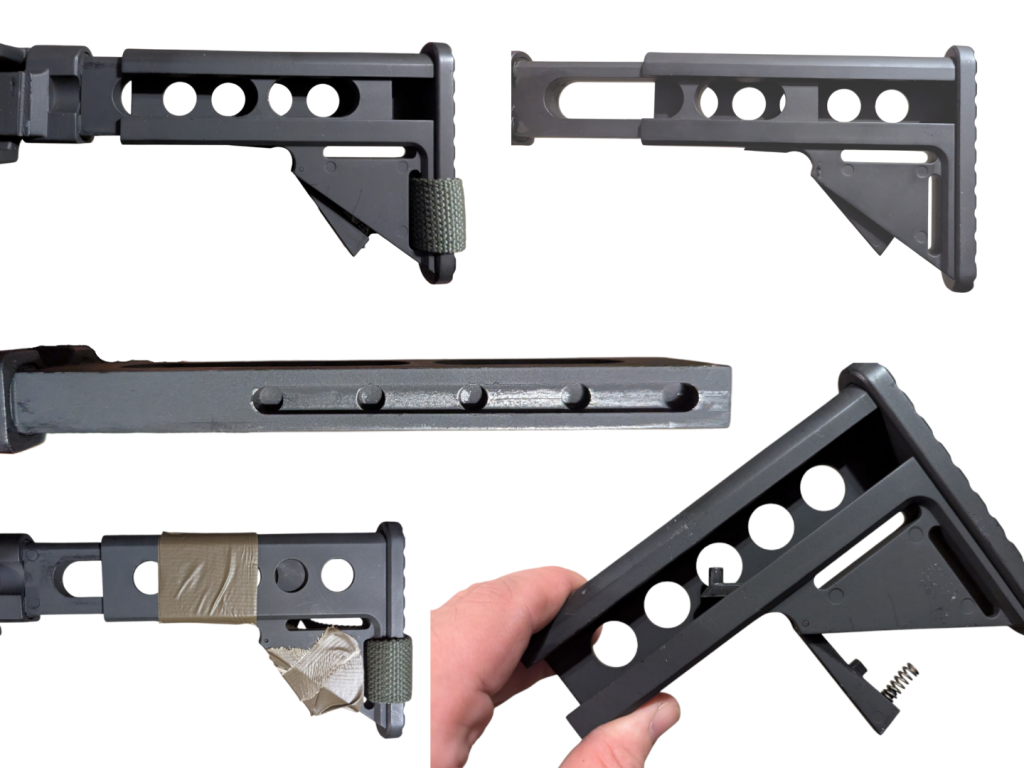
I tried a few things to fix this: First I replaced the spring. Then I added a 3D printed plug to decrease the depth and flex room of the spring in the pocket it sat in inside the stock with the help of my friend Nathan. The latter required me to uninstall the latch by punching out the retainer pin, and then reinstall the latch component and pin after the plug was set into place. It locked up pretty tight at first but eventually it gave way to being pulled straight open. Shouldering the rifle pushes the butt of the stock forward, toward its closed position; I imagine the only time I’d have to worry about it being PULLED open is when the rifle is hanging slung unsupported.
From what I can tell, a stronger spring (without the pocket plug) should remedy the issue, but I don’t know where to find one or how to get it made. In the meantime, some 100MPH tape around the latch will keep it secure if I’m really worried about it, even though it screws with the aesthetic of the lightning holes drilled along the length of the stock.
FINAL TOUCHES
The grip also got an update; when I went to Ricky for the new handguard sleeve, he mentioned that he came upon a new blueprint for the grip. This one was modeled off of an authentic LR-300 grip. The grip angle for the first one he made was slightly off; this one, a bit more vertical, was a 1:1 match. I told him to throw one in with the handguard sleeve and add it to the bill. The original now sits in the parts bin. For those wondering, the flat part on the backstrap of the grip was apparently made that way in conjunction with the grip angle to more easily fit into the rifle rack of a patrol car.
I mentioned before that I had originally placed Manta rail covers along the front end of the top rail to imitate the raised vent and recoil system access of the original LR-300. In all honesty I always thought it looked kind of half-assed, but short of crafting my own piece that bolted onto the pic rail, there was no other solution. When I took it off, I didn’t mind how it looked; it reminded me of the conceptual render I made of an LR-300 styled handguard for the AR-15 that retained the top rail functionality.
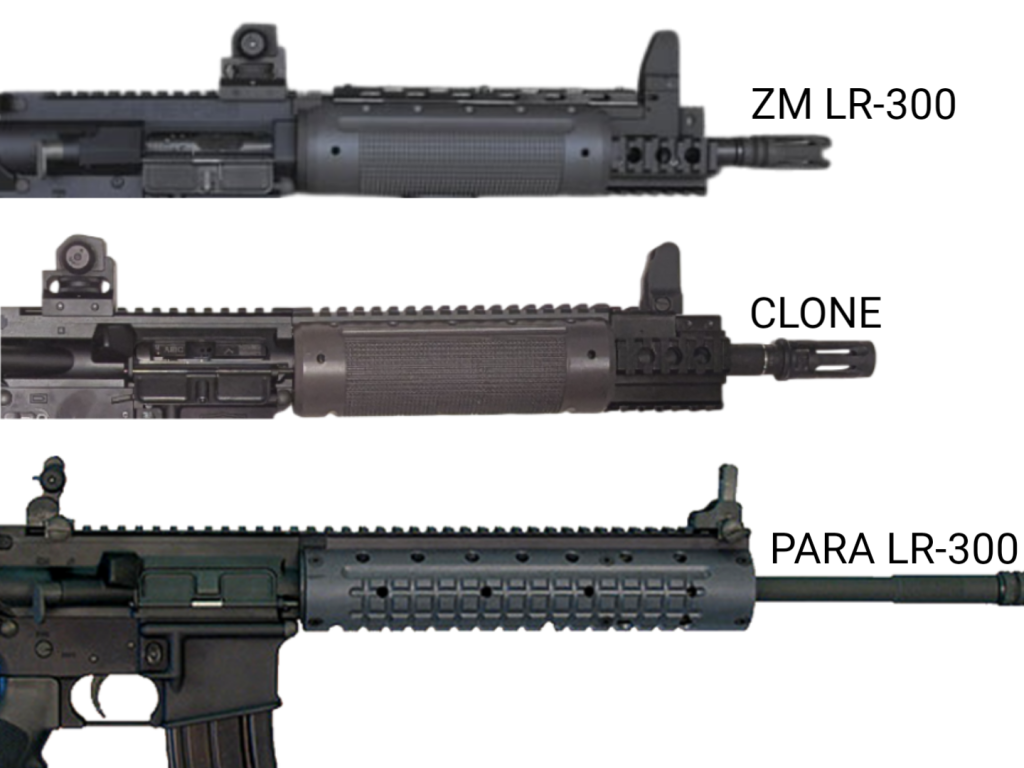
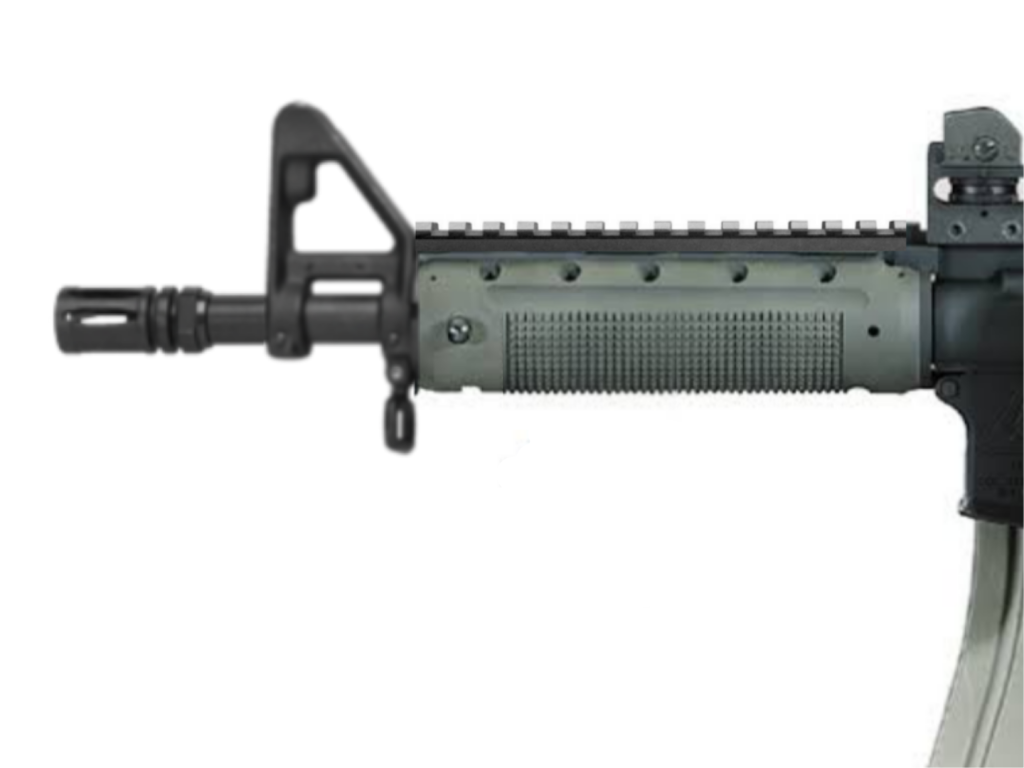
It also bore similarity to the SR-N version of the LR-300 (renamed “TTR”) that Para USA developed with a handguard that sort-of evoked the aesthetic of the original, but had a top rail along its length. When I installed the new handguard sleeve, I decided to leave the top rail bare; now it looks like a hybrid between the original and the Para USA version. I dig it.
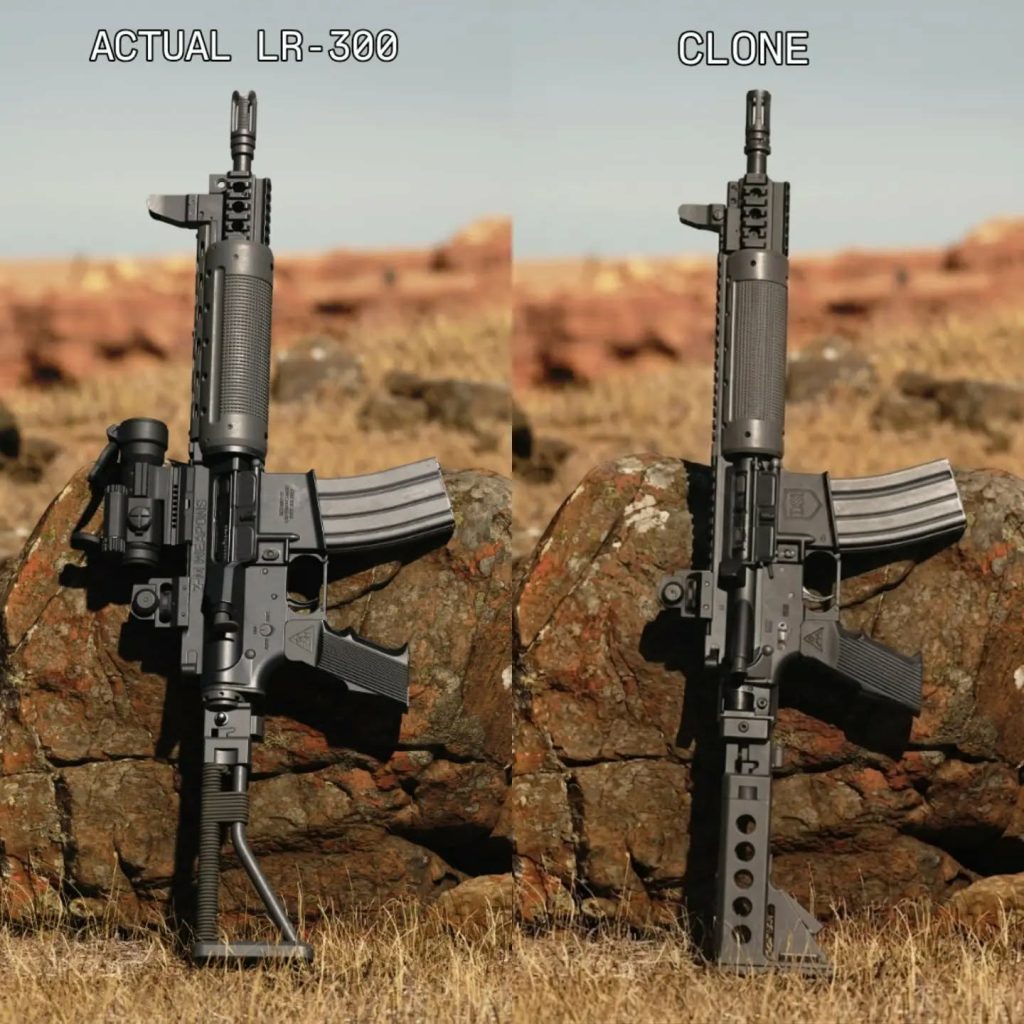
FIRST IMPRESSIONS & FINAL PRESENTATION

Of course, I couldn’t have done this without the LAW Tactical ARIC BCG and the RAP. By now the ARIC is familiar; the RAP is the star of the show here.
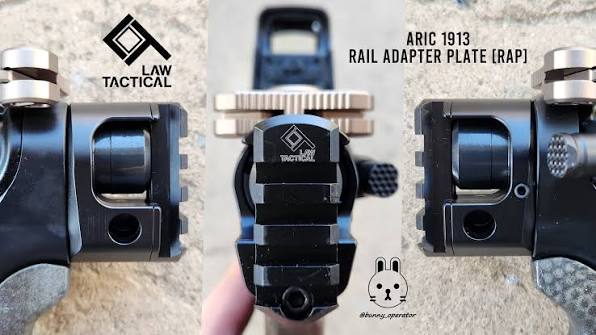
It adds about two inches to the rear of the lower receiver and therefore the length of pull over any stock that would attach to a 1913 interface that was machined into a lower directly. For this rendition of the LR-300 stock it doesn’t matter as much since it’s already small when fully collapsed and if I run it a notch out it’s still a manageable length. I don’t know why the ARIC was designed to protrude so far beyond the rear of the AR’s lower receivers or whether there was an attempt to keep it within the confines of the upper receiver (I never asked), but it is what it is at this point.
I’d probably mind more if I was using an ACE style skeletal stock like the LR-300 was also known to have, given its added fixed length. But I don’t plan to since the folding collapsible stock I have on there now is iconic. Also, I don’t feel like repeating the 1913 interface procedure on that version of the airsoft stock; to make an actual ACE stock fold without stacking adapters I would have to install one of the AR-specific models to a Gen 3-M or Gen S folder. I’ve got an S laying around but I’m still thinking of what to do with it.
Installing the RAP is just like installing a LAW folder with regard to its internal castle nut. But instead of closing the hinge and installing a receiver extension assembly to it, you just bolt the 1913 rail to the RAP body with a pretty big hex screw. The rail also acts as the rearmost retainer for the ARIC cup (and the ARIC is the only BCG you can use with the RAP). Make sure you don’t go crazy with the retention screw on the right side of the RAP, or it will restrict the rear cup of the ARIC; you should be able to push it into the upper receiver BCG track freely, as this is how one would field strip the rifle.
Opening the receivers for servicing is simple. You could pop the pins and just pull the upper forward until the ARIC’s springs fully extend rearward and lift the upper receiver off of the lower receiver. Or you can pop the rear pin, depress the ARIC’s rear cup into the upper until it clears the receiver extension threads, and lift the rear of the upper the way you normally would to remove a BCG. Just make sure you don’t let the rear cup launch off the spring pressure and go flying once it clears the lower.
When you’re putting the rifle back together, or for the first time, depress the ARIC’s rear cup into the upper the same way you would if you were using a folding adapter: Hold the rear cup in until it’s being retained by the receiver extension threaded section, then just push the receivers together until the ARIC pops into place and is retained by the RAP. You’ll know you did the retention screw properly if the rear cup launches into the RAP under spring tension. This will not damage the ARIC.
HANDLING
To me, the ARIC feels like it dampens the recoil impulse of the rifle significantly, even if firing without a suppressor. I’m sure that has something to do with the fact that the weight and reciprocal mass of the ARIC is less than that of a standard AR-15 sized BCG by about half.
While this would likewise apply to any AR-15 so equipped with the ARIC (since that’s what this thing is under all the cosmetics), the result is an extremely soft shooting rifle that rivals what I imagine is the dragon some chase with the A5 buffer system to replicate the recoil impulse of rifle length gas systems as closely as possible. That’s not to suggest that the recoil impulse on a standard carbine recoil system is insufferable, or that the A5 system is the end all, be all— they’re not— but this rifle all together is FUN to shoot, and it looks cool on top of that; a winning combination.
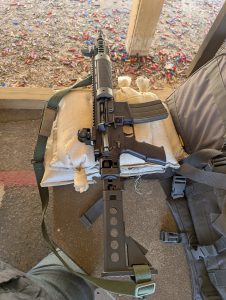
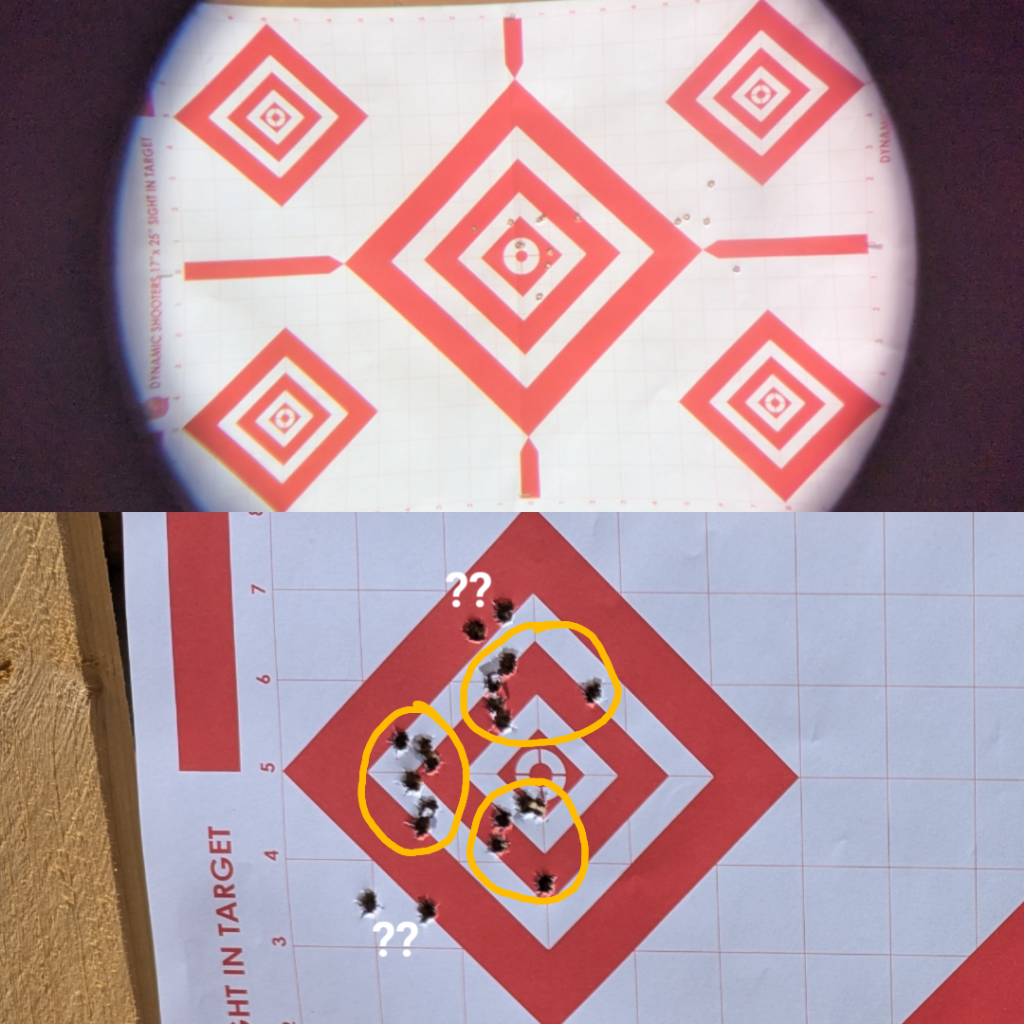
Zeroing the rifle irons only with 55gr XM193 spec PMC X-Tac at 50 yards came down to a game of me chasing the zero with five round groups; the first target below shows me walking it into center POA/POI, the second target shows my five round groups shifting about trying to fine tune them (with a few flyers I couldn’t determine/remember the call for). I attribute this dancing dragon of groups to eyesight vs not holding the front sight precisely in the same space relative to the target. All things considered, at least it’s zeroed. I’ll take it.
OVERALL
This project took me longer than I anticipated, mainly because I wanted to make sure it was as aesthetically close to the LR-300 as I could within reason. The slight imperfections that were manageable tripped my OCD and I endeavored to fix them; I’m glad I did, cause as far as “an AR-15 that looks like an LR-300 goes,” it looks awesome. The parts that mechanically enabled it to function as such all did their job as advertised or expected.
Sure, there are some minor tweaks that can be made for polishing like getting that spring in the stock latch replaced, or figuring out how to approximate the operating system access vent along the top of the handguard rail. But nobody can argue that this wasn’t the coolest way to use the LAW RAP.
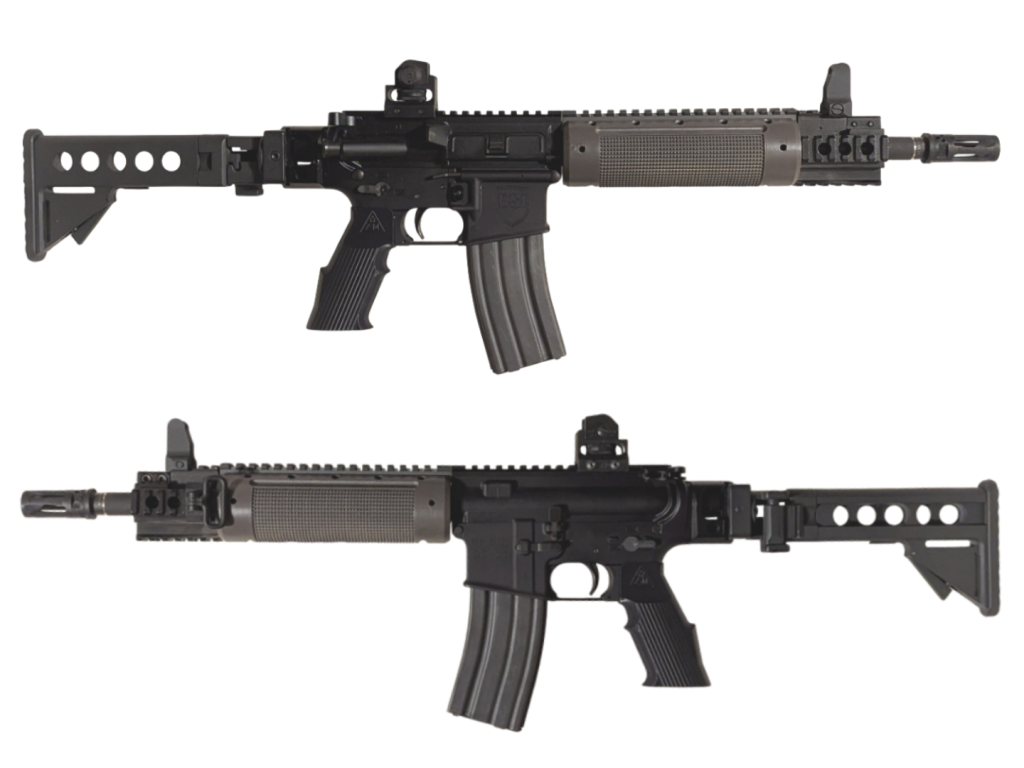
BUILD SHEET
Upper Receiver: Standard mil spec flat top will do, but it came to my attention after the fact that aesthetically speaking, for some the VLTOR MUR-1A upper may look more accurate. The actual LR-300 had a taller top rail height (kind of like an HK416), but there’s no handguard rail that will match with a 416A5 pattern upper receiver suitable for this project with regard to the handguard sleeve.
Lower Receiver: Plain Jane USGI mil spec lowers are fine here. Mine is a DSI MFR lower because I like the Ambi bolt catch as a standard and I don’t think it’s so visually off-putting as to take away from the “retro” look of these things, but the lines and the fencing of the standard lower are the important thing to adhere to for this.
Lower Parts Kit (LPK): Plain Jane USGI/mil spec, no need to go crazy. We’re talking about a rifle that was designed during the AWB era, that was really all they had back then. If you want a better trigger like a two stage, just make sure it has a standard curved bow. I’ve got a KAC Ambi safety in my lower cause I had one laying around and thought why not since they fit the aesthetic for not being overly stylized.
Grip: Made by ar180parts.com, hit him up and ask for the updated version of the LR-300 grip with the more accurately modeled dimensions.
Handguard Rail: Stubborn Mule MFG Octagonal M-LOK Handguard Rail, 7″ length. This is absolutely required for this project as it’s the only rail the handguard sleeve was designed to work with.
Handguard Sleeve: Made by ar180parts.com, hit him up and ask for the updated version of the LR-300 sleeve for the octagonal AR-15 rail.
Gas Block: Midwest Industries Upper Height Gas Block. This will require modification by a competent machinist.
Front Sight: Daniel Defense Fixed Front Sight. This will require modification by a competent machinist, to shave material off the back side and give it that LR-300 front sight tower look.
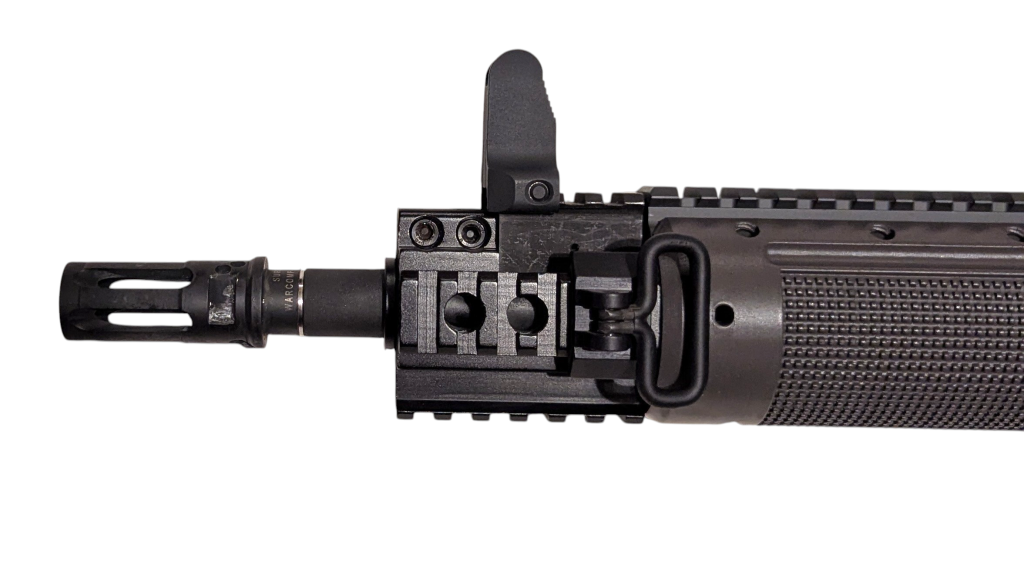
Tri Rail: Manufacturer Unknown, perhaps Presma? I forget, but the Presma model looks like a match. You can find it on eBay by searching “Tri Rail BR Mount w/ Spacers for Front Sight Attachment”
Front Sling Loop: ERGO SCAR/SOCOM spec rail mount & sling swivel
Sling: Blue Force Gear standard Vickers sling in Green, attached to ERGO loop and stock loop slot.
Muzzle Device: If you wanna be super duper gay (I mean clone correct), the YHM Phantom flash hider— aggressive end is what the LR-300 was always classically pictured with; Mine wears a spare Warcomp I had, for RC2 suppressor compatibility. Go with whatever you need to work with whatever suppressor you have, or YHM if you have no suppressors.
Barrel: Rosco Mfg Husky 11.5″ Phosphate
BCG: LAW Tactical ARIC-M. This component is vital and must be used for this set up.
Charging Handle: Standard USGI
Rear Sight: YHM Fixed Rear sight; discontinued currently because someone at YHM is a retard. Bug them to make more, or hunt one down, or make your peace with the LMT fixed rear sight.
End Plate: LAW Tactical Rear Adapter Plate (RAP). This component is vital and must be used for this set up for the LR-300 folding/collapsible stock; HOWEVER, if you would rather go with an ACE Skeleton Stock, just use a LAW Gen-S folder to simplify the folding mechanism and save some weight in the process.
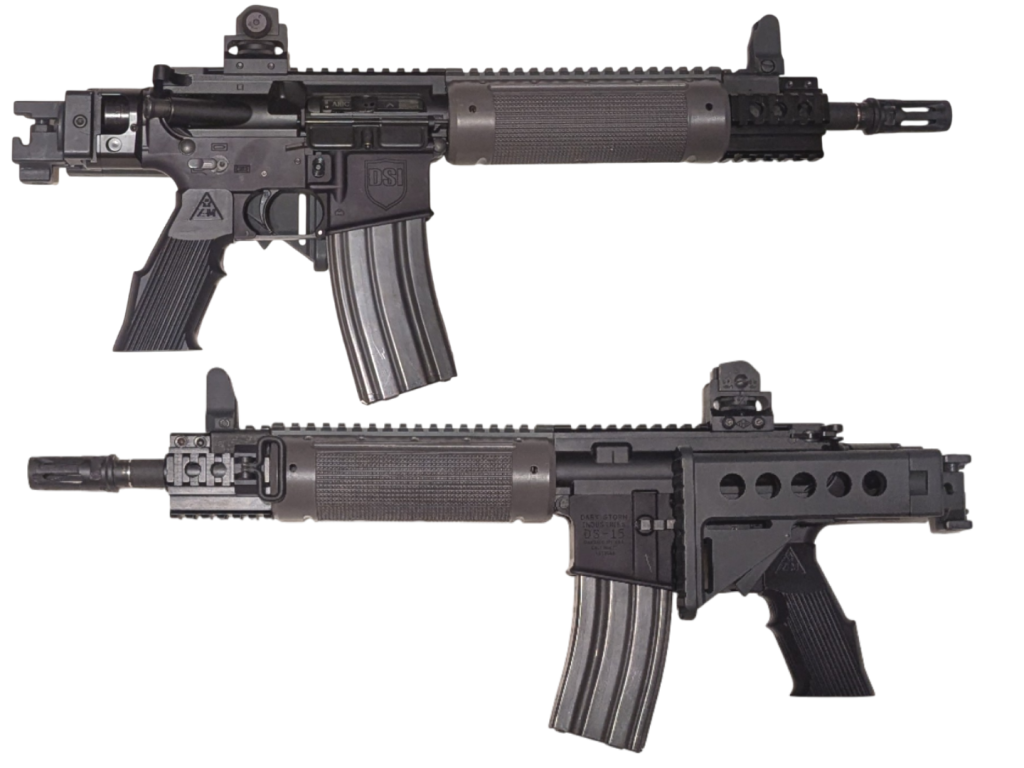
Stock: Matrix LR-300 5-Position Folding Stock, from Evike + Lage Manufacturing Stock Adapter, MCX/Picatinny M1913. These will require modification by a competent machinist. I’m still looking for a stronger stock latch spring to replace the one this comes with, so be advised to keep an eye on it. Alternatively: ACE Skeleton Stock, cheek pad & stock pad removed.
Spray Paint:
• Stock, Front Sight: Behr Premium Chalk “Classic Noir (Matte)” — Looks dead on for the old school gray anodized receiver color.
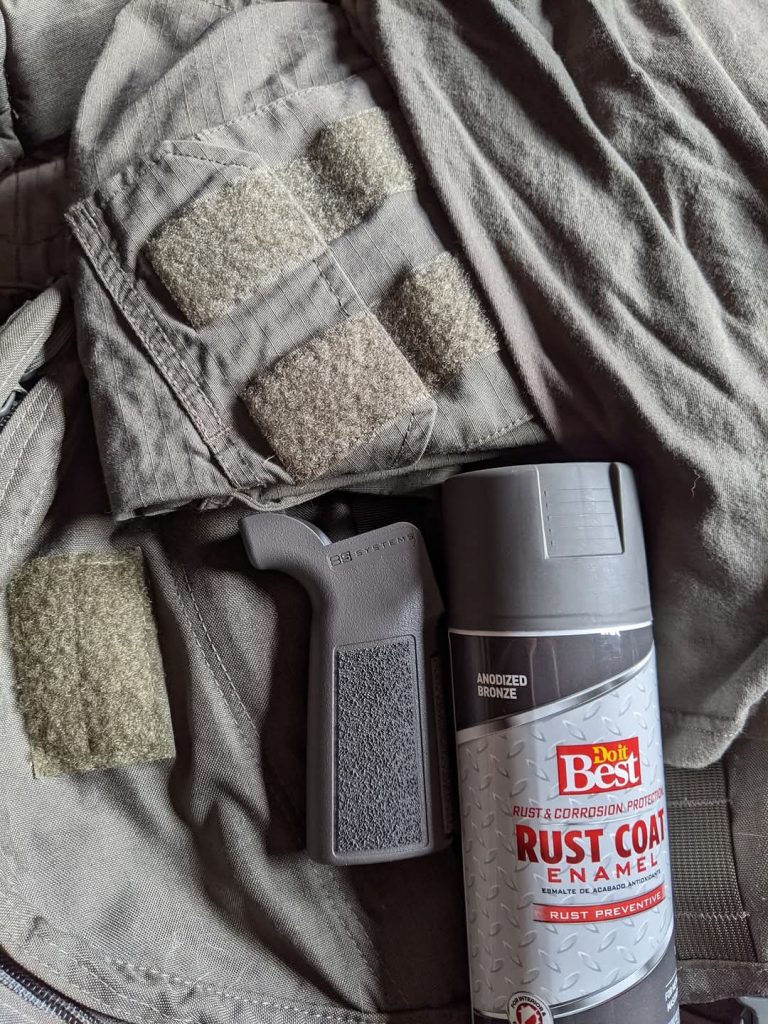
• Handguard Sleeve: Do it Best Rust Coat Enamel “Anodized Bronze”— Despite the name, this is basically MAS Gray in a can.



Stay Dangerous.
Stay in this L.A.N.E.