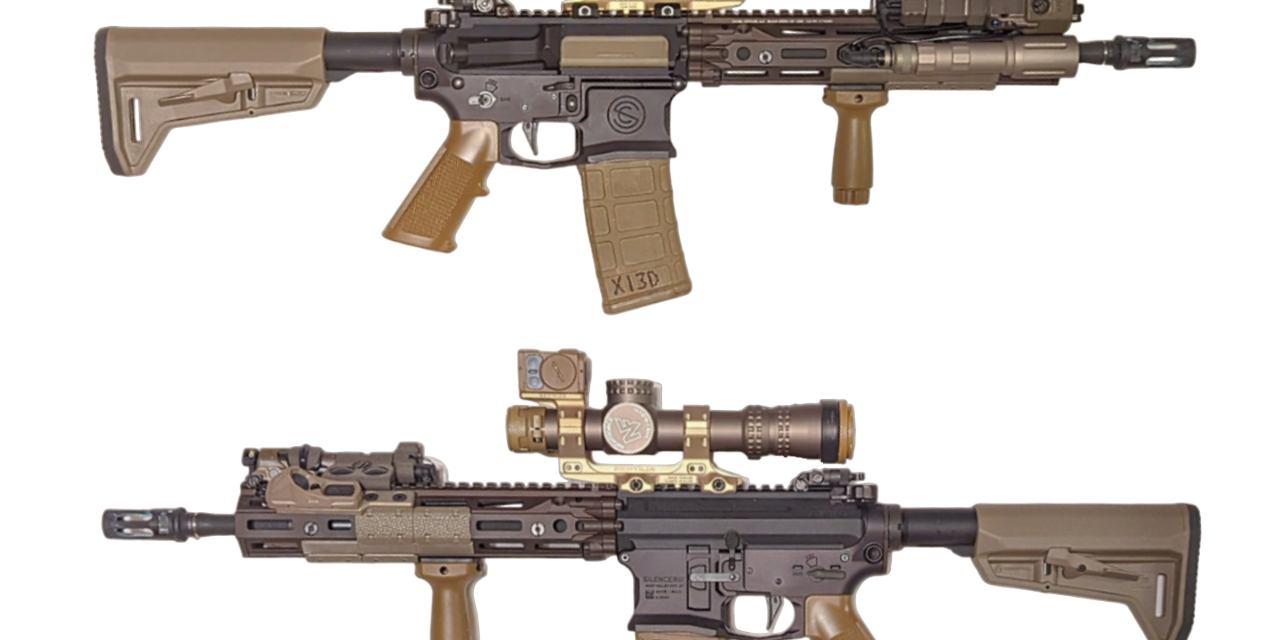
[BUILD SHEET] GPR-K: New Tech Testbed
Author: Frank Woods
Now that the stamp has cleared and the engraving is done, I can tell you about my latest completed project: GPR-K.
In March of 2022, it came to my attention that O P Tactical had gotten a batch of Hodge Defense barrels in stock. They had the 12.5″ barrel (gas port size unspecified at the time), and since I’d never had an AR-15 with that barrel length before, I grabbed one quick. Usually Hodge product (any component, really) moves FAST, so I didn’t hesitate. Turns out those barrels actually sat there in stock for a while; some of them are still available. Maybe O P Tactical was just flying under the radar.
When the barrel arrived I put it to the side, having figured that while I wasn’t in a rush to put a new rifle together, eventually more parts would come along or come to my attention that I’d want to combine with it to make a complete rifle that was something different than what I’d had already; Ultimately, an opportunity to try new to market components all at once, and offer my findings to the audience. Hence the “new tech testbed” subtitle.
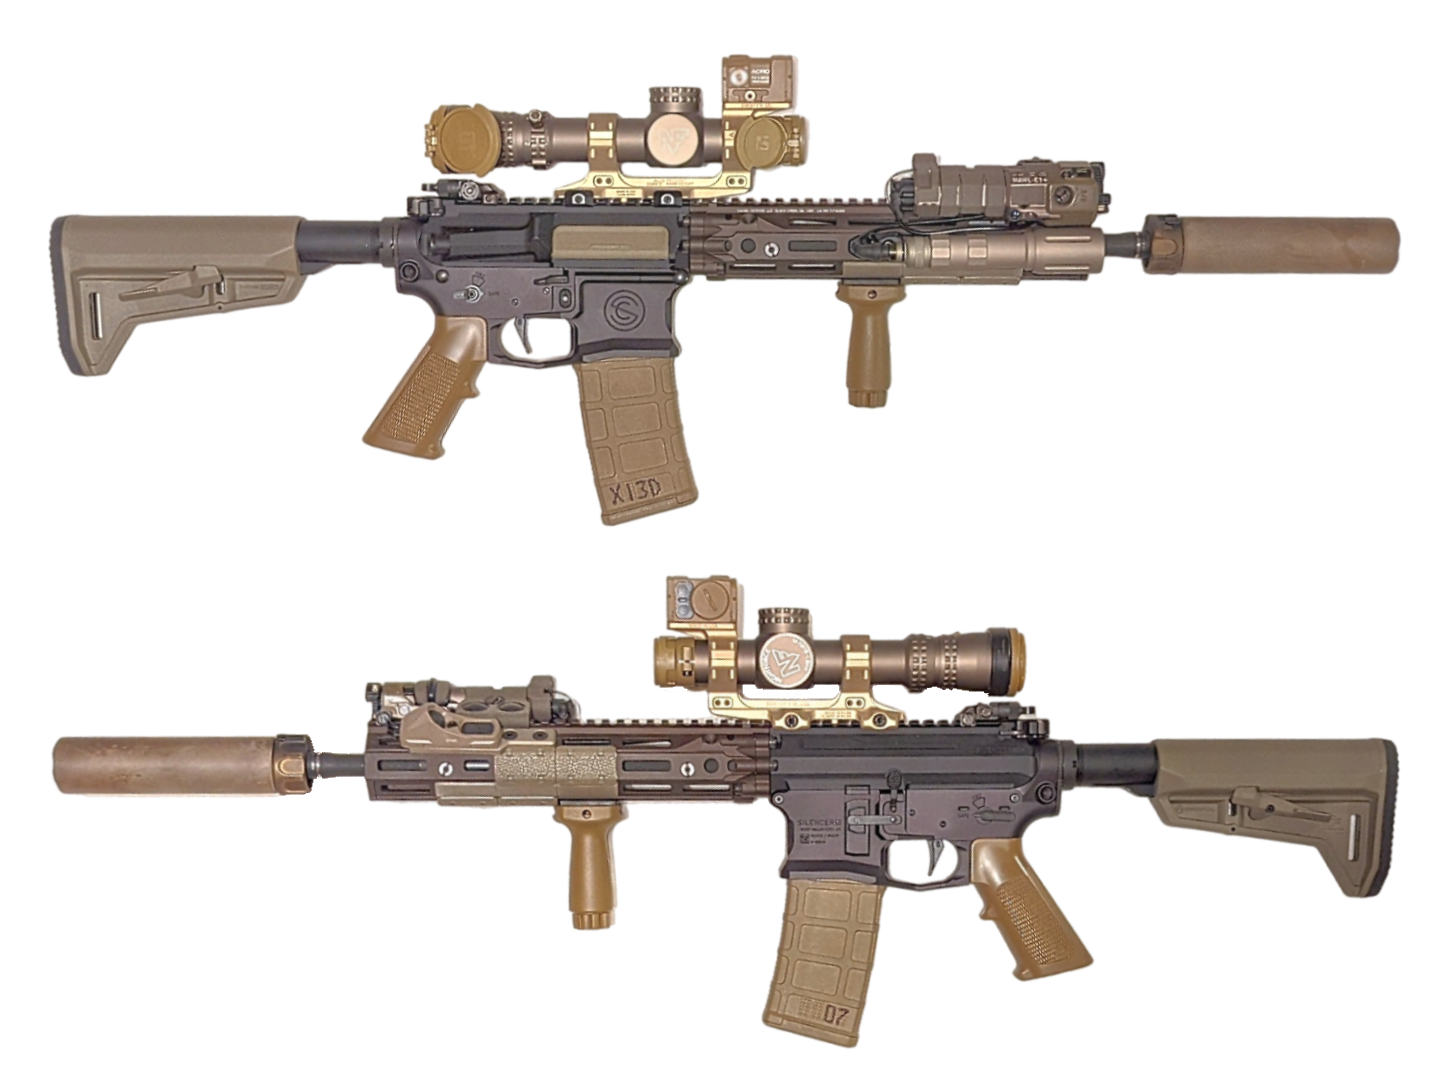
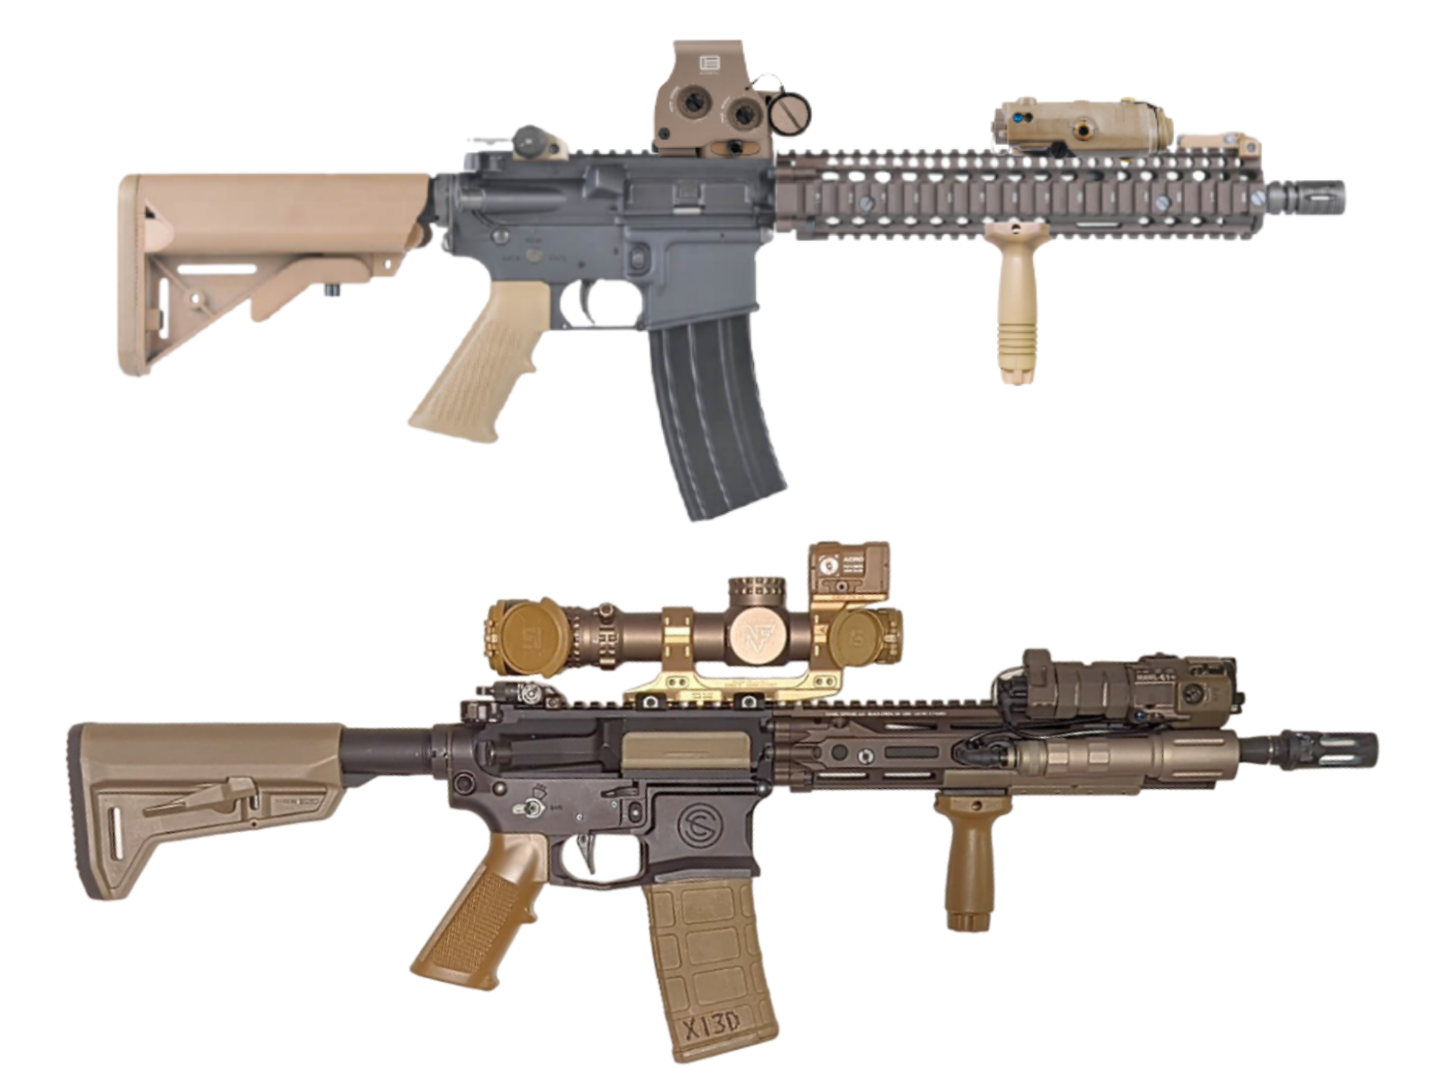
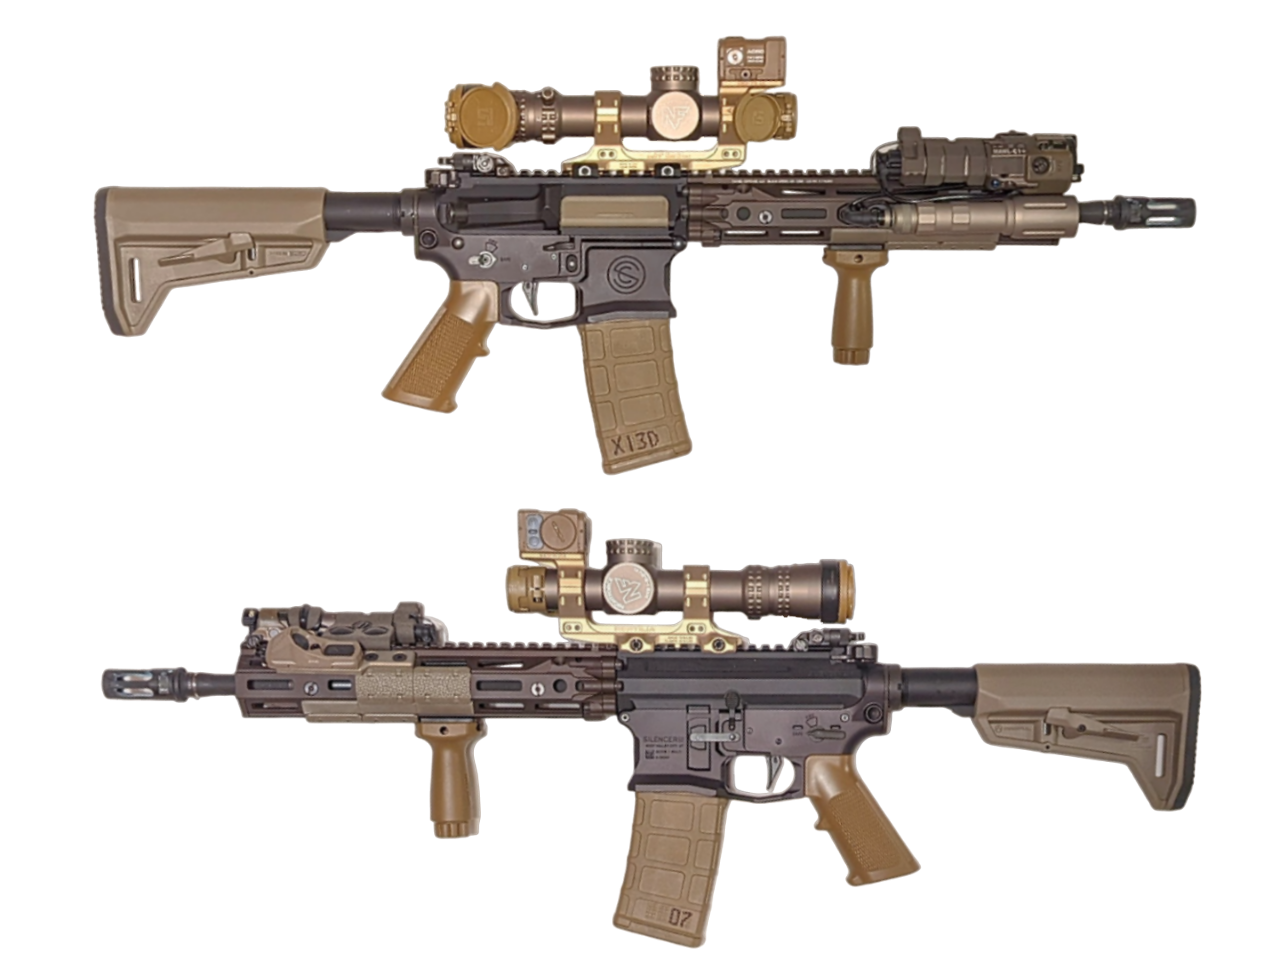
We’ve covered configuration naming conventions for ease of navigating options before; the name “GPR-K” came as a matter of comparison: All together, this configuration very closely mirrors that of my existing GPR, which you can see here compared to this new rifle
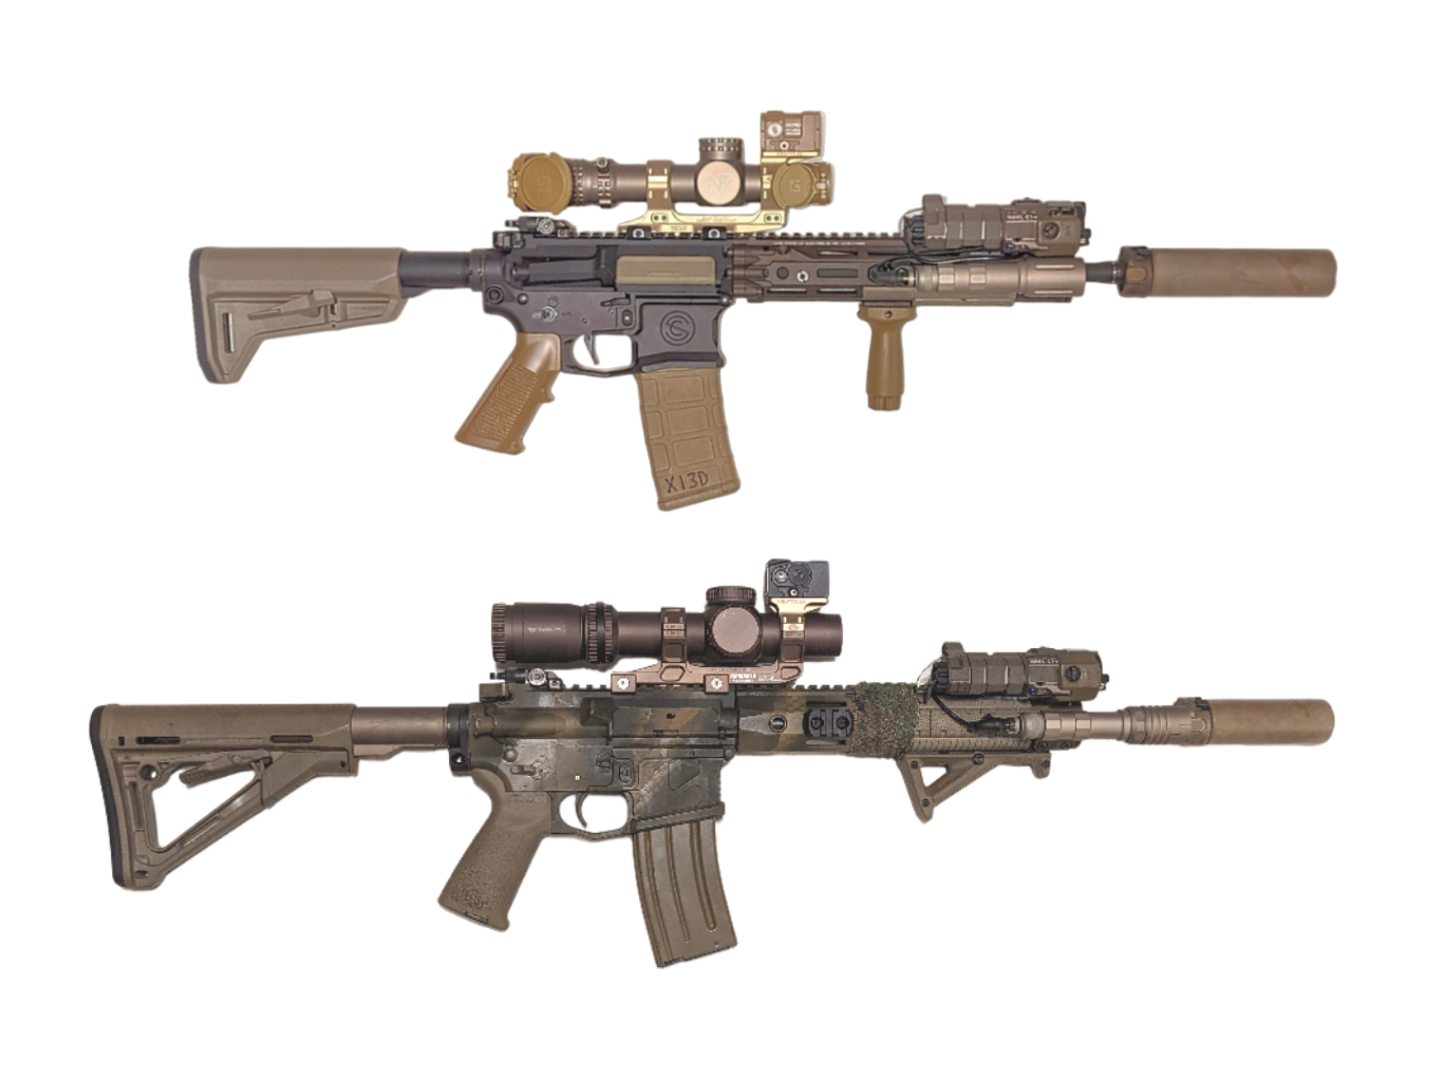
• Same optics package
• Same/similar accessories
• Same control interface
…just in a smaller form factor, by virtue of the 12.5″ barrel instead of the 14.7″ barrel, and the smaller LPVO. The rail is ¼” shorter, but that’s not a huge difference.
Bottom line, this rifle is equipped to perform the same tasks in the same manner as a GPR, in a smaller package of comparable capability. To delineate them from each other, the smaller size is accounted for by adding the “K” for Kurz (German for “short”), now institutional firearms industry terminology to denote a smaller version of an existing model ever since HK’s MP5K came into popularity.
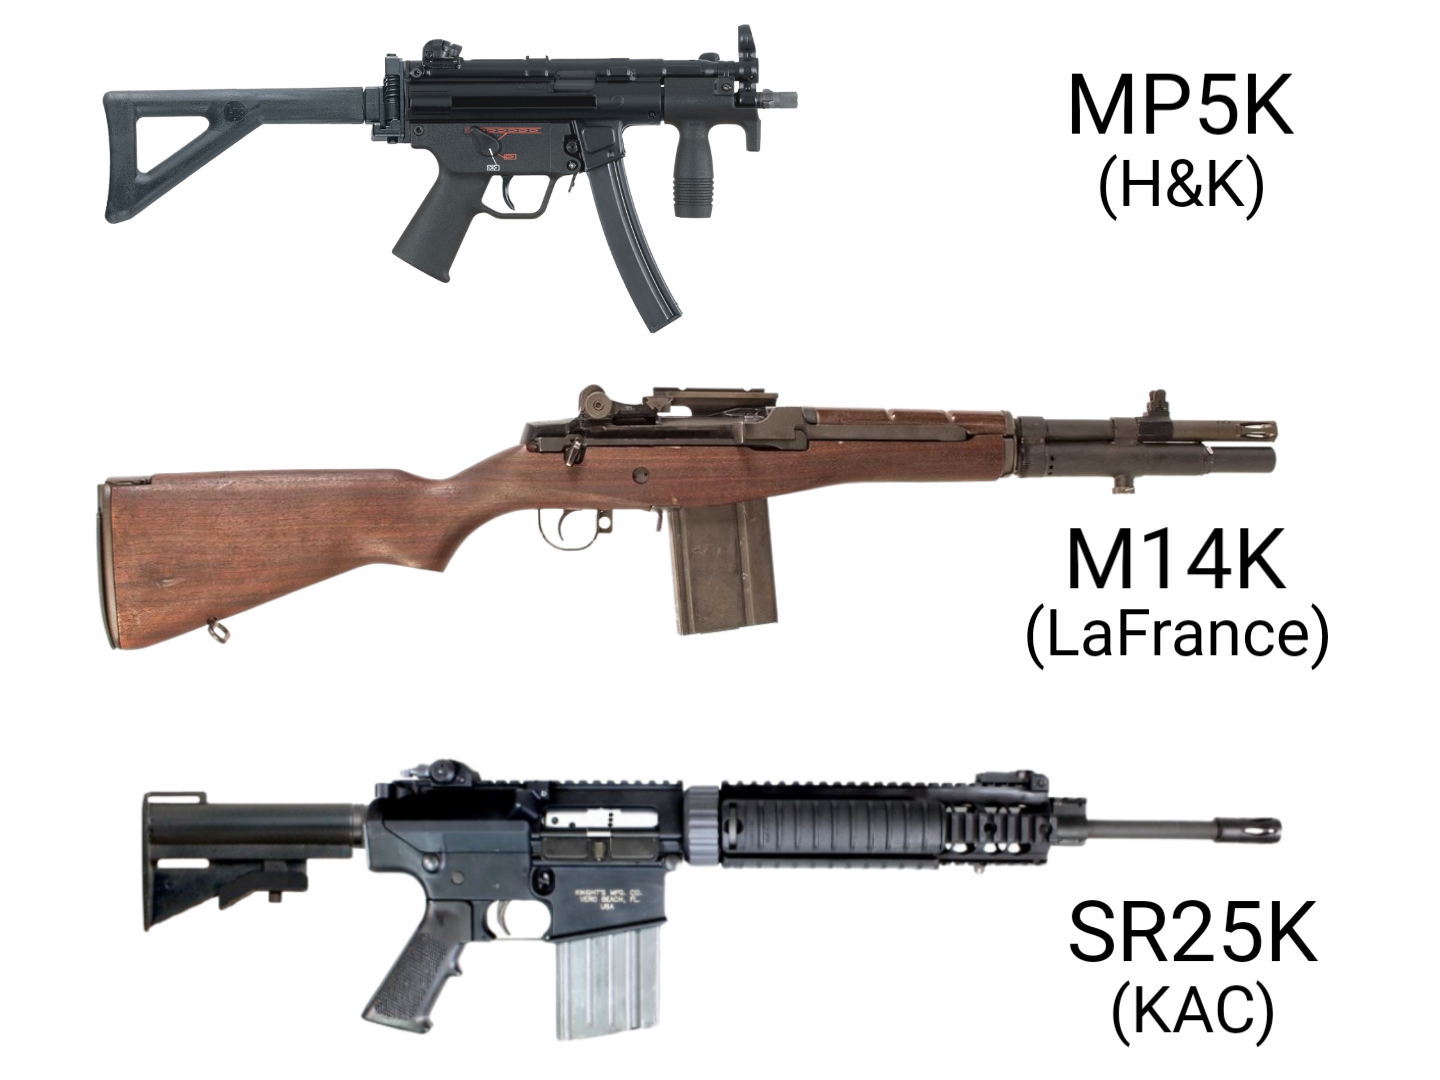
You get the idea.
The purpose of this article will be to showcase all the different components of this parts gun, and explain the selection thereof. A range report from its first function check and zeroing will follow at a later date.
We’ll start with a complete parts list, and go into more detail from there:
• Receivers: SilencerCo SCO-15 (including Ambidextrous Bolt Catch/Release)
• Barrel: Hodge Defense 12.5″ (Port Size not specified at time of purchase)
• Muzzle Device: Surefire Warcomp (Closed Tine)
• Suppressor: Surefire SOCOM556-RC2
• Gas Block: Cobalt Kinetics Low-Pro, Non-Adjustable
• Gas Tube & Roll Pin: SOLGW, Carbine, QPQ
• BCG: Geissele REBCG
• Rail: Daniel Defense RIS III FDE, 10.5″
• Grip: Geissele A2, Coyote Brown
• Trigger: Geissele SSA-X
• LPK: Geissele Super Duty
• Buffer Assembly: Geissele Premium MIL-SPEC receiver extension tube + Super 42 spring & H2 buffer, Black
• Stock: Magpul SL-K
• Forward Assist Assembly: SOLGW
• Charging Handle: SilencerCo GDCH (Gen 2)
• BUIS, Rear: KAC Micro
• BUIS, Front: KAC MK12/MK18, Taupe
• LPVO: NightForce NX8 1-8x Gen 2 (FC-DMx Reticle), Dark Earth
• LPVO Lens Cover, Front: Tenebraex UAC030-FCR, RAL 8000
• LPVO Lens Cover, Rear: Tenebraex UAC004-FCR, RAL 8000
• LPVO Mount: ReptiliaCorp AUS Mount, 30mm, Tan
• MRDS: Aimpoint ACRO P-2, Coyote Brown cerakote & logos re-lasered
• MRDS Mount: ReptiliaCorp ROF-90, ACRO, 30mm
• Ejection Port Cover: Magpul Enhanced, FDE
• Rail Cover Panels: Magpul, Type 1 & 2
• M-LOK 1913 Rail Segment: Magpul, Polymer
• Foregrip: Onyx Arms Stubby Vertical Grip, 1913, Coyote Brown
• Weapon Light, Mount: Arisaka Inline M-LOK mount
• Weapon Light, Head & Body: Modlite PLHV2, Dual Fuel
• Weapon Light, Tail Cap: Surefire UE, Tan
• Weapon Light, Switch: UNITY Tactical AXON SYNC, Surefire/Crane, FDE
• Weapon Light, Switch Mount: Fernilab OHM1, Tan
• Laser/MFAL: B.E. Meyers MAWL C1+
• Sling: Blue Force Gear GMT two point
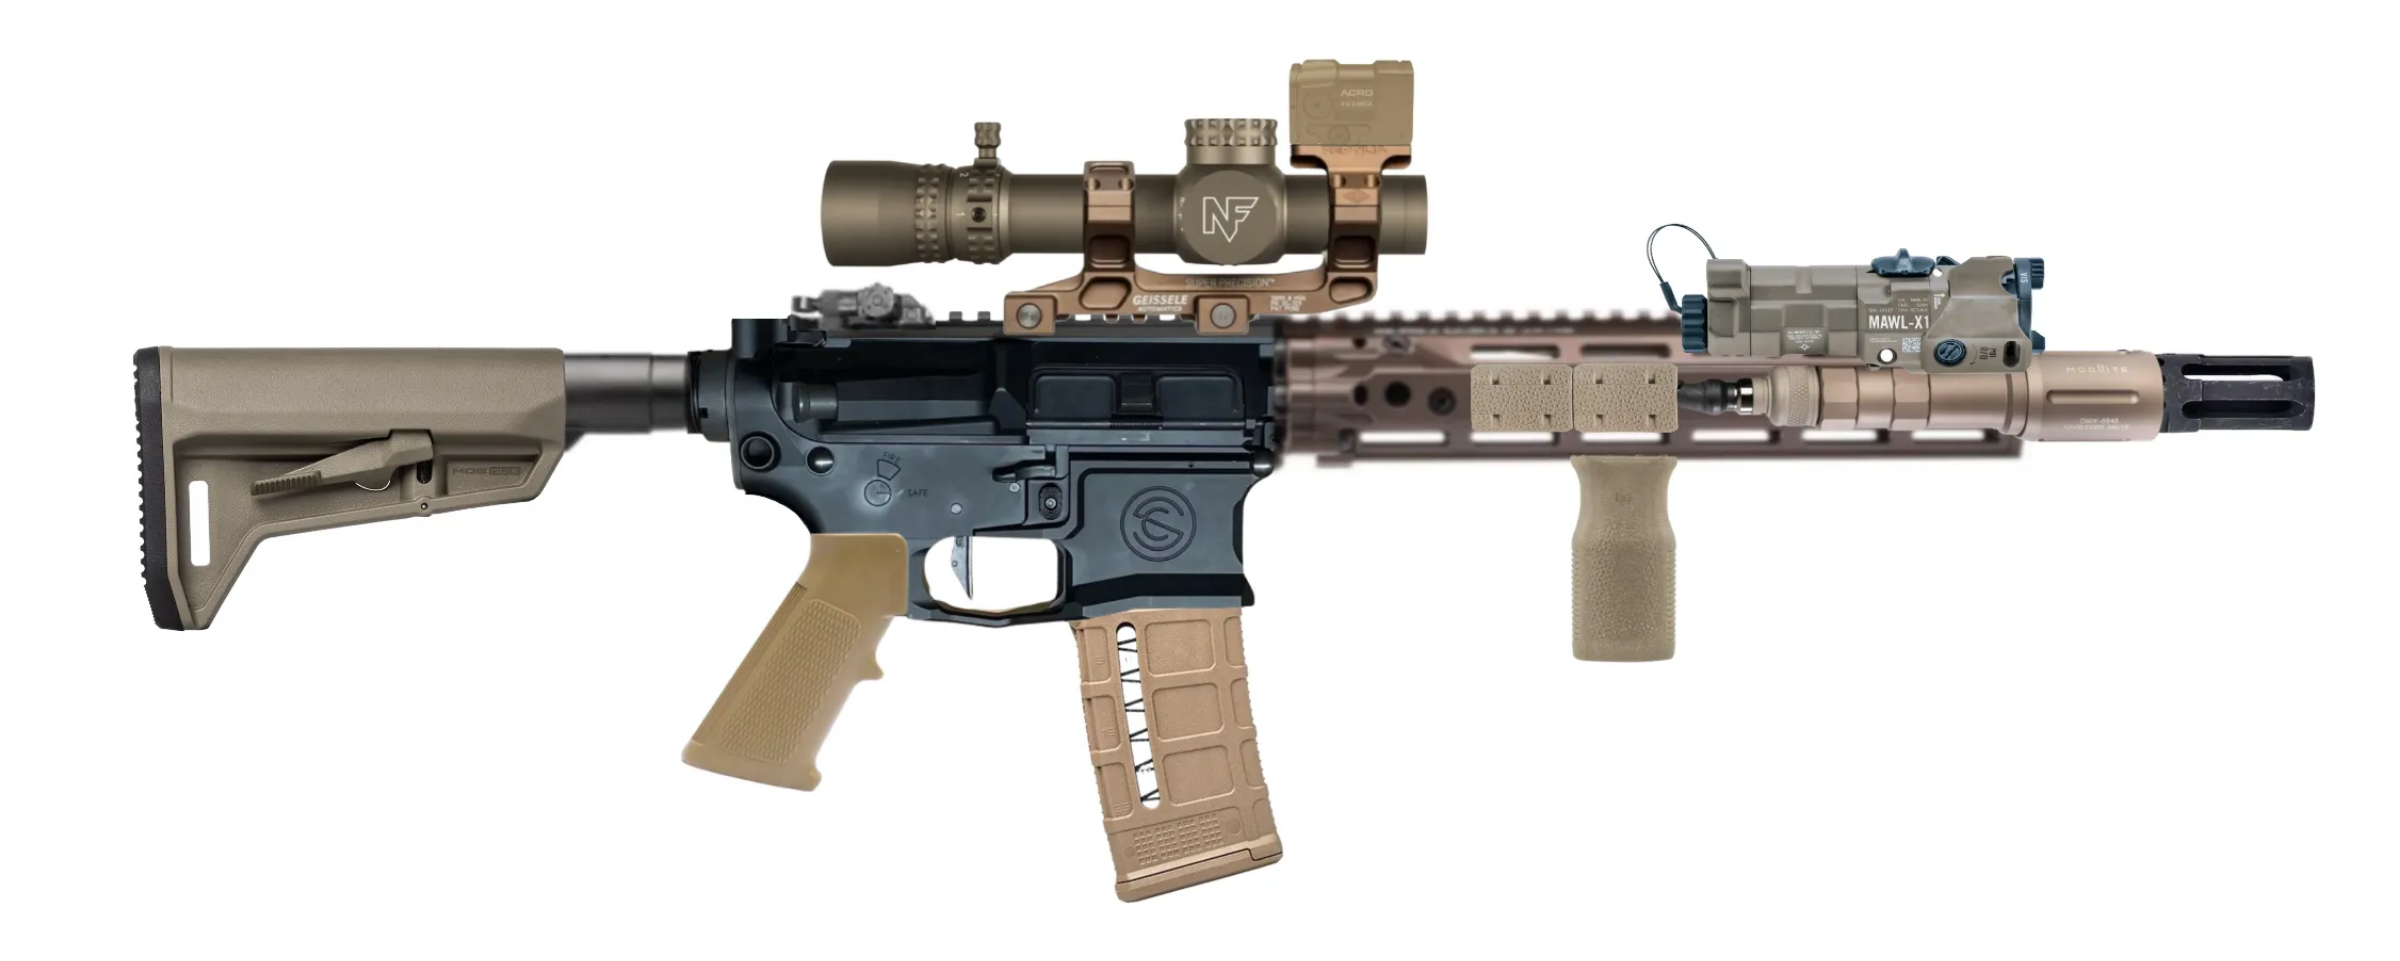
The original GPR-K render done in an illustrator app, piecing together most of the above components for a visual concept of the finished project.
SELECTIONS IN DETAIL
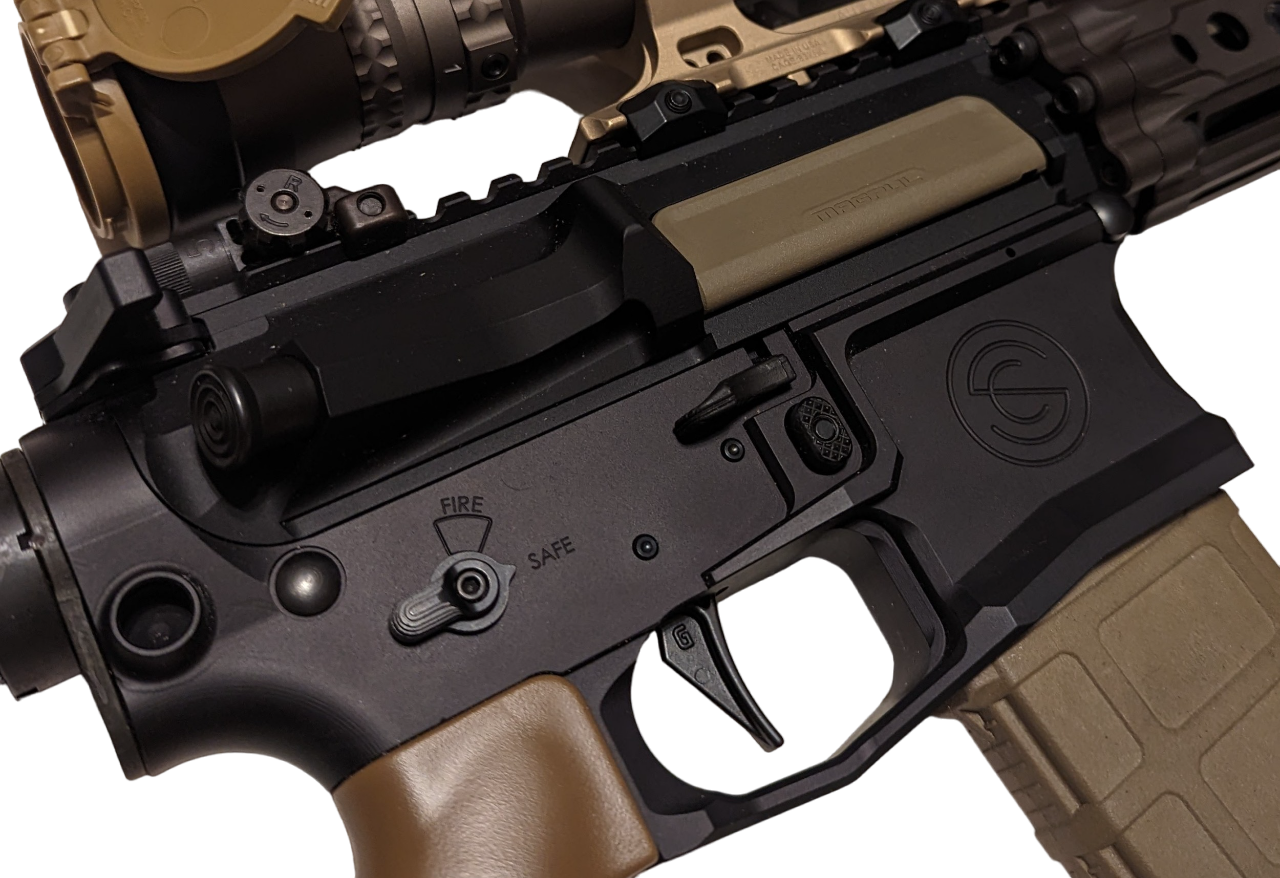
Receivers: I went with the SilencerCo SCO-15 receivers because I was already familiar with the form factor of their ambidextrous bolt catch/release in the lower from using the Teal Blue Bravo PDQ in a few of my previous rifles (at least four of them).
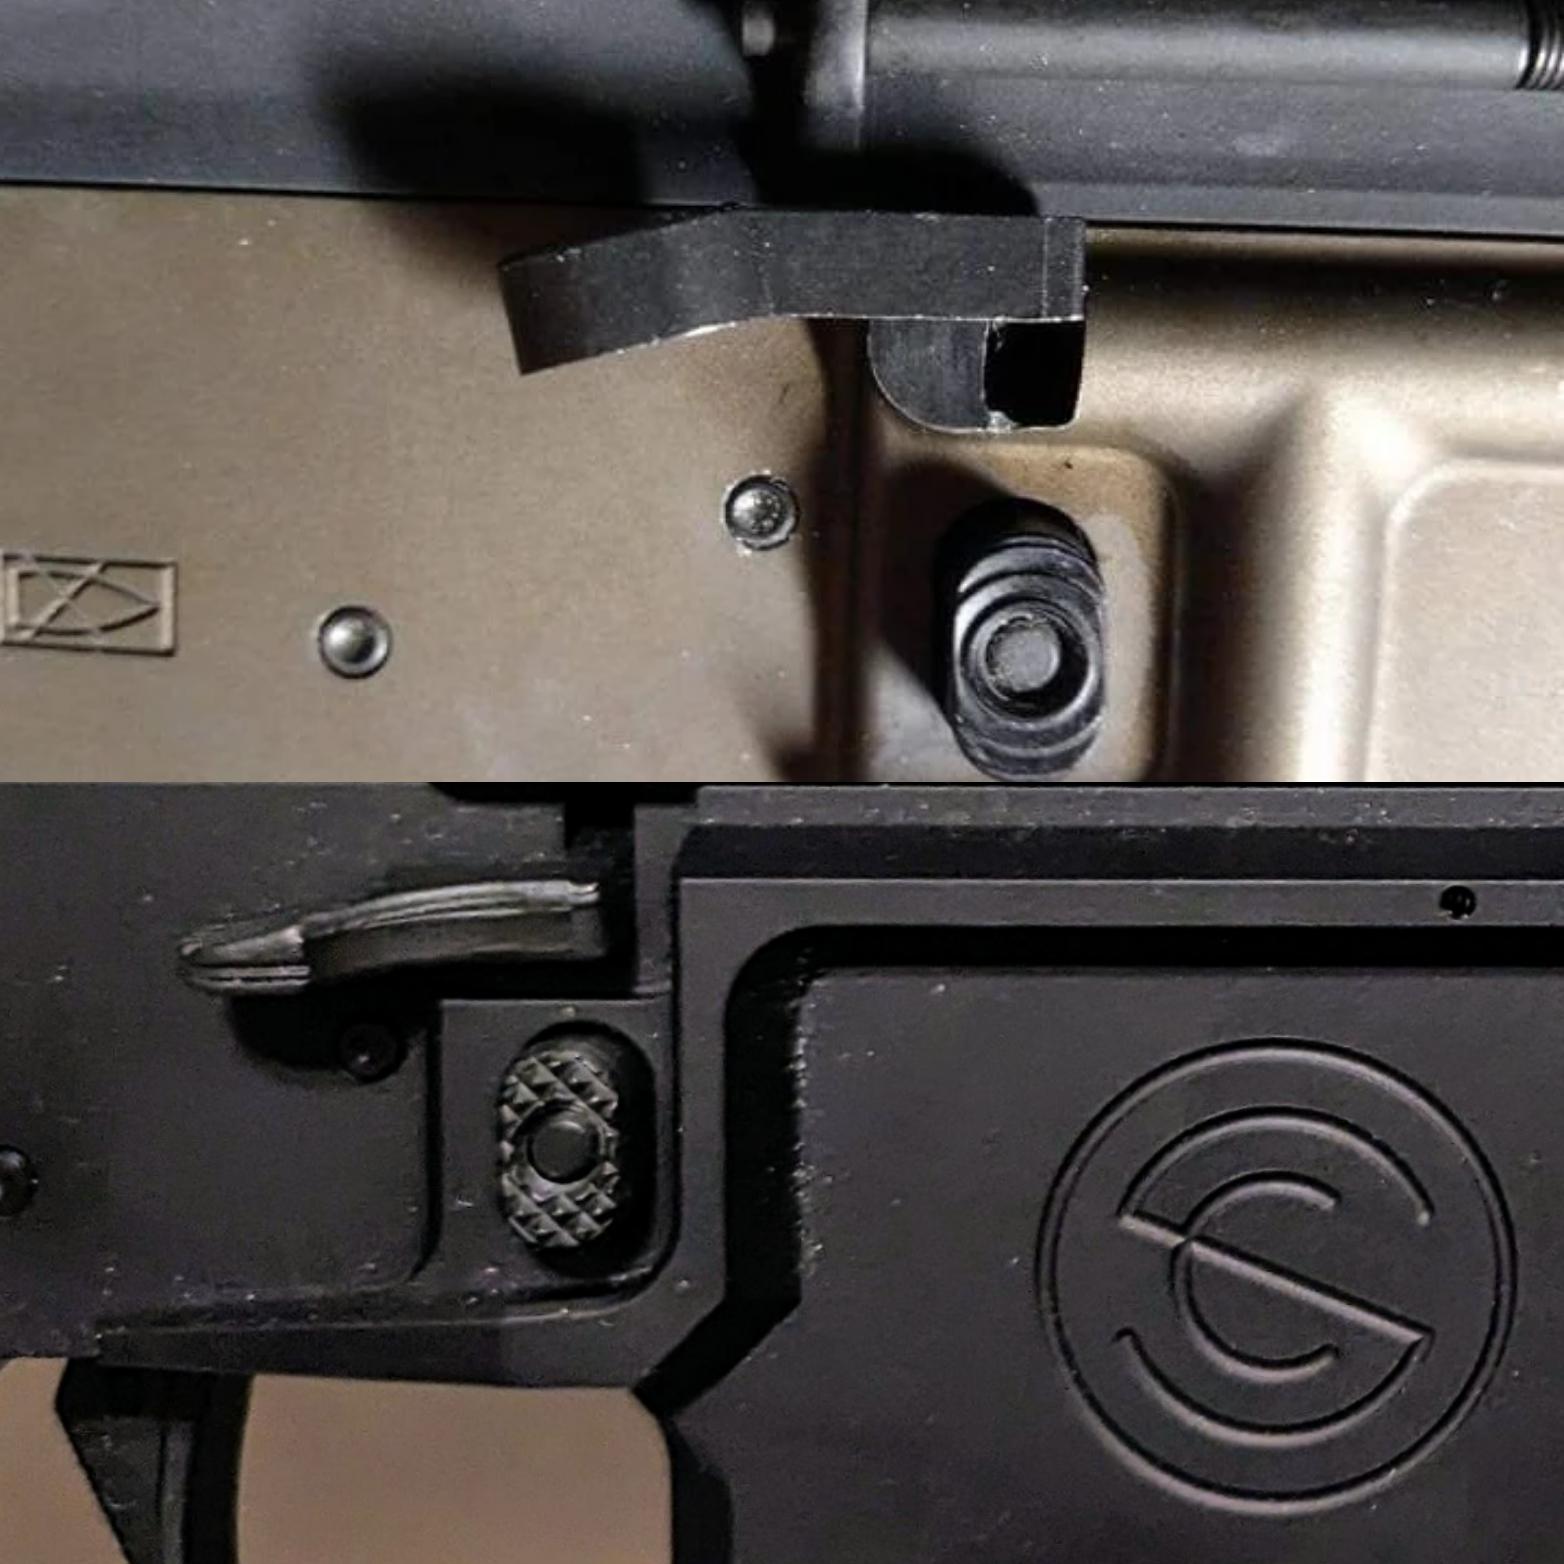
The SiCo version is an upgrade to that component; Although it drops in and installs the same, it’s shaped in a more streamlined fashion that brings it closer to the lower receiver, and therefore avoids two malfunction-inducing mechanical issues that came with the PDQ:
1.) Because the ejection port cover would rest directly on the PDQ, in some cases the port cover’s spring was strong enough that the constant down and inwards pressure of the port cover would remain undefeated and therefore prevent the PDQ from lifting up high enough for the bolt catch to lock the bolt carrier back after the last round had been fired. That made reloads annoying because you’d almost instinctively go into a tap/rack clearance thinking you had a dud round in the chamber (not realizing you were actually empty), and then you’d have to do dumb AK shit to get back in the game.
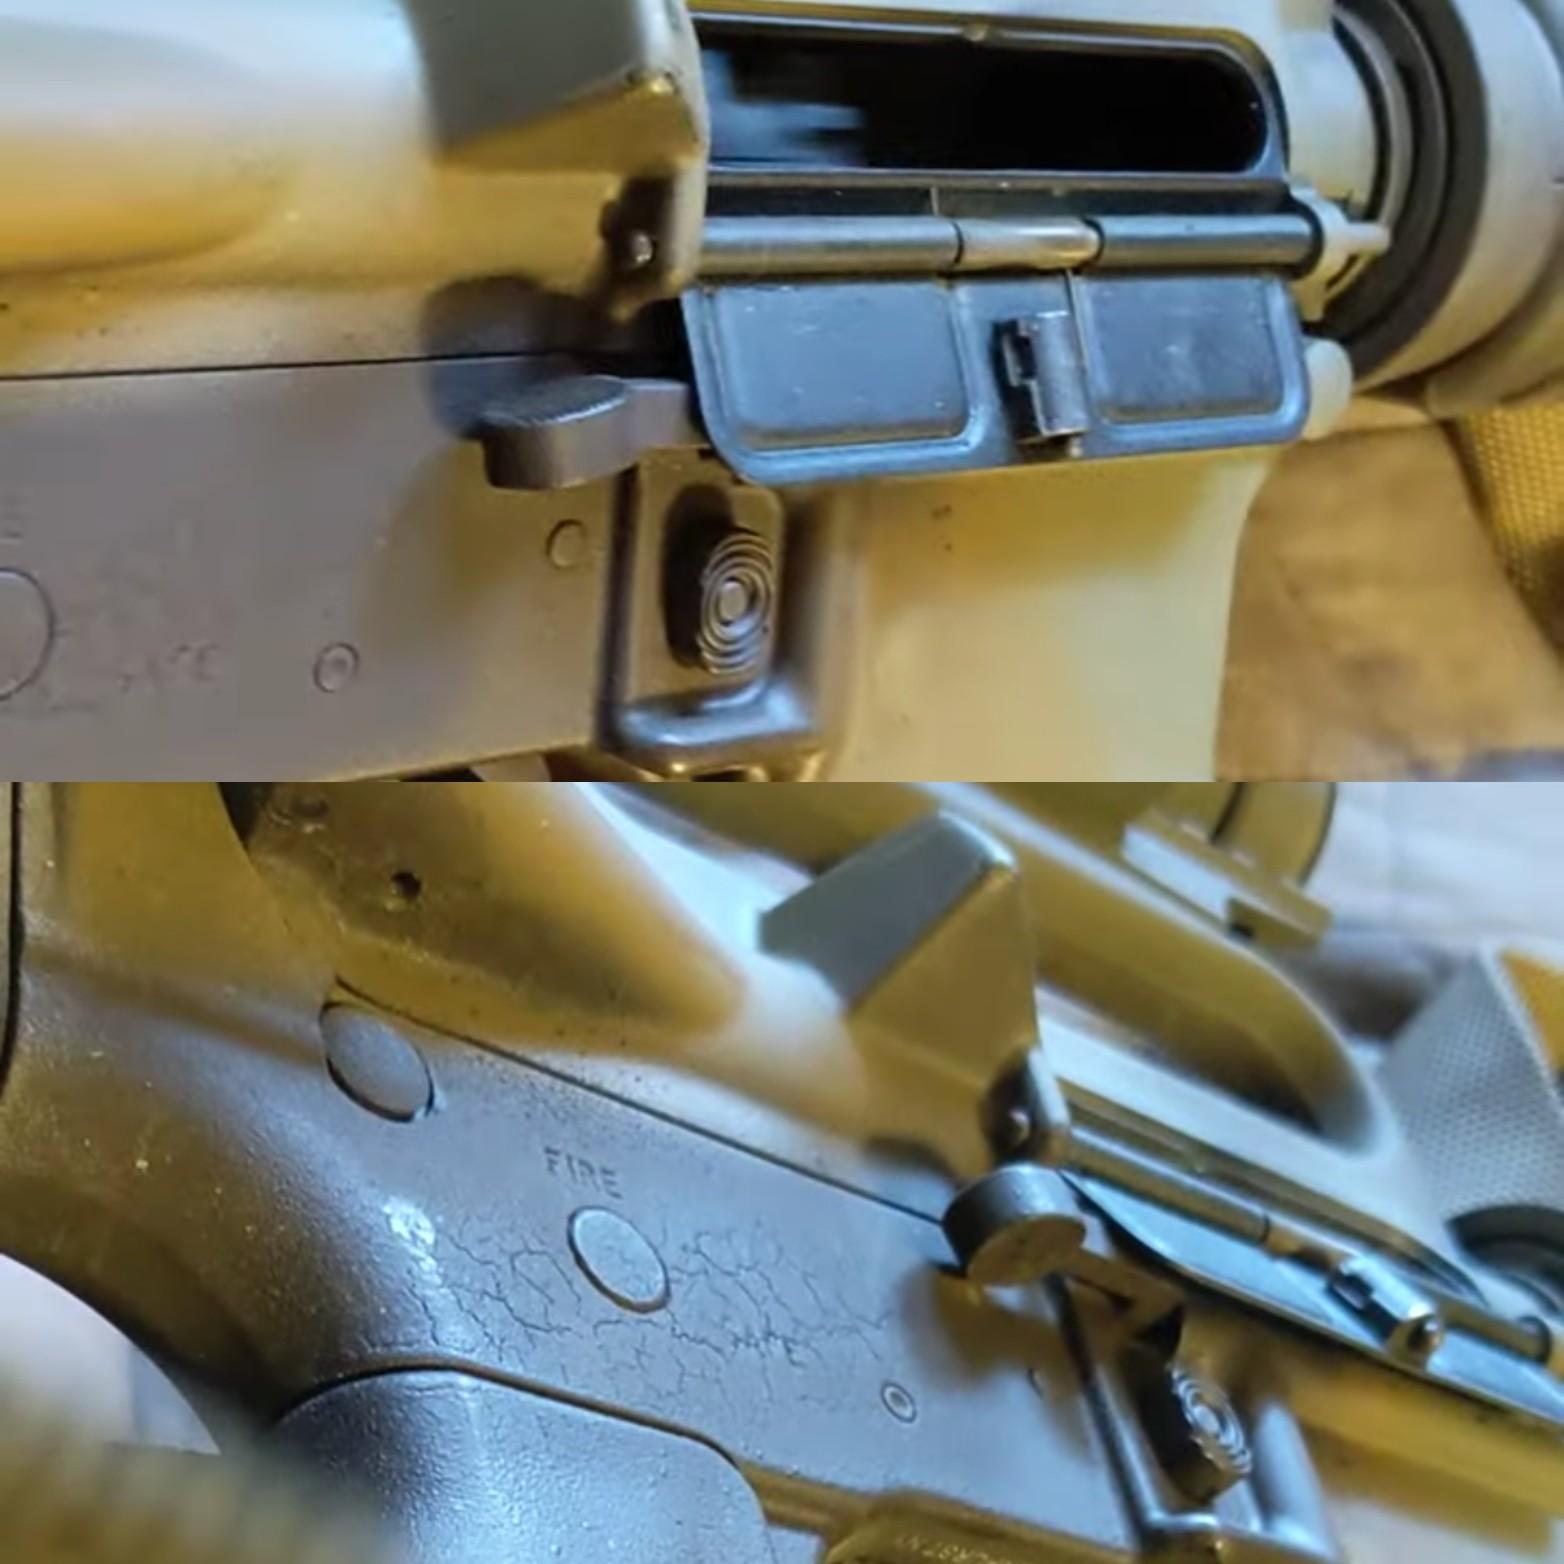
2.) With the port cover open and resting on the PDQ sticking out as far off the lower receiver as it does, were one to apply pressure directly to said port cover while the PDQ is raised and the bolt locked back, the port cover would push the PDQ down prematurely and send the bolt home, acting like a giant bolt release. Also annoying if your rifle got bumped at any point while the bolt was meant to be locked back.
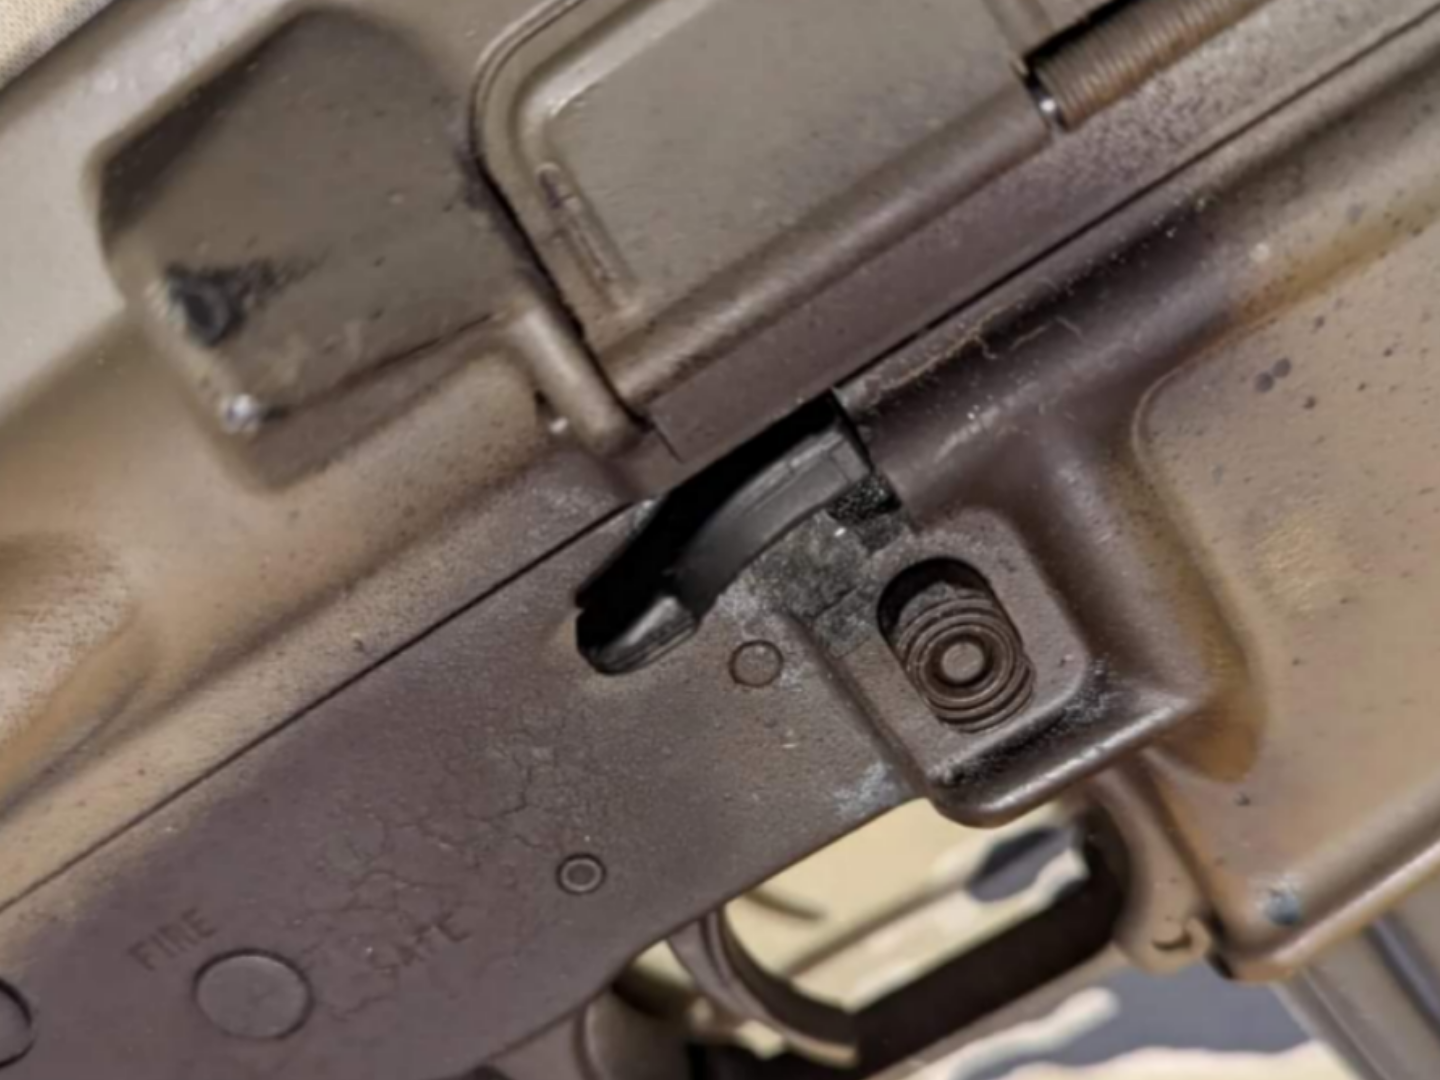
I’ve already started converting my previous PDQ equipped rifles to the SiCo version of the bolt catch/release lever. All that takes is modifying the shape of the cut going across the lower receiver, adding a downward angle relief cut so the SiCo component can fit. As of this writing, it’s my understanding that you can acquire this part directly from SiCo to have installed in your own lower by a competent individual (or yourself, if you’re qualified/experienced) by placing an order over the phone.
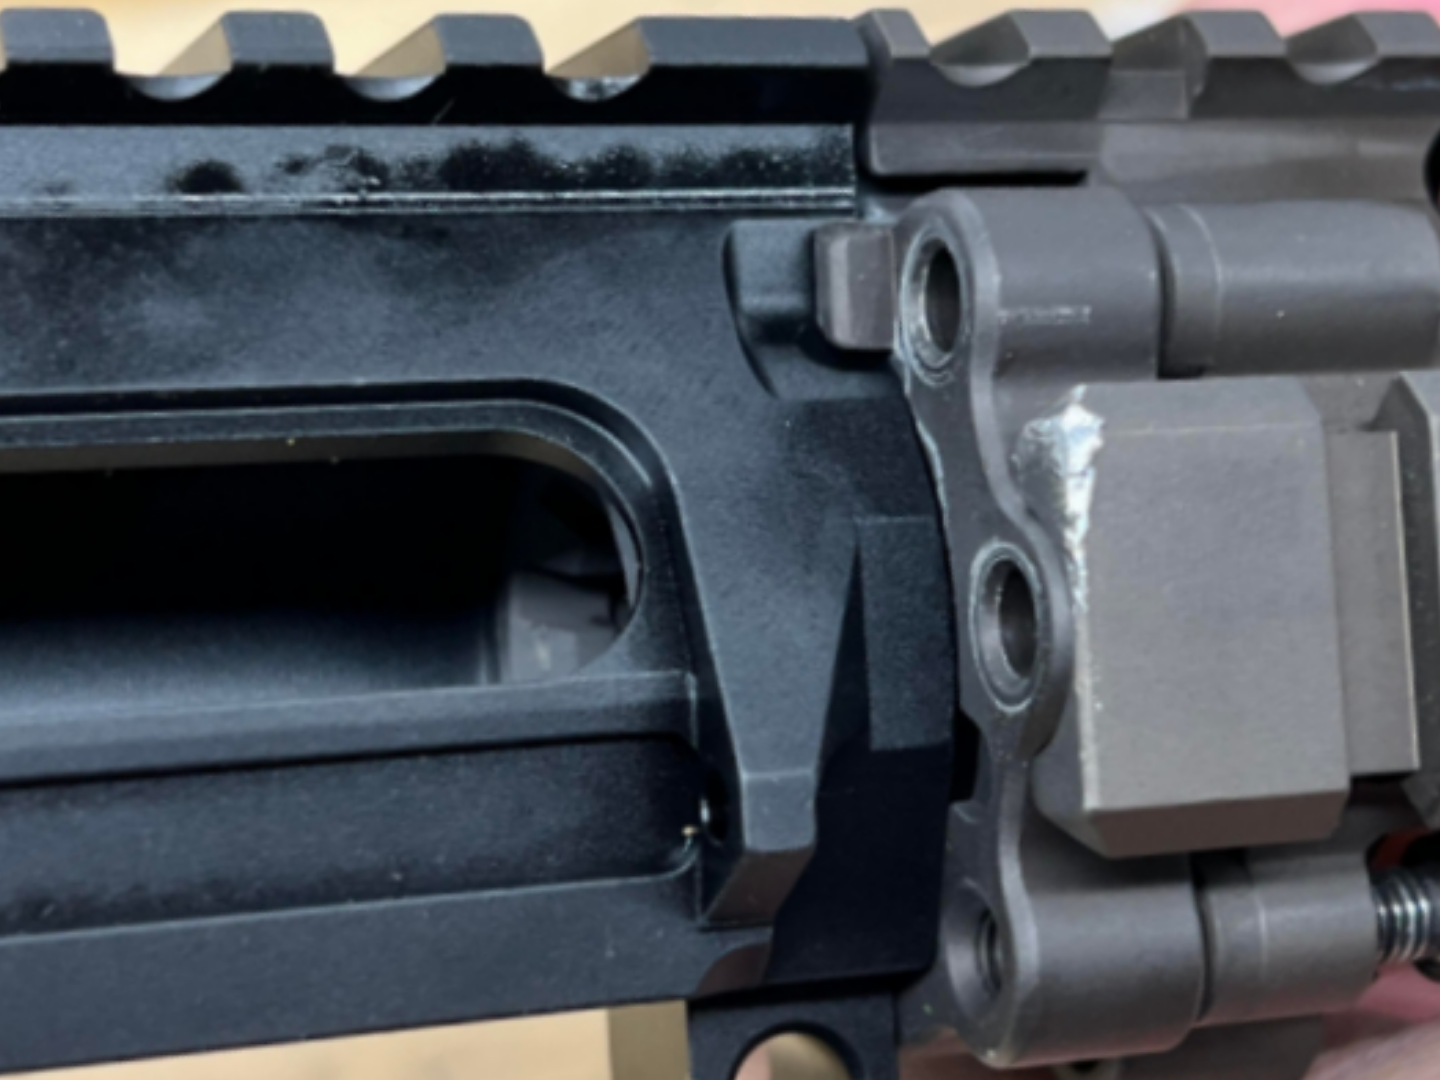
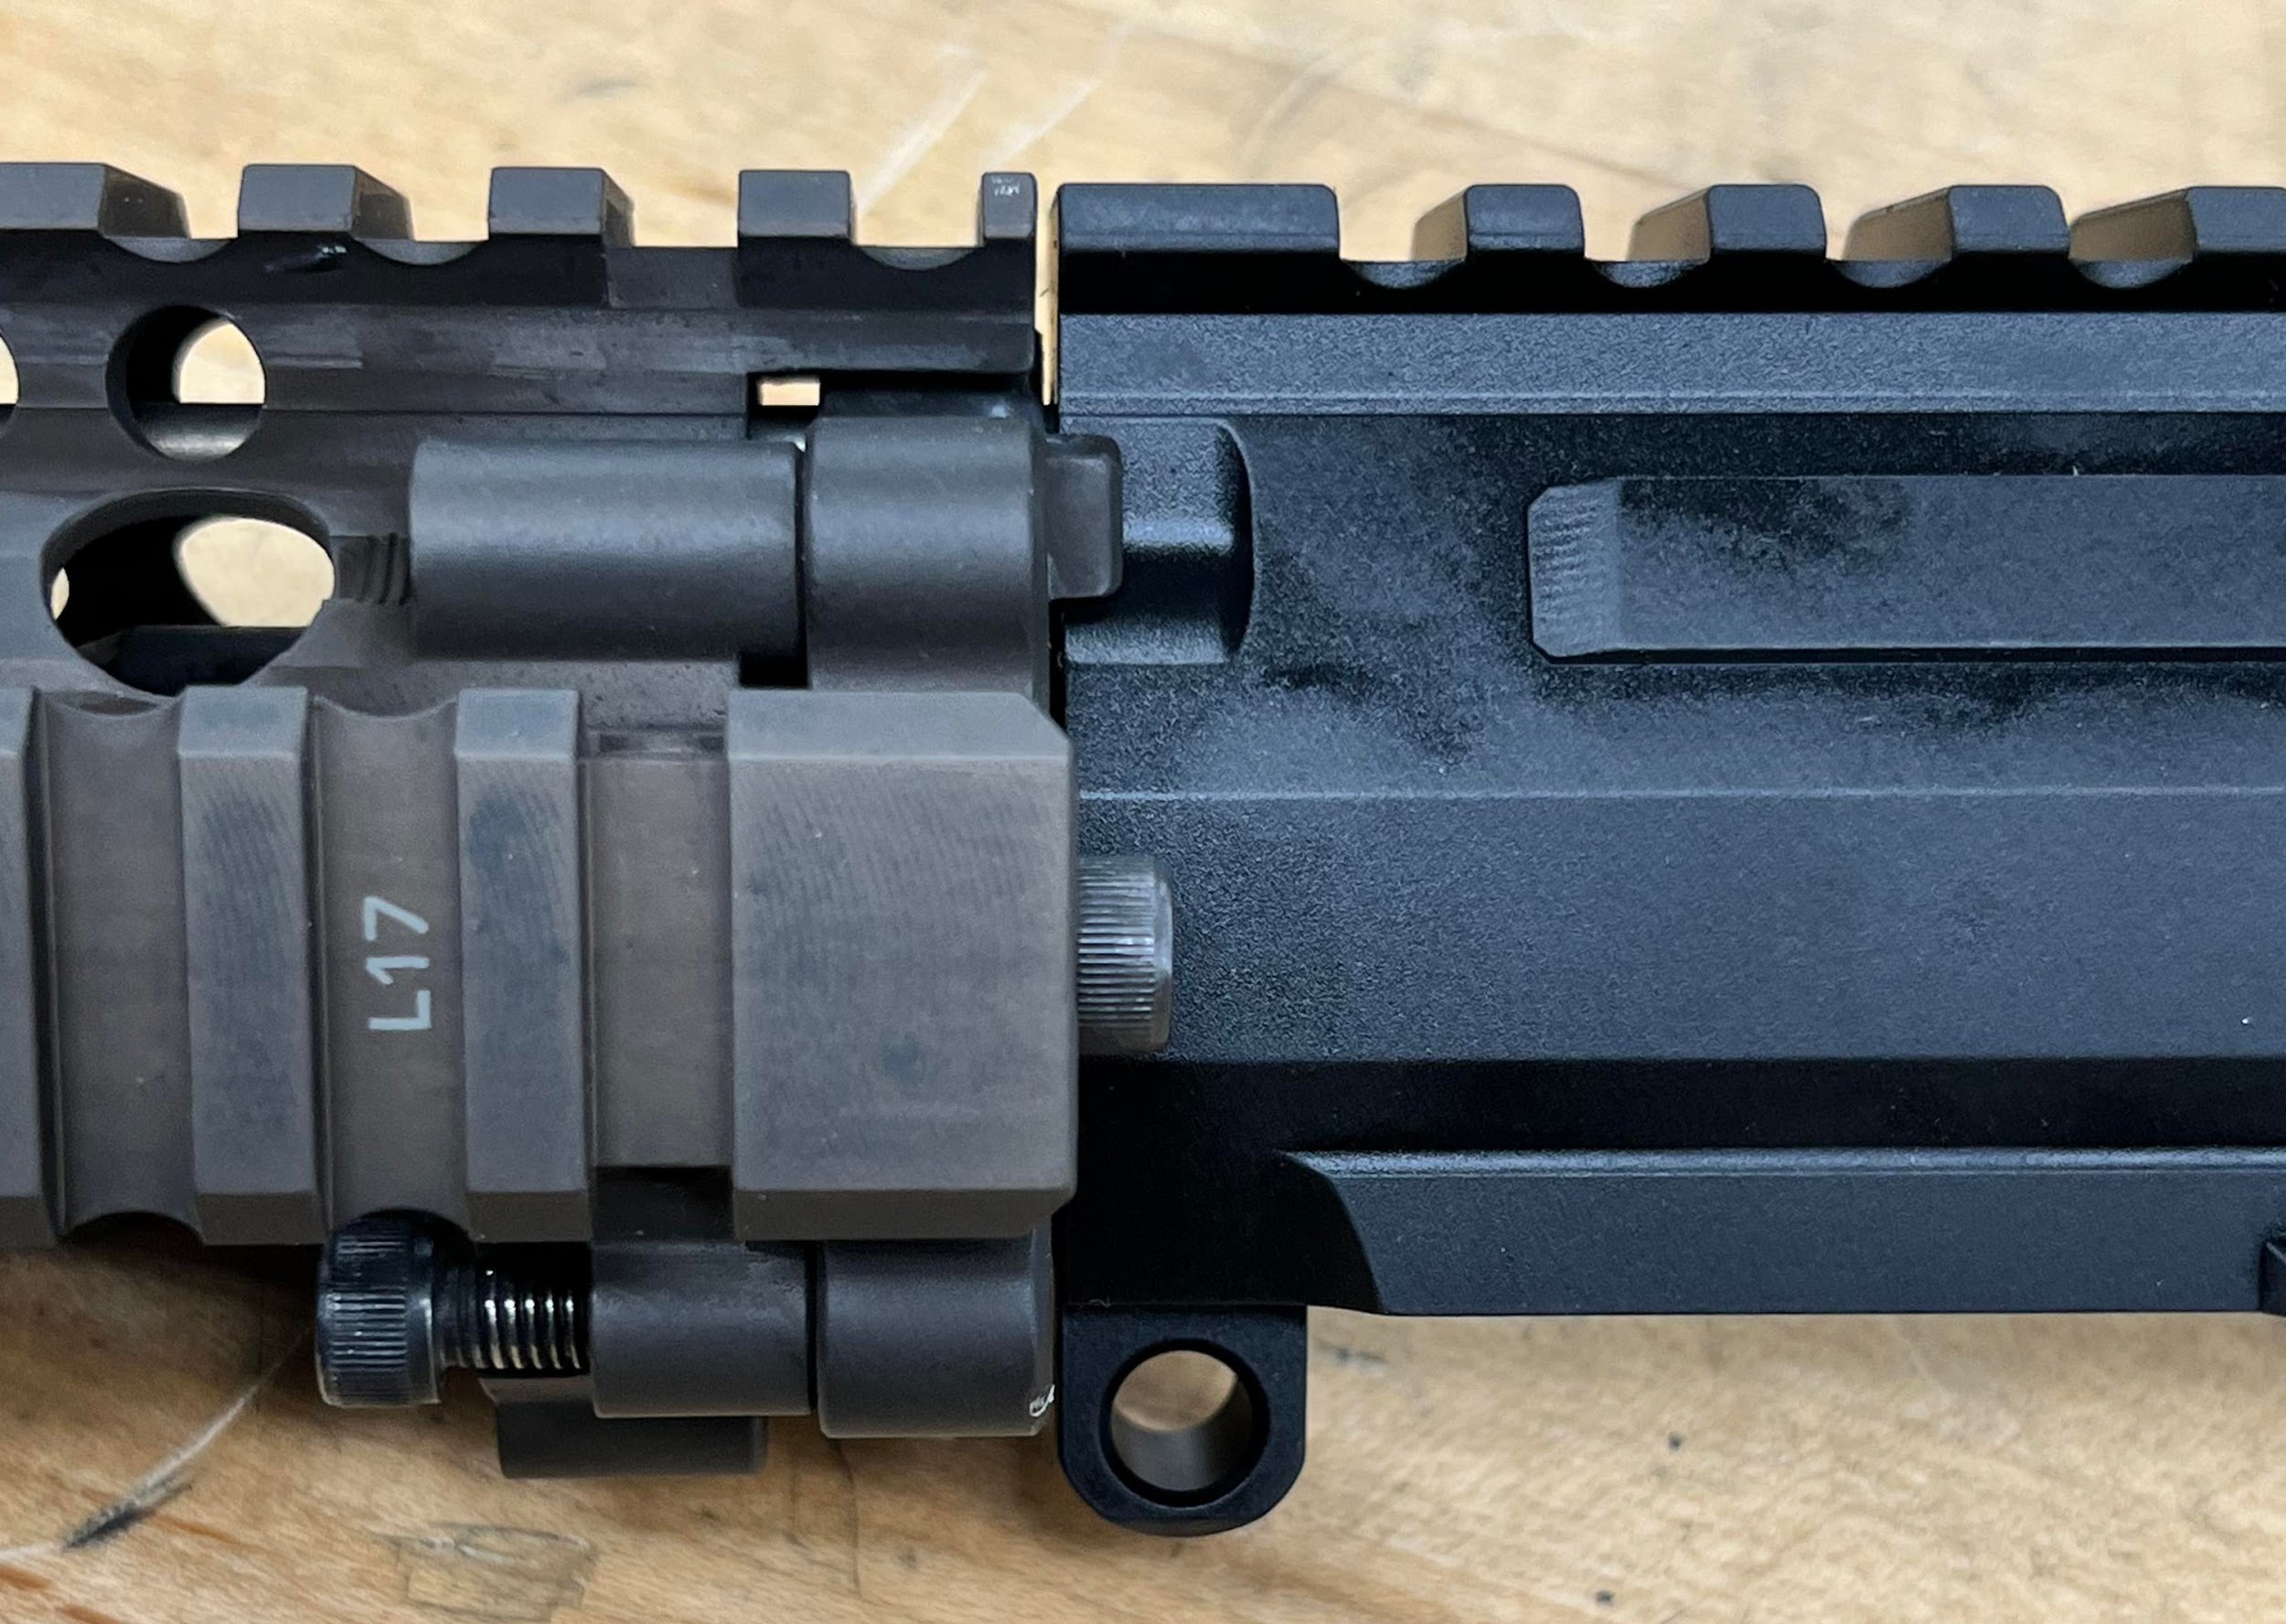
The SiCo upper receiver is your standard fare billet upper; I got it just to have matching receivers for a change. Although, I did verify with a friend at SilencerCo that the upper was compatible with the RIS III rail before purchasing; he sent the above pictures of the SiCo upper with the RIS II installed with no modifications to the upper itself to confirm as much. I’ll explain more about that later.
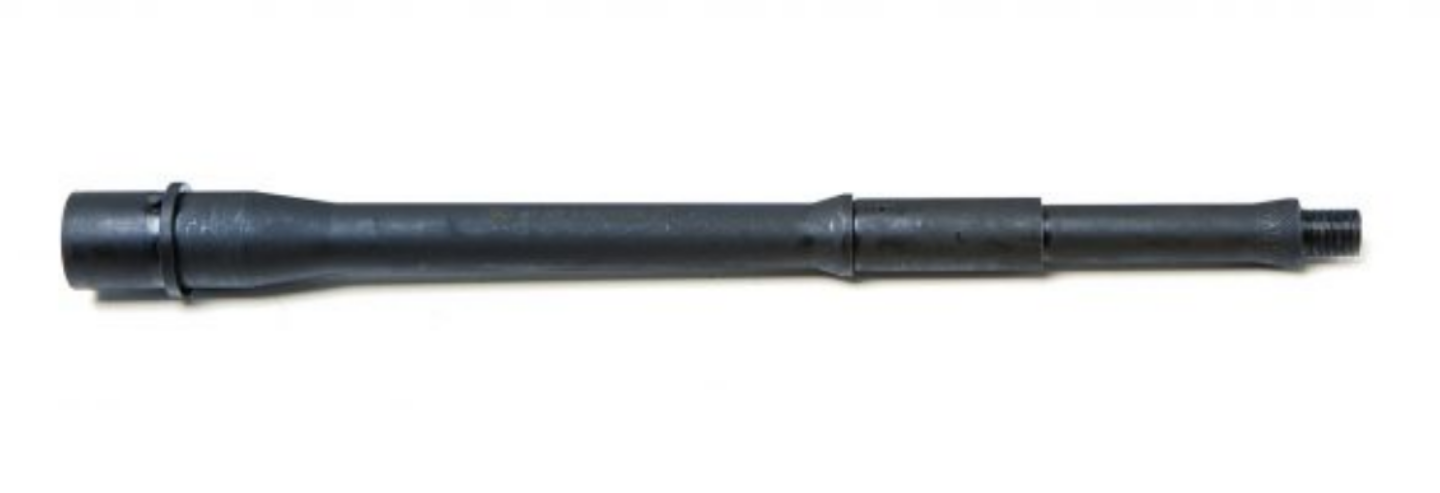
Barrel: I’d heard tell of the increased muzzle velocity inherent to the Hodge barrels due to their tapered chamber before; though the exact numbers escape me at the time of this writing, I remember hearing in general that the 12.5″ barrels had a muzzle velocity comparable to that of a standard 14.5″ barrel. Since I felt like going with something different, and believing Jim’s explanation when I asked him about the Muzzle Velocity, I grabbed one of the 12.5″ barrels.
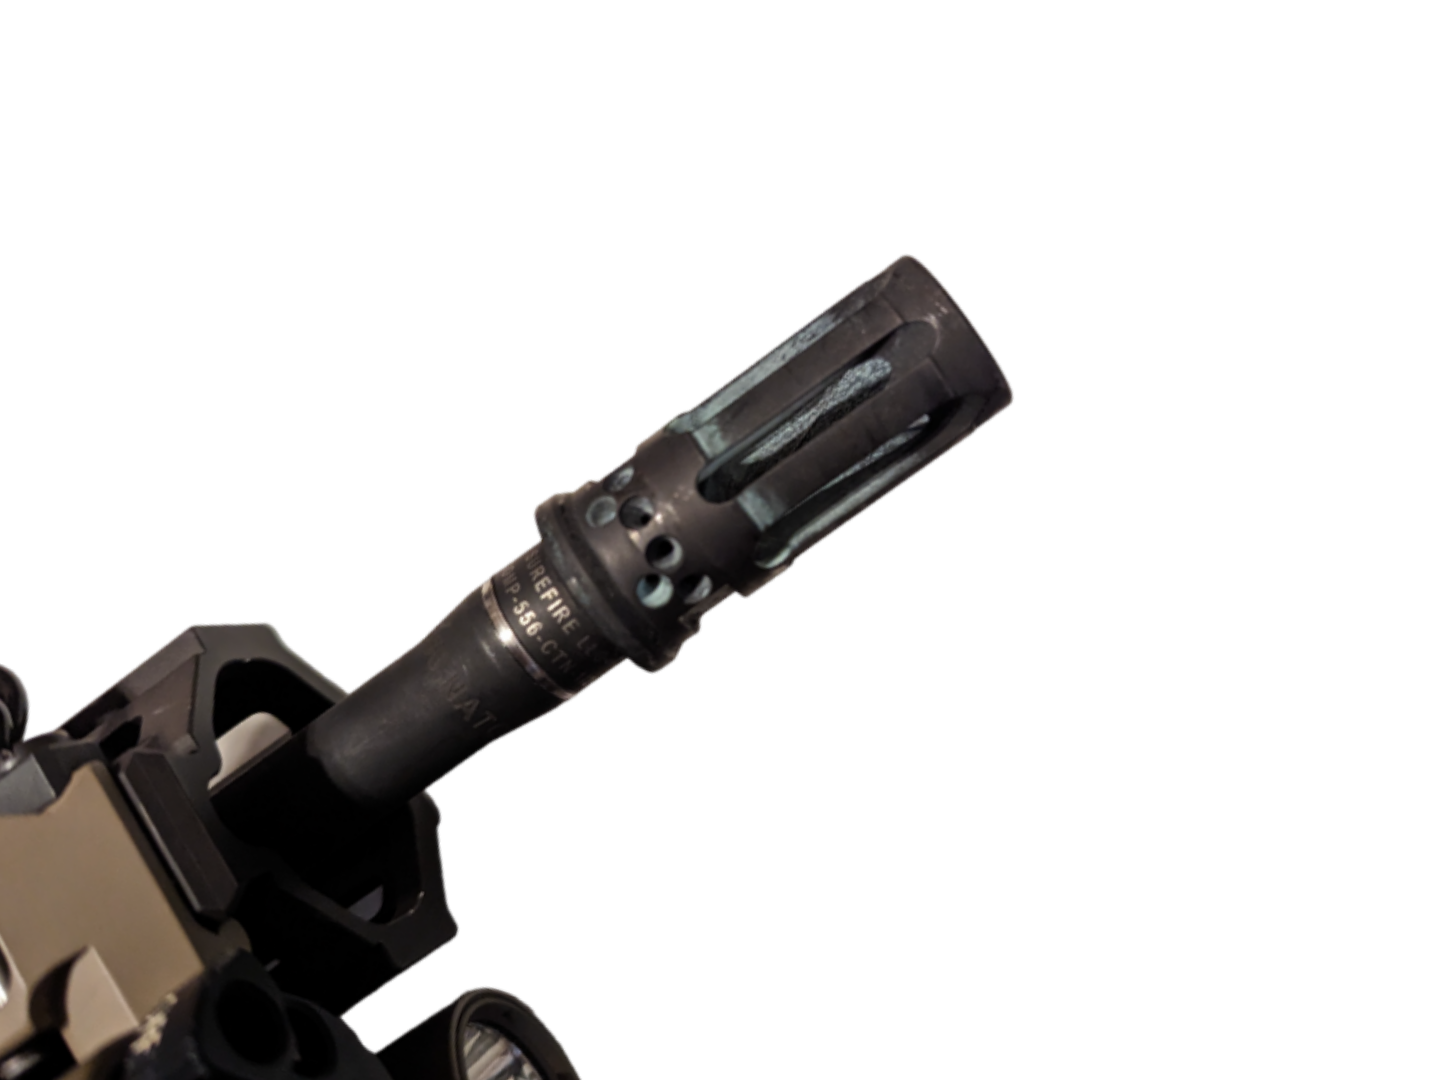
Muzzle Device: I grabbed a Surefire Warcomp (Closed Tine) off a buddy that was selling one used on the cheap since my two 5.56 suppressors are already Surefire (RC2 & MINI2) and I had therefore standardized all my 5.56 rifles that would be suppressed with Warcomps. I’ve got a few and I’ve been using them for years, both open and closed tine varieties.
A lot of guys like to gripe about carbon lock with these things; although I have experienced it before after hundreds of rounds fired on suppressed guns (namely my HK416, GPR, and SPR), I have never experienced it so bad that it required me to shoot the can off the gun into oblivion and hope it didn’t get damaged in the process. There are other ways to get the things off, and it’s never a project. They’re man-made objects; man can therefore defeat them.
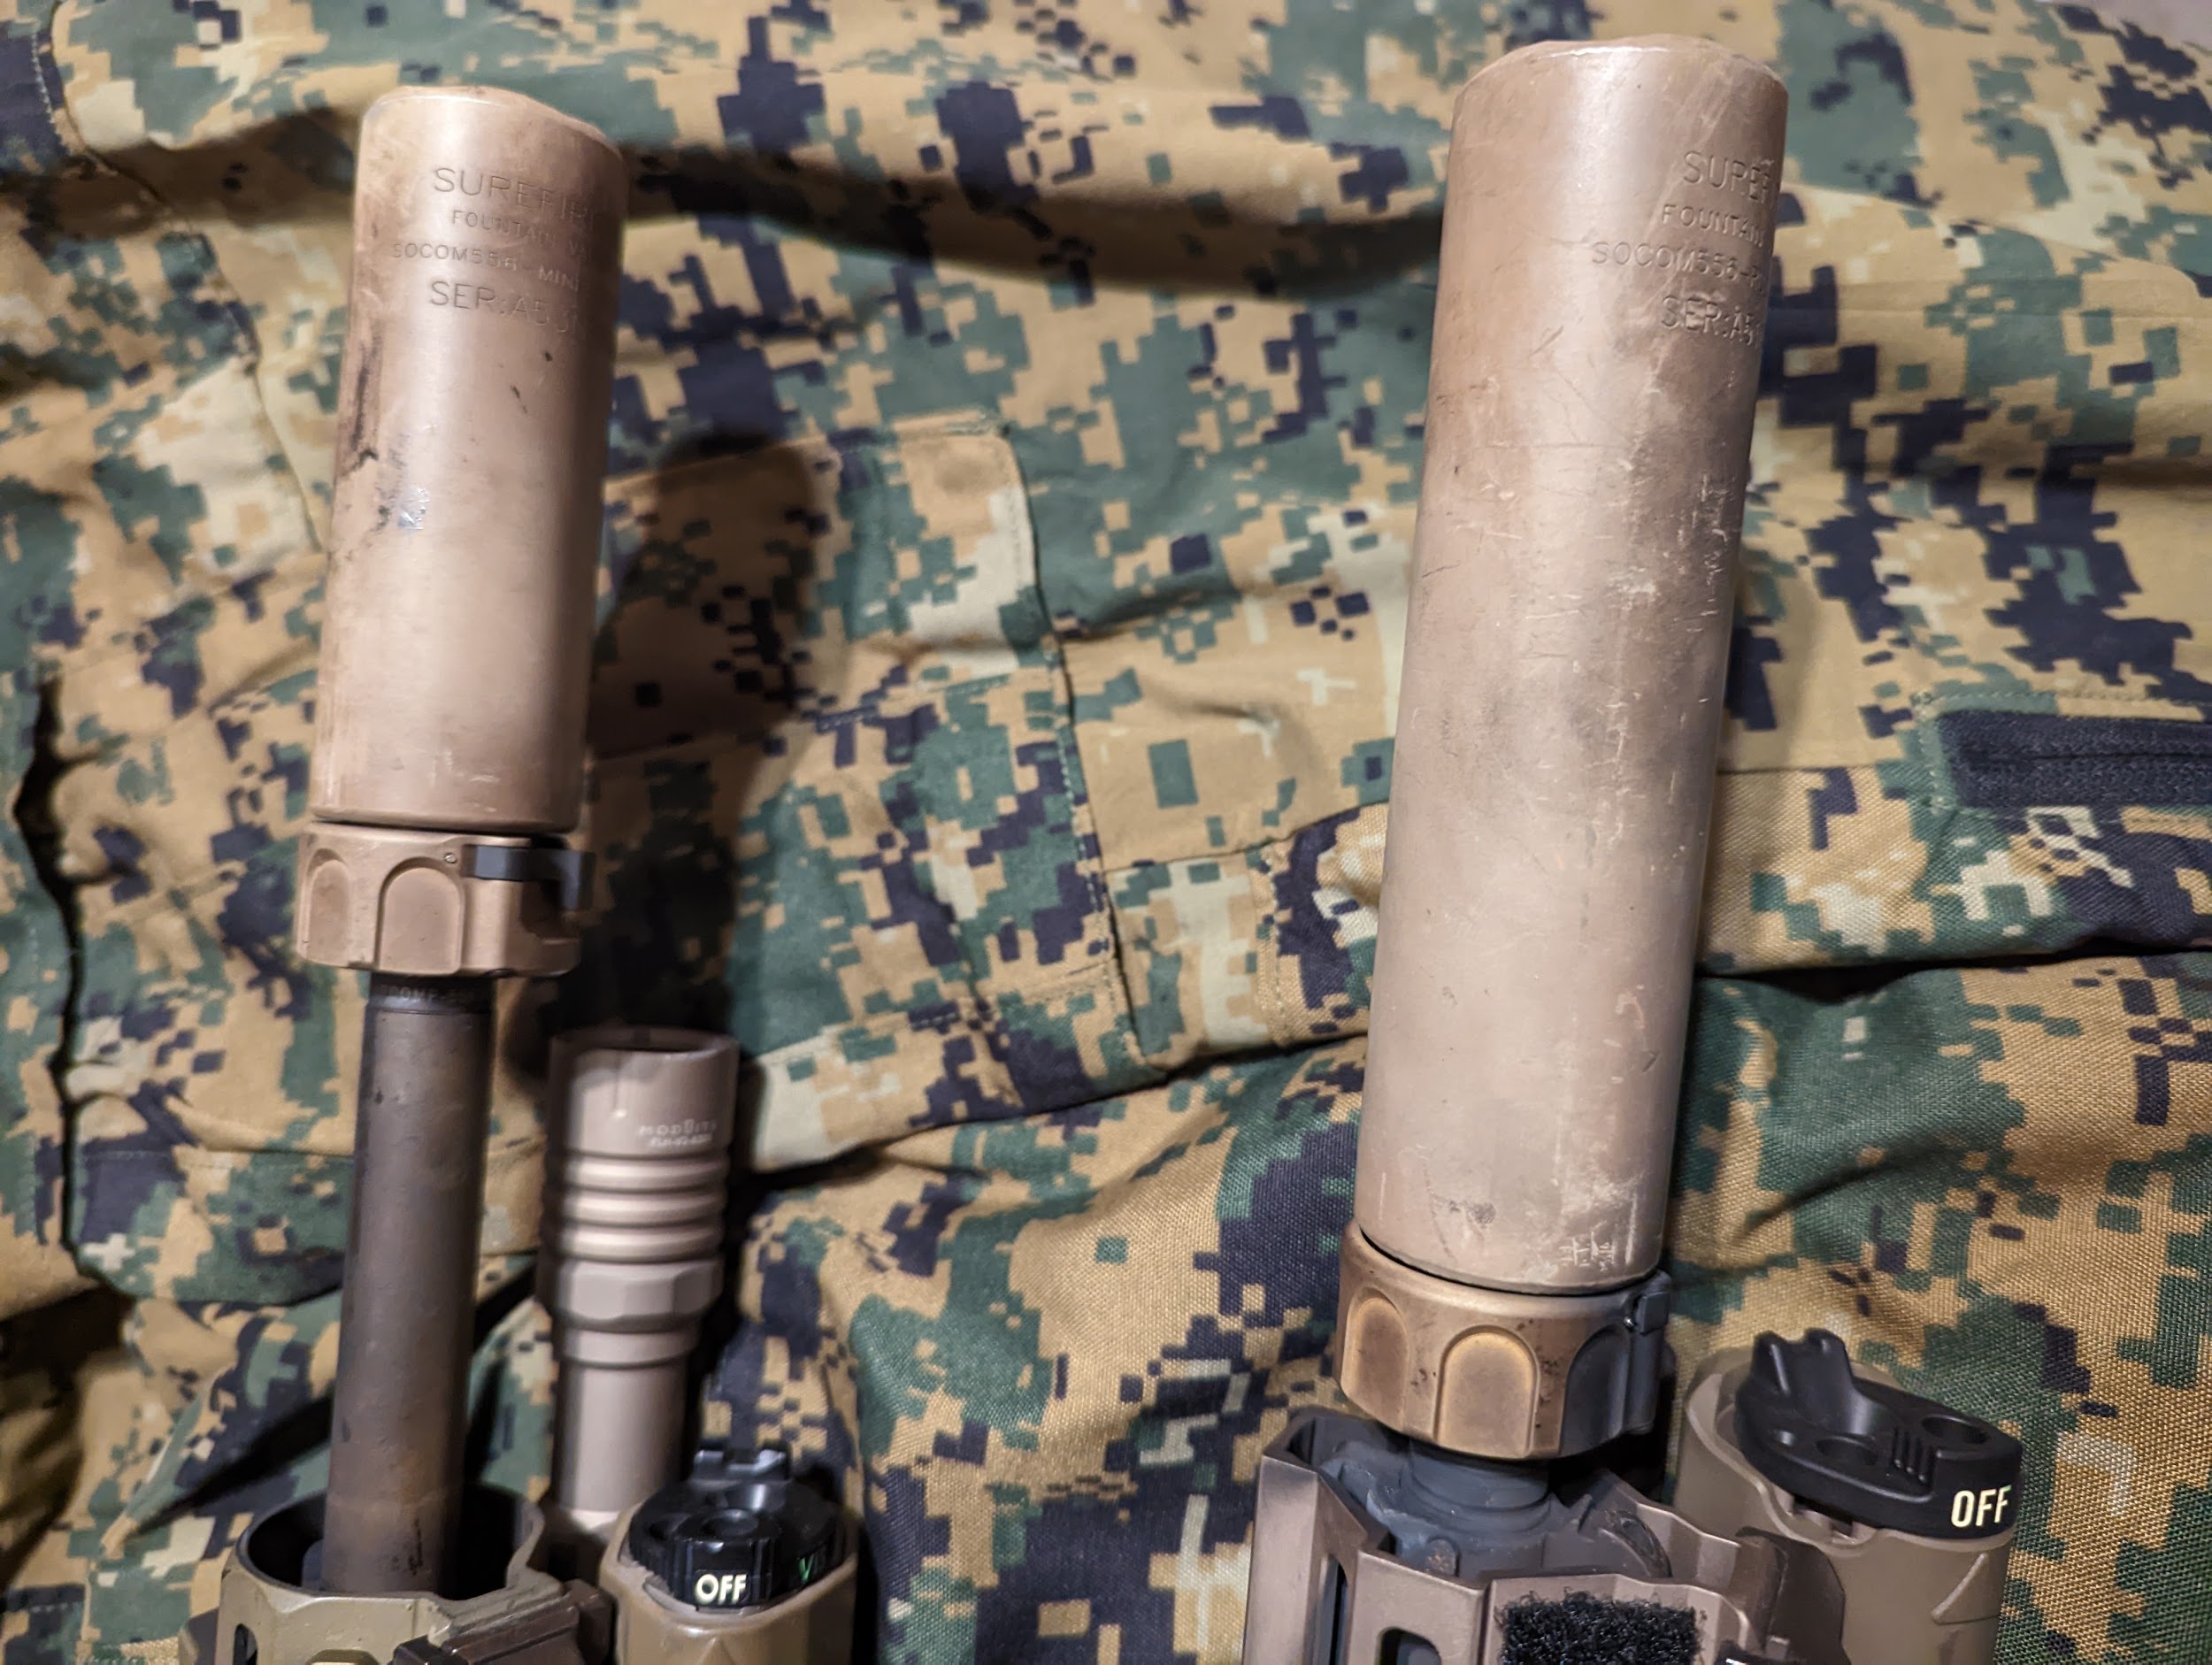
Suppressor: I’ve had my RC2 and MINI2 for a few years now. When I was shopping for suppressors and seeking guidance in regards, one thing I inquired about was suppressor length. I was advised (by a former Surefire employee who helped develop the suppressors no less) that between the RC2 & MINI2, if the barrel was 14.5″ or longer, the MINI2 was good to go, but if it’s shorter than 14.5″, the RC2 was the way to go.
Reason being, the lesser space for the gas to expand inside the MINI2 meant the back pressure from the unburnt powder in the shorter barrel would be increased, and on a barrel shorter than 14.5″ it would increase the cyclic rate of the gun and therefore increase wear on the internals. It could be done, but it was ill advised. Instagram sexy sometimes is only just that, and not necessarily useful past that.
I ended up with both. My MINI2 bounces between my GPR (14.7″ barrel) and SPR (18″ barrel), having mid length and rifle length gas, respectively. My RC2 typically lives on my 10.4″ barrel HK416 upper (since it was purchased as a dedicated suppressor host first and foremost), but now it will bounce between it and the GPR-K and its carbine length gas system. Just simple math there.
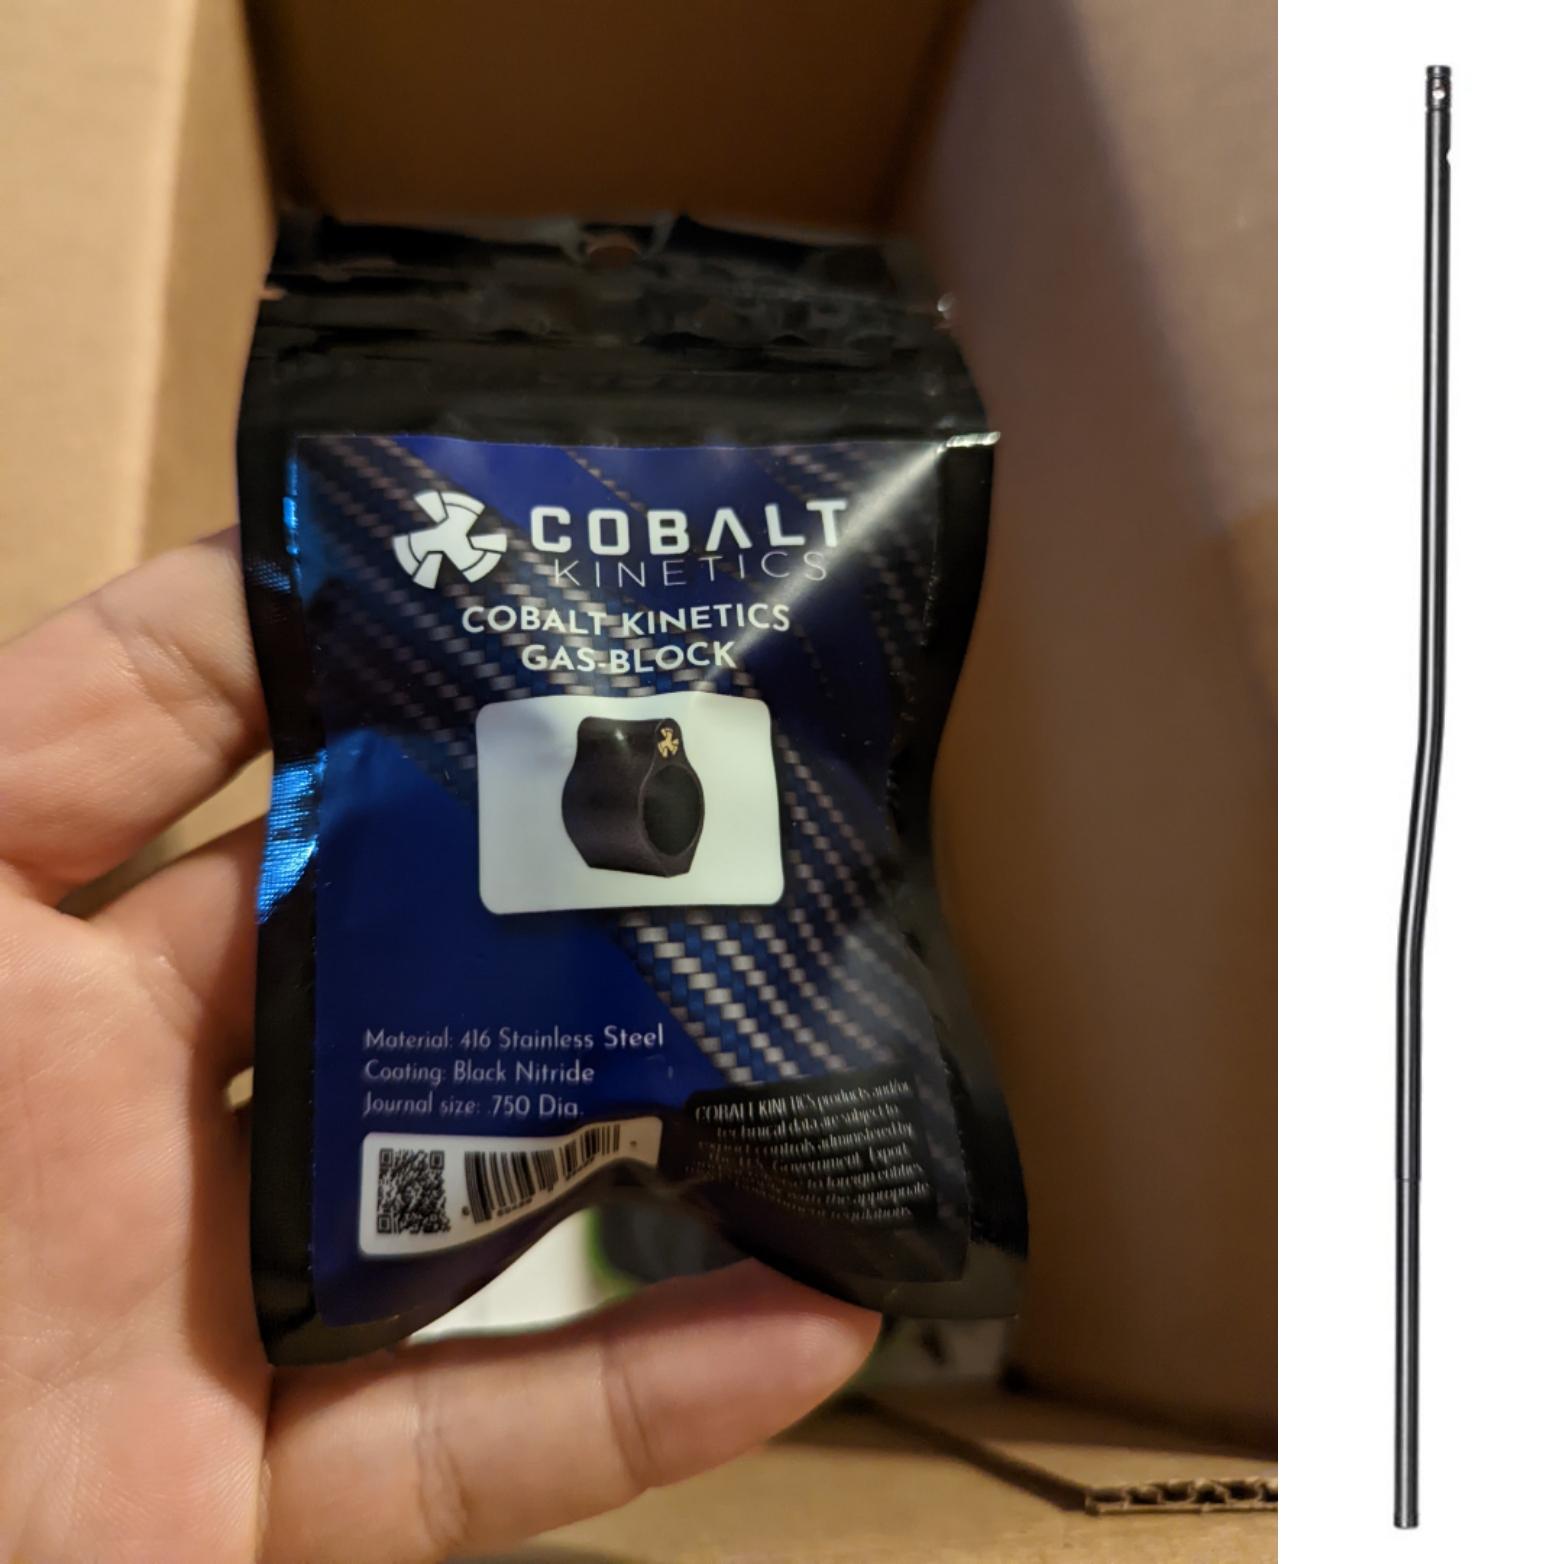
Gas Block/Tube/Tube Roll Pin: This was pretty much a matter of what all did Big Tex Ordnance have in stock that I could grab all at once.
The Cobalt Kinetics Low-Pro Non-Adjustable Gas Block is pretty much every low pro gas block you’ve ever seen in the last 15 years, with the exception of the nitride coating. Having observed their product output and who among my qualified friends and mentors put their names behind it, I’m confident in their craftsmanship to begin with, and it’s a low pro gas block– kinda hard to fuck one of those up, you know?
Same goes for the SOLGW gas tube and roll pin; SOLGW’s product quality speaks for itself with complete rifles and the larger components thereof, so it stands to reason that the same can be expected of their small parts. I threw them in the cart and kept it moving.
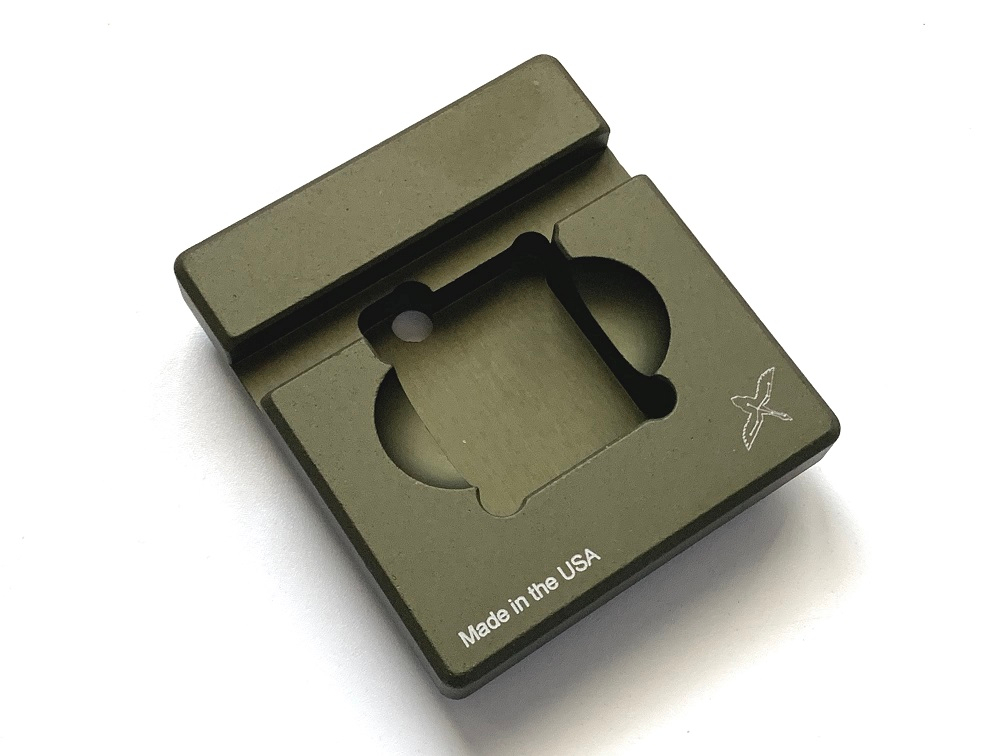
One item not listed that I grabbed along the way was the Forward Controls Design GPT (Gas block Pin Tool); after several years of improvising this step of the assembly process just short of growing extra fingers to hold everything in place, I finally gave up and grabbed this one armorer’s tool I’d been ignoring the whole time, along with a set of roll pin starter punches. All in all, it did make life easier.
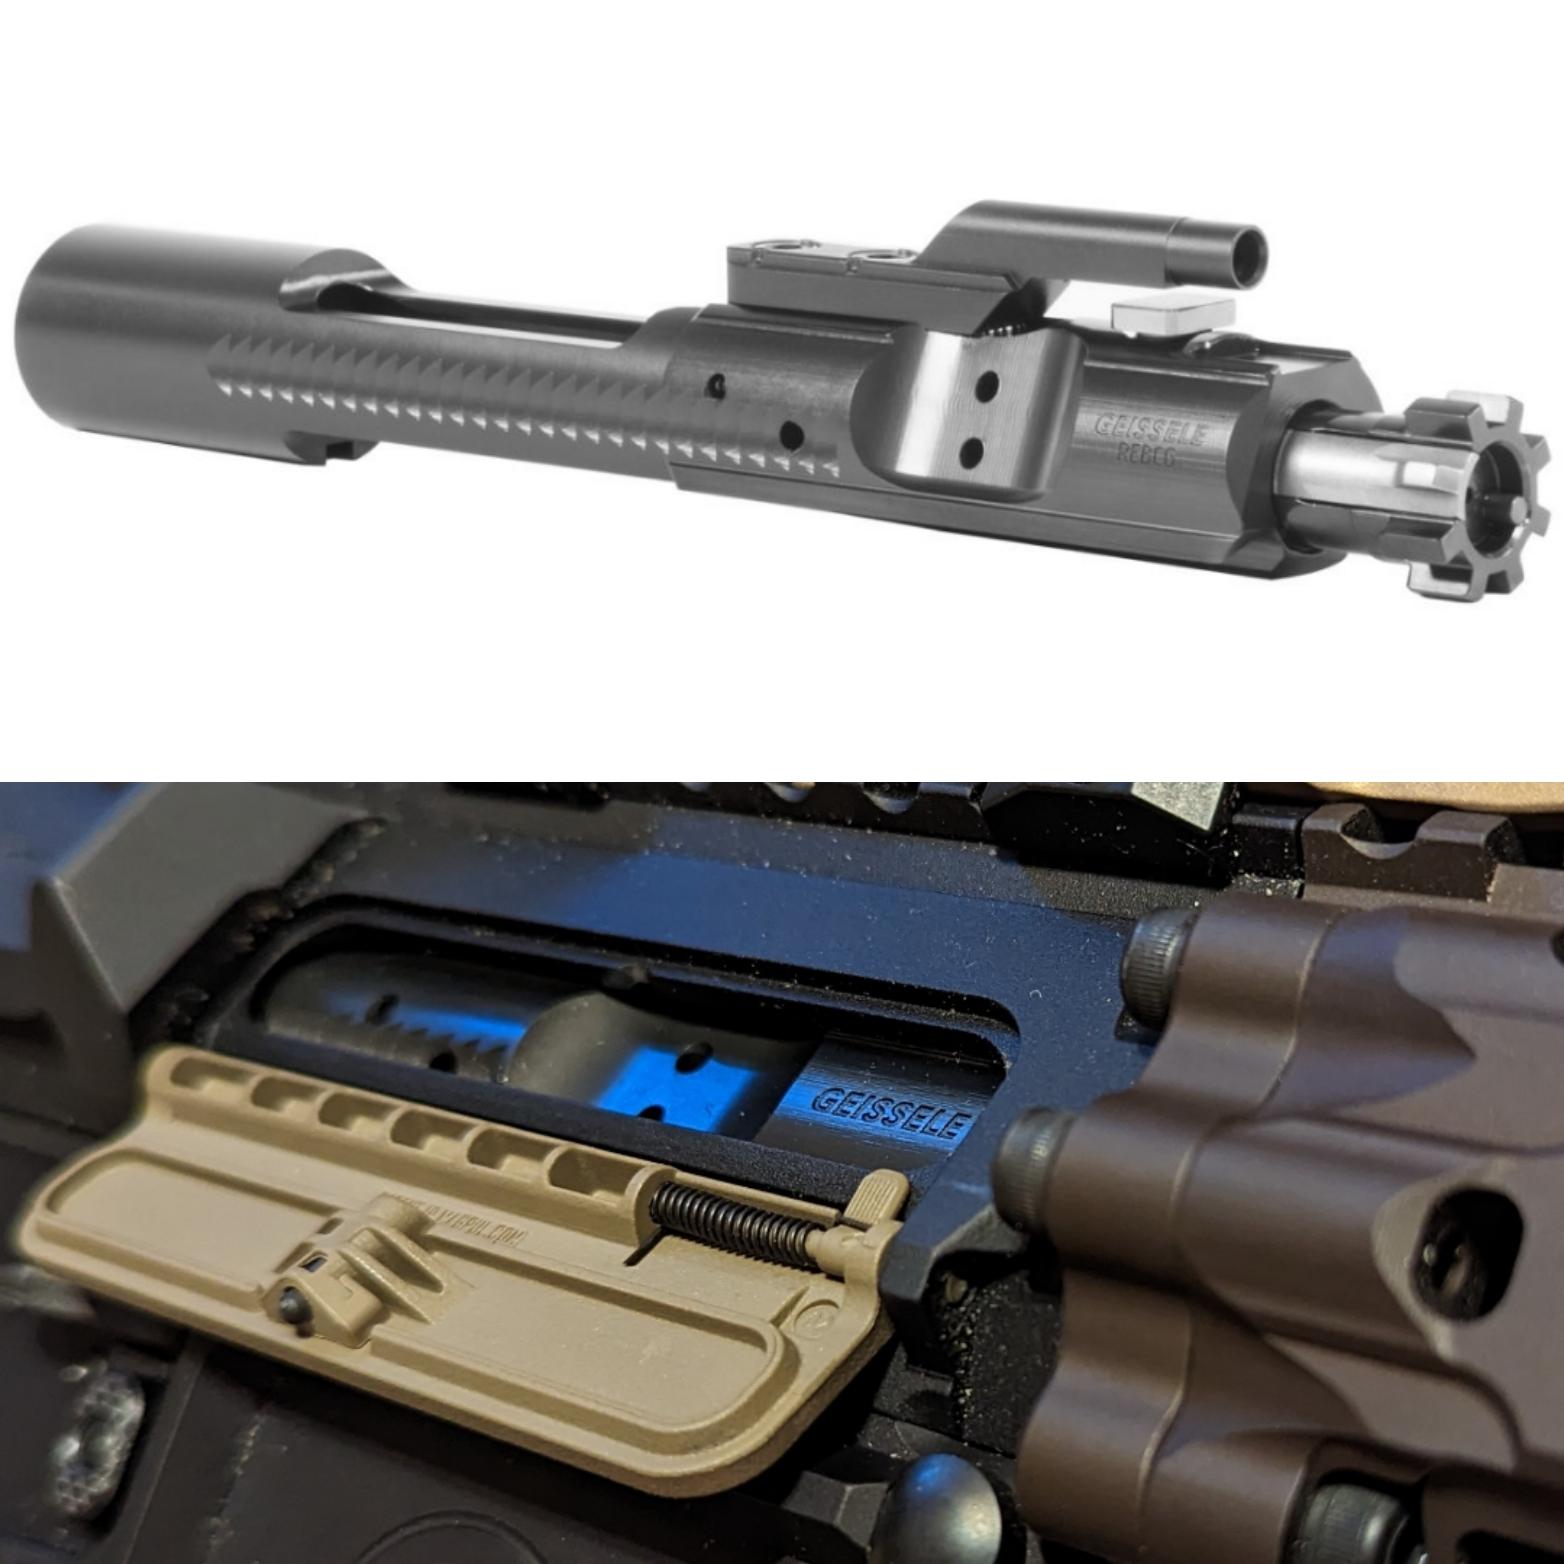
Bolt Carrier Group: Since I was swinging by Geissele to grab some parts for this thing anyway, I figured I’d give their new REBCG (Reliability Enhanced Bolt Carrier Group) a whirl. NAVYMAN8903 is my resident Geissele fanatic friend, and he had a lot of good things to say from his personal findings with the REBCGs in his rifles.
Between that and the whiz-bang description regarding Geissele’s coating and assembly/manufacturing details on their website, it didn’t sound like a bad idea to grab one; I got the impression that it was in the LMT Enhanced BCG or KAC Sandcutter bracket of “greater than mil-spec” options on the market. We’ll see.
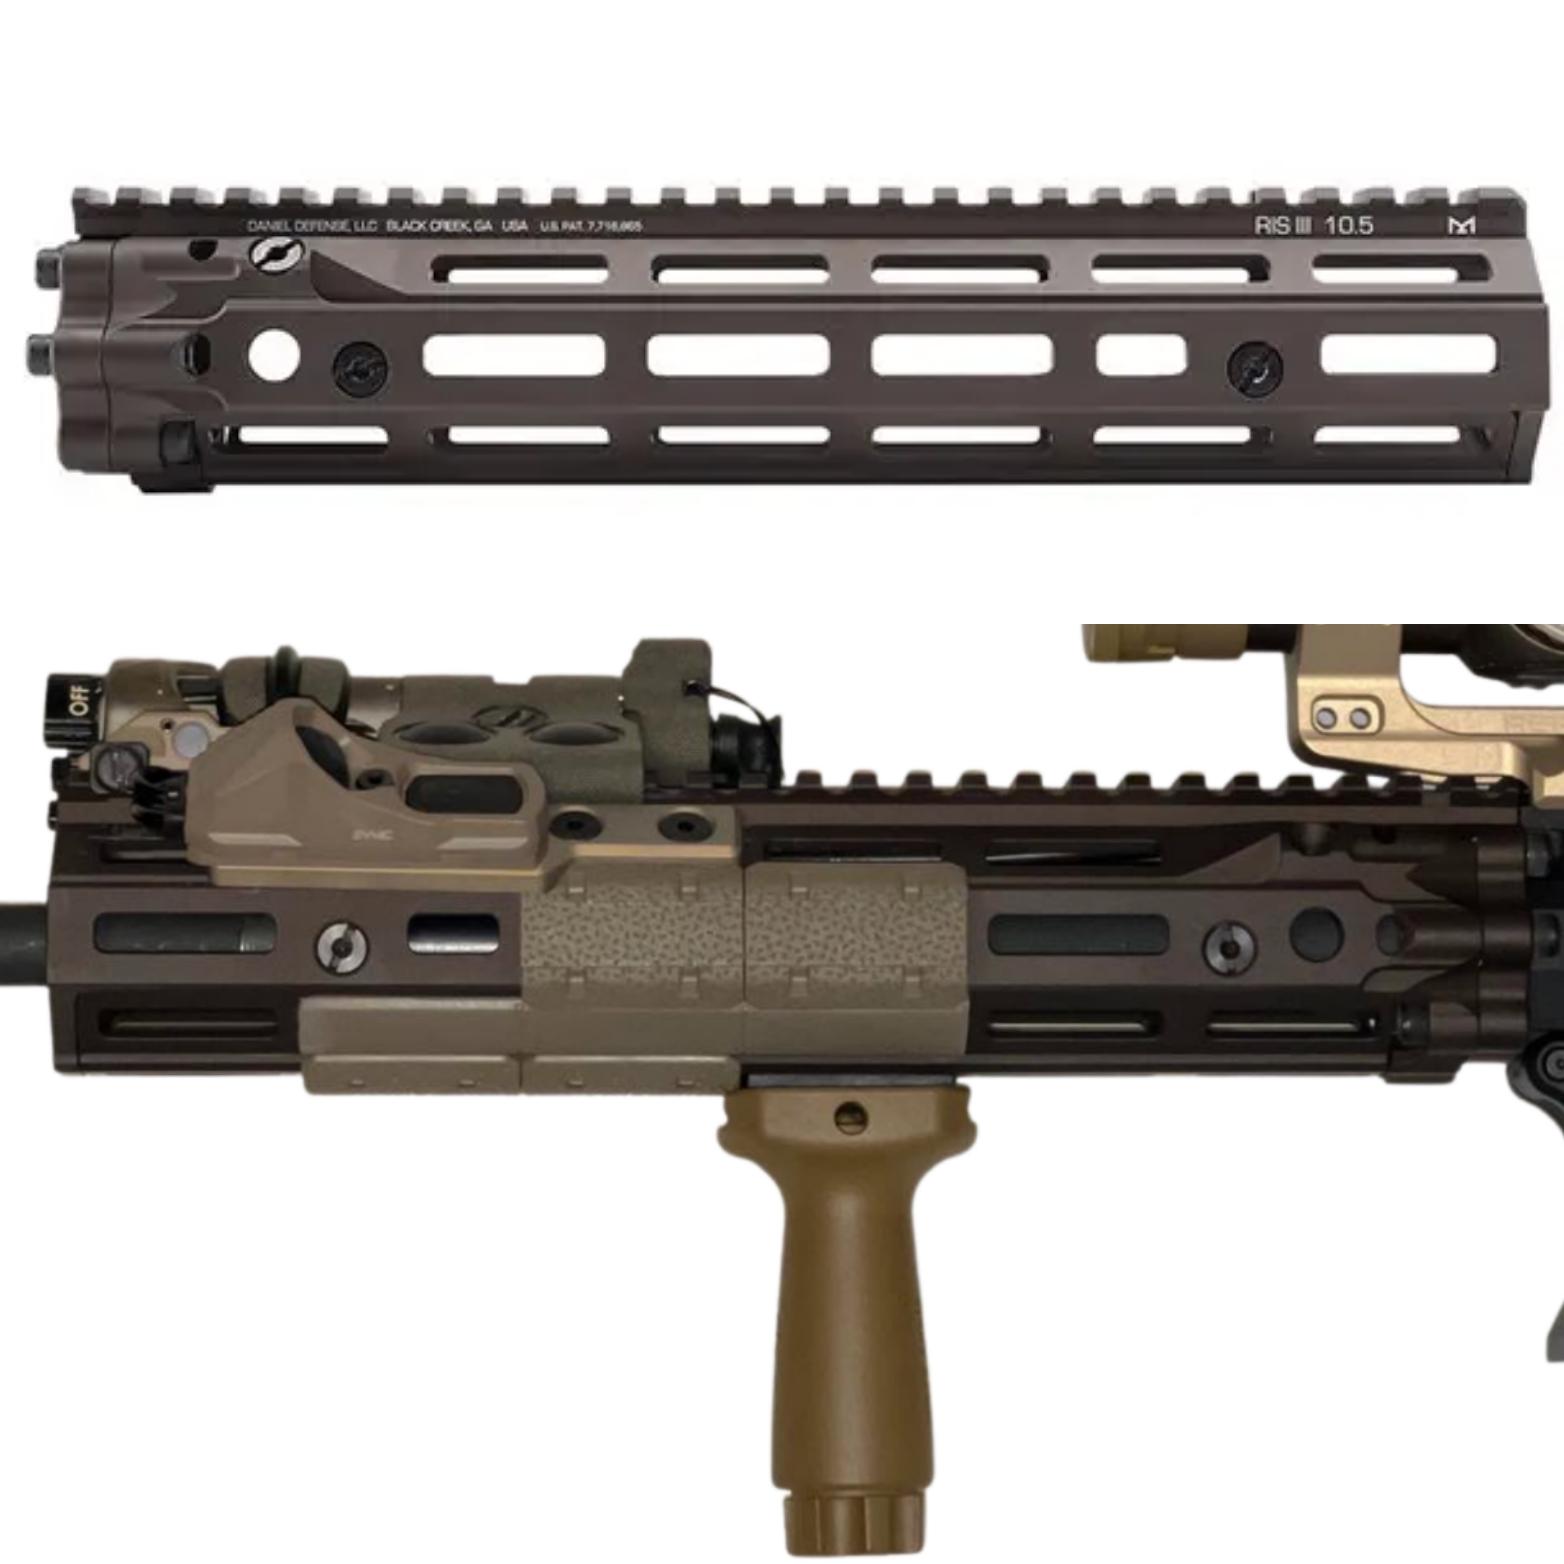
Handguard Rail: This was one of the more important pieces of the puzzle. I’ve never owned a full-pic Daniel Defense RIS II rail that became popular following its selection for the SOPMOD Block II series of M4A1 upgrades, and although I initially hated it at first, the “Block II color scheme” with a brown rail and tan furniture and accessories on black receivers grew on me over time and became one of my favorite “looks” on fighting rifles. However, the closest I got to it personally were the shorter versions of the Geissele HKSMR and MK16 rails for other ARs I have.
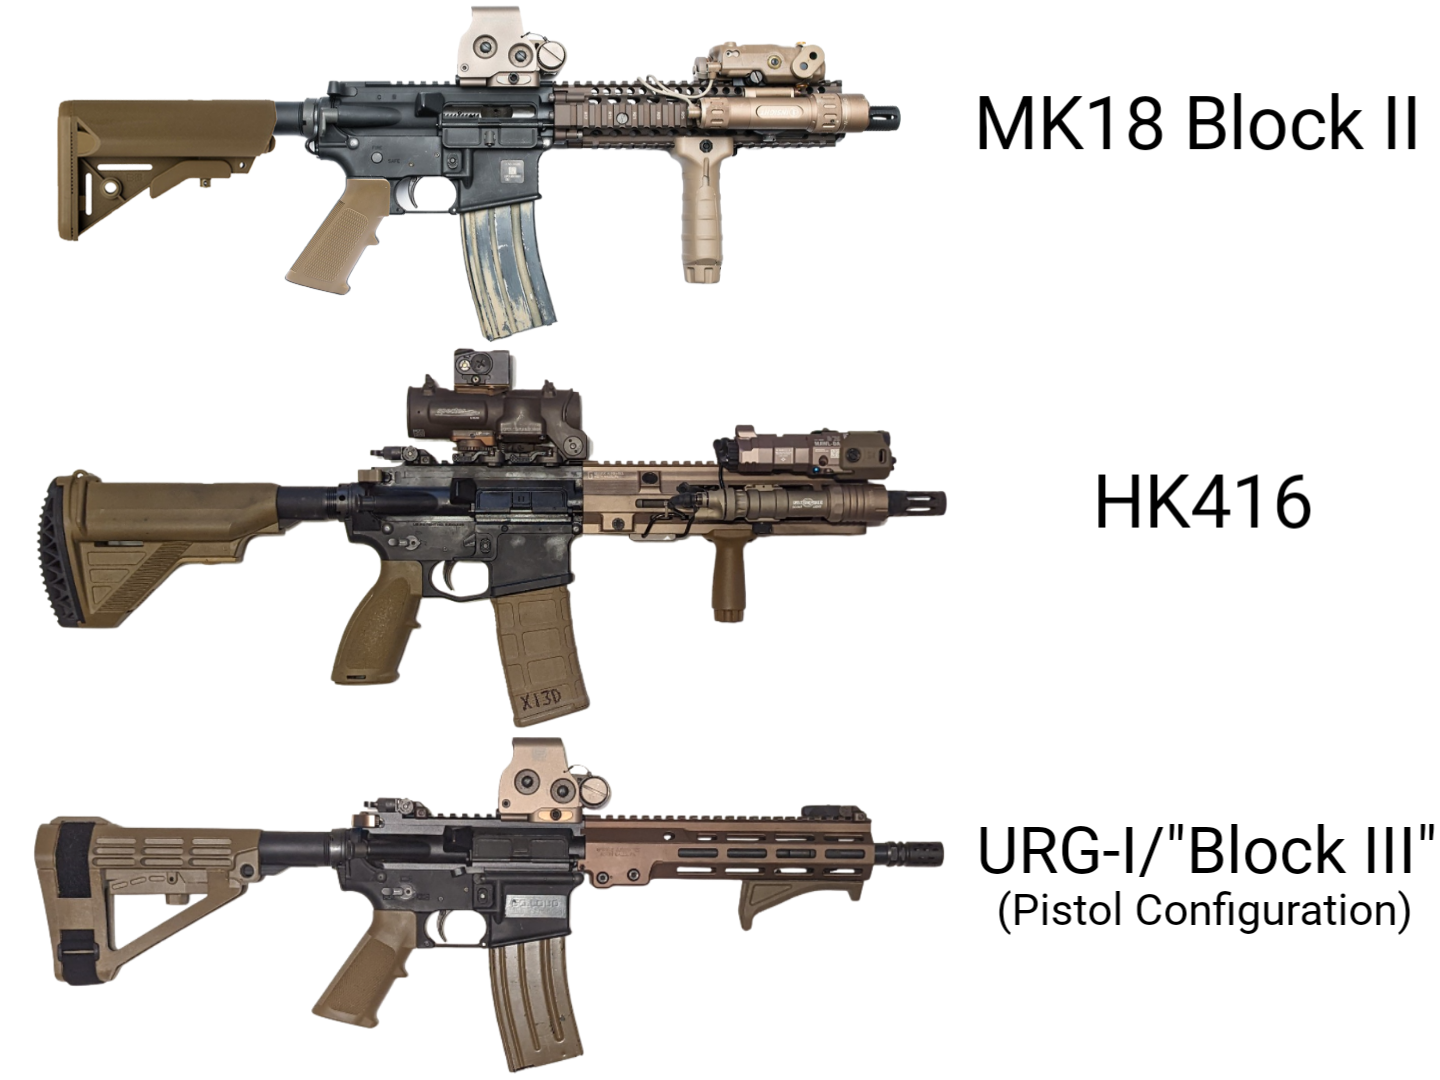
The “Block II look” vs a Block II Rifle
All that being said, in the last decade, one thing about the RIS II that was heard consistently from its end users in both professional and civilian capacities: It was rugged as fuck and extremely flex resistant despite being a two piece rail.
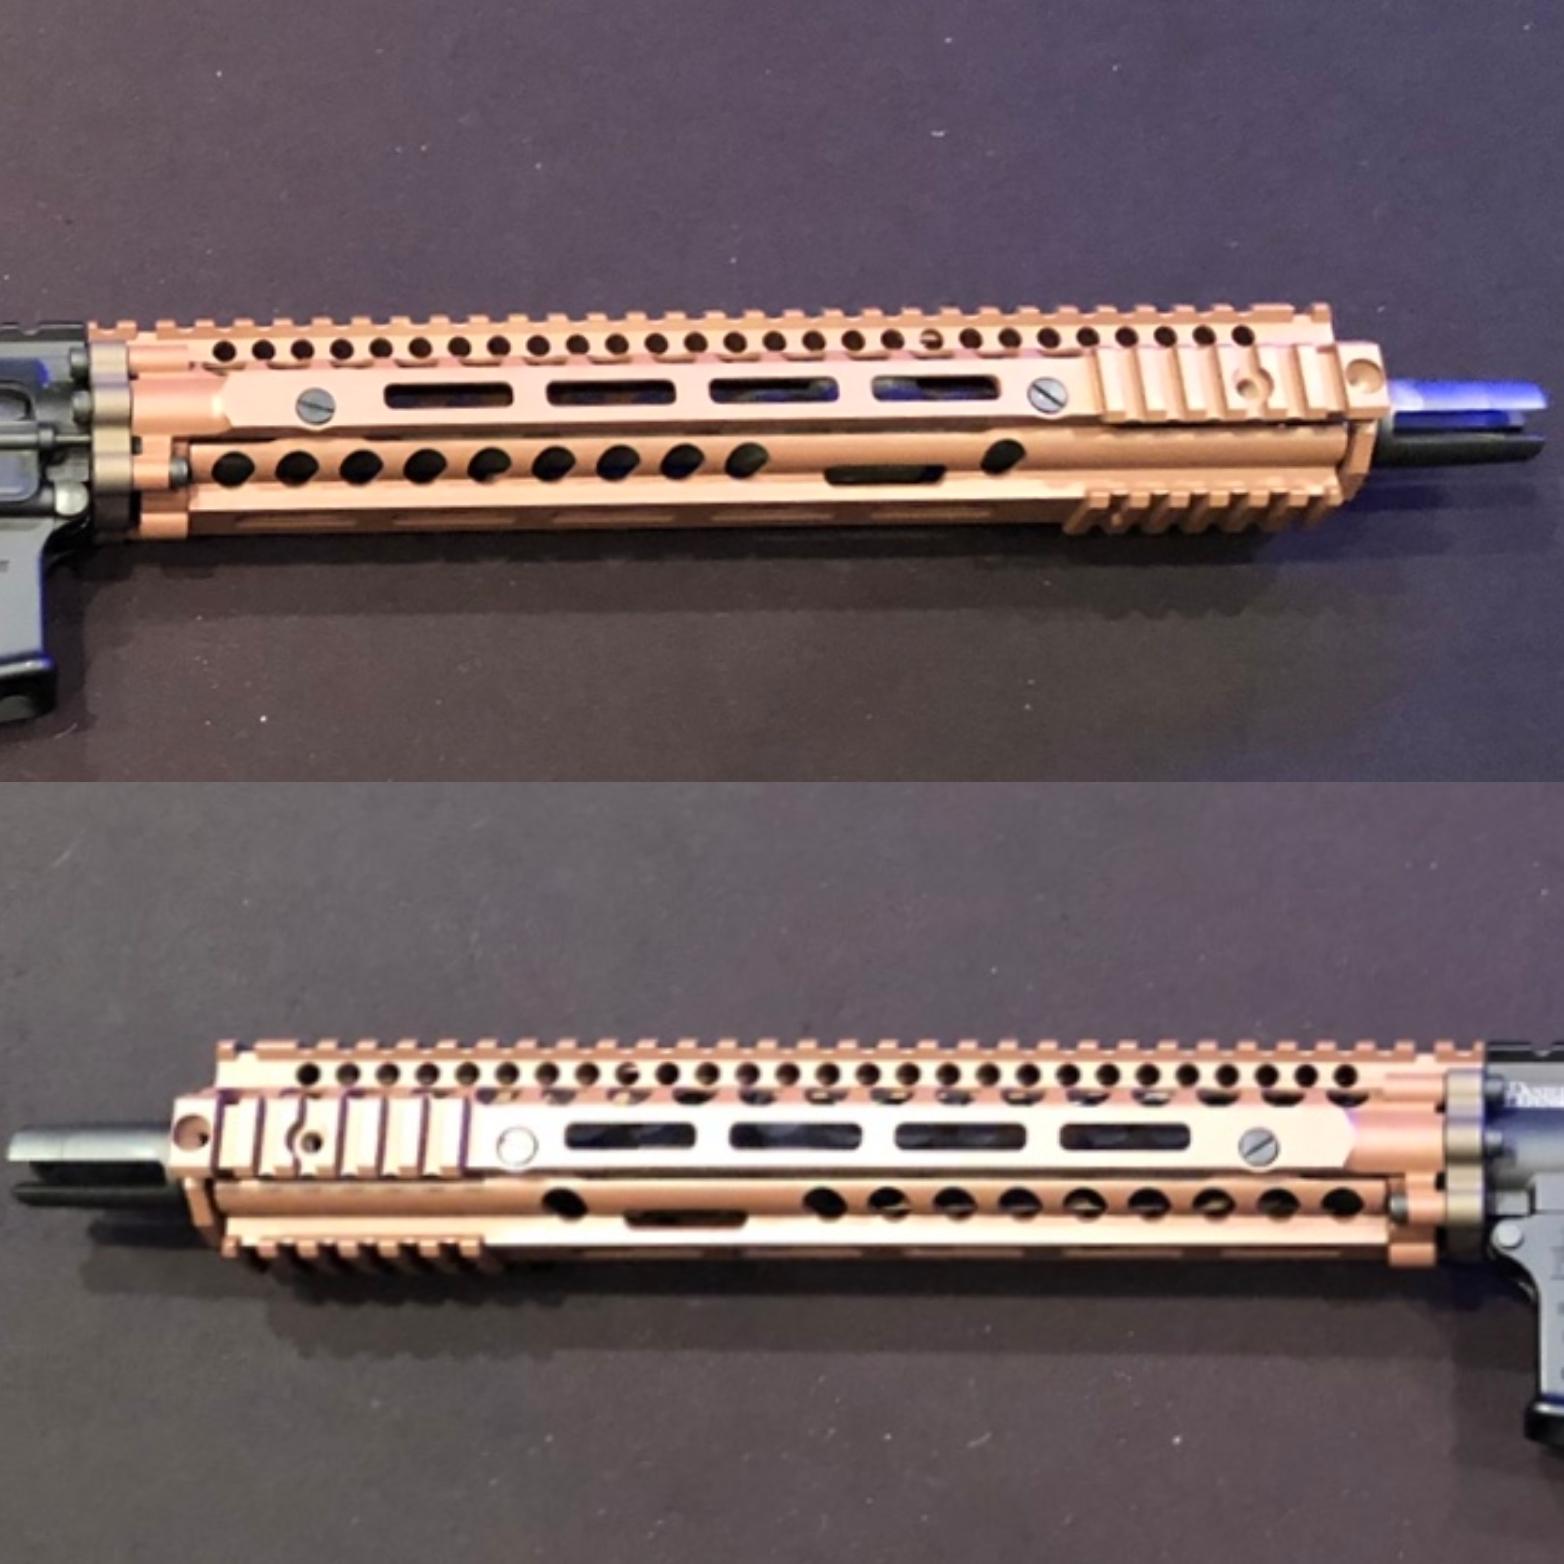
Back in May 2018, the first version of the RIS III was revealed to us by Soldier Systems Daily: A hybrid rail, part picatinny, part M-LOK, but all together unobtanium that Daniel Defense developed as per DOD request. Although Daniel Defense would go on to develop and bring to market other varieties of M-LOK rails, it would be years until any such upgrades to the RIS rail was heard of again; at SHOT 2022, the RIS III returned, this time ready for commercial release.
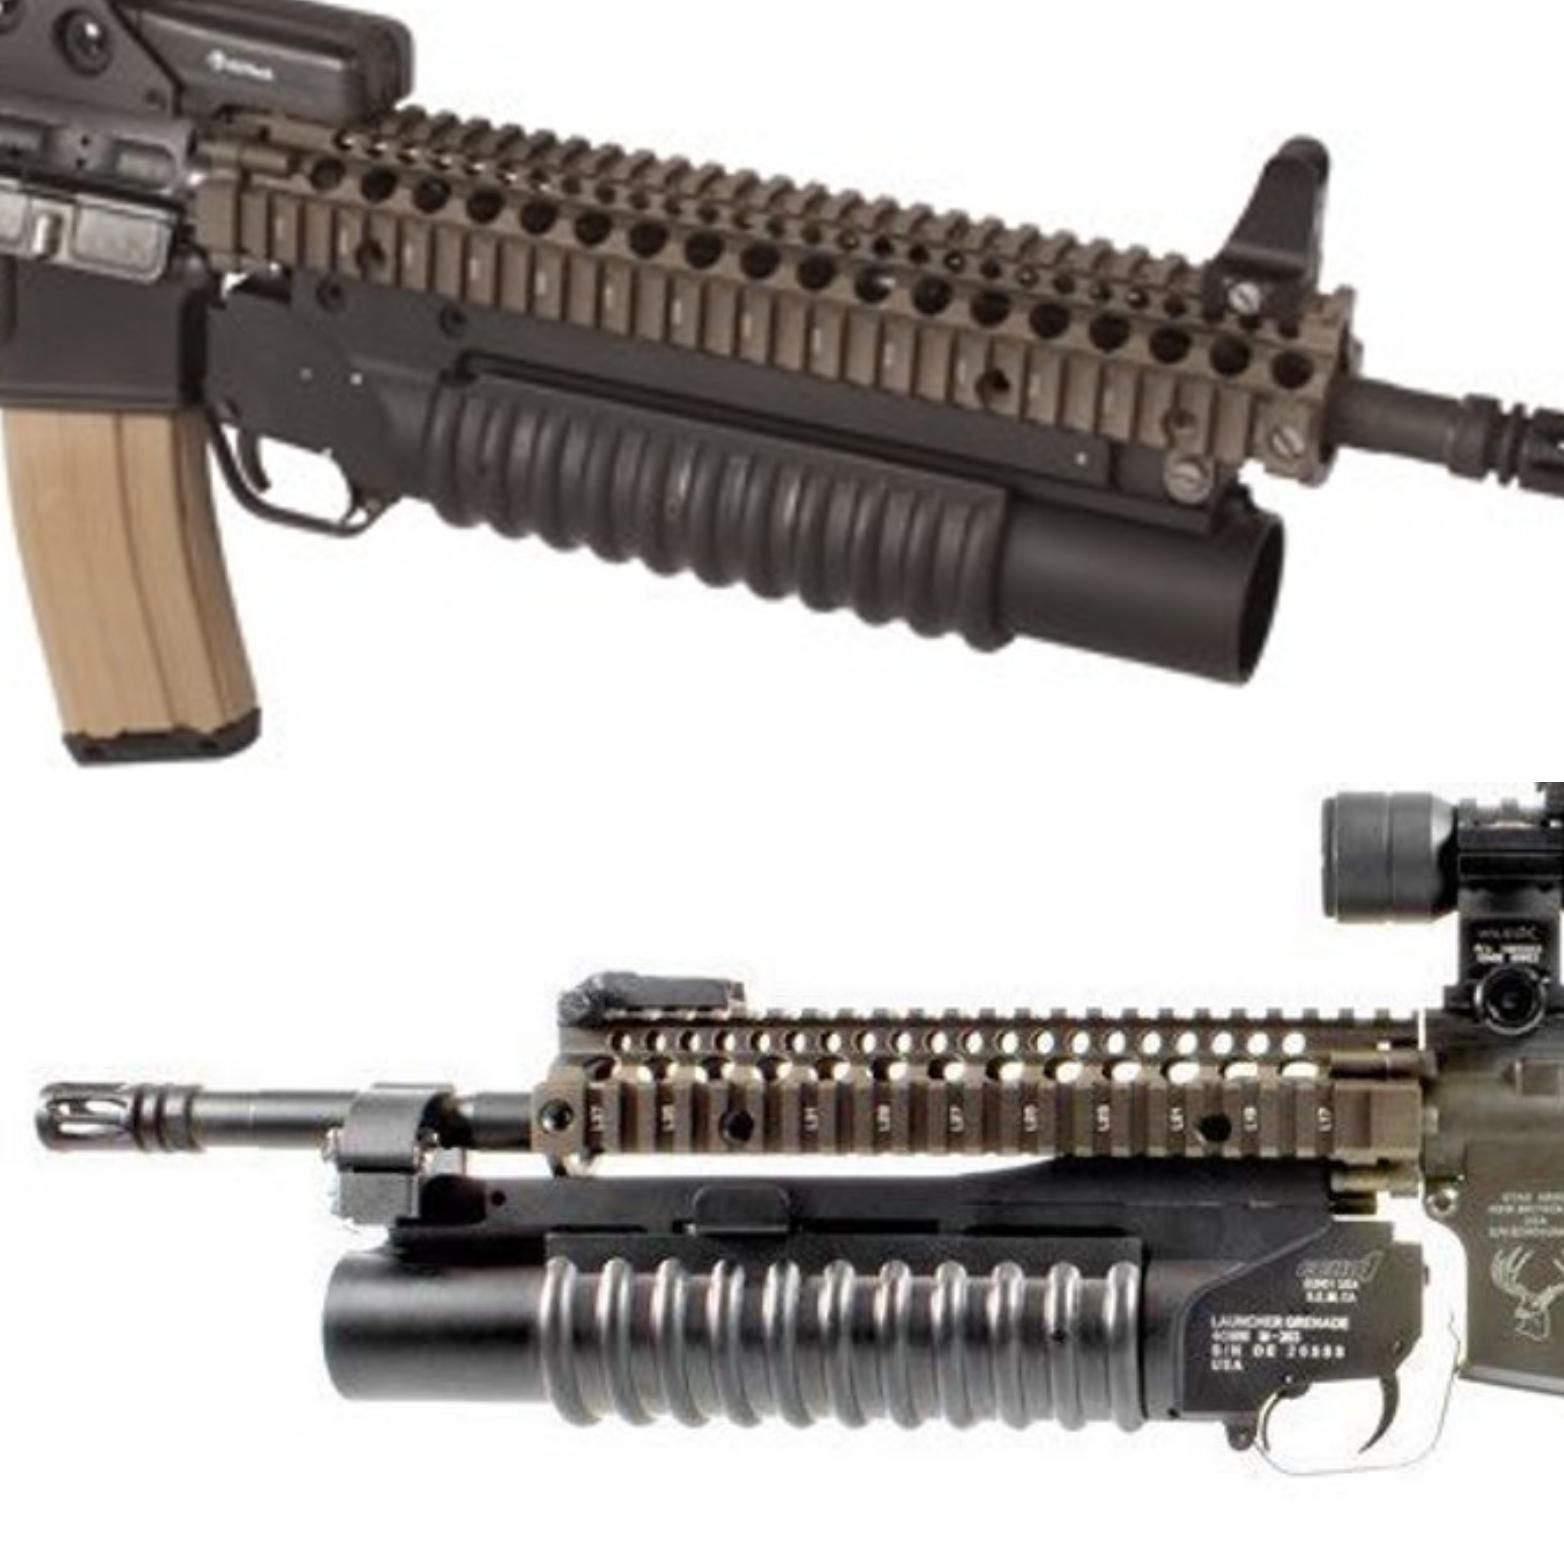
Although fully M-LOK along its seven sided length with the monolithic picatinny top rail, it’s still a two part rail to accommodate the use of underslung grenade launchers, and utilizes the very same attachment pattern as the RIS II that came before it. This was significant for two reasons:
1.) Anyone with a RIS II equipped rifle that wanted to upgrade to M-LOK could do so without removing the barrel nut; all they have to do is remove the six bolts from the barrel nut ring, slide the RIS II rail off the barrel assembly, slide the RIS III on, reattach the six bolts, and that’s it. Reattach enablers, check zero, and move on.
2.) The RIS III rail using the same attachment method as the RIS II meant that it would also have the same renown and reliable rigidity and flex resistance as the RIS II. Being a common point of concern of negative space rails like M-LOK compared to full length albeit heavier picatinny rails like the RIS II, this comes as a huge plus.
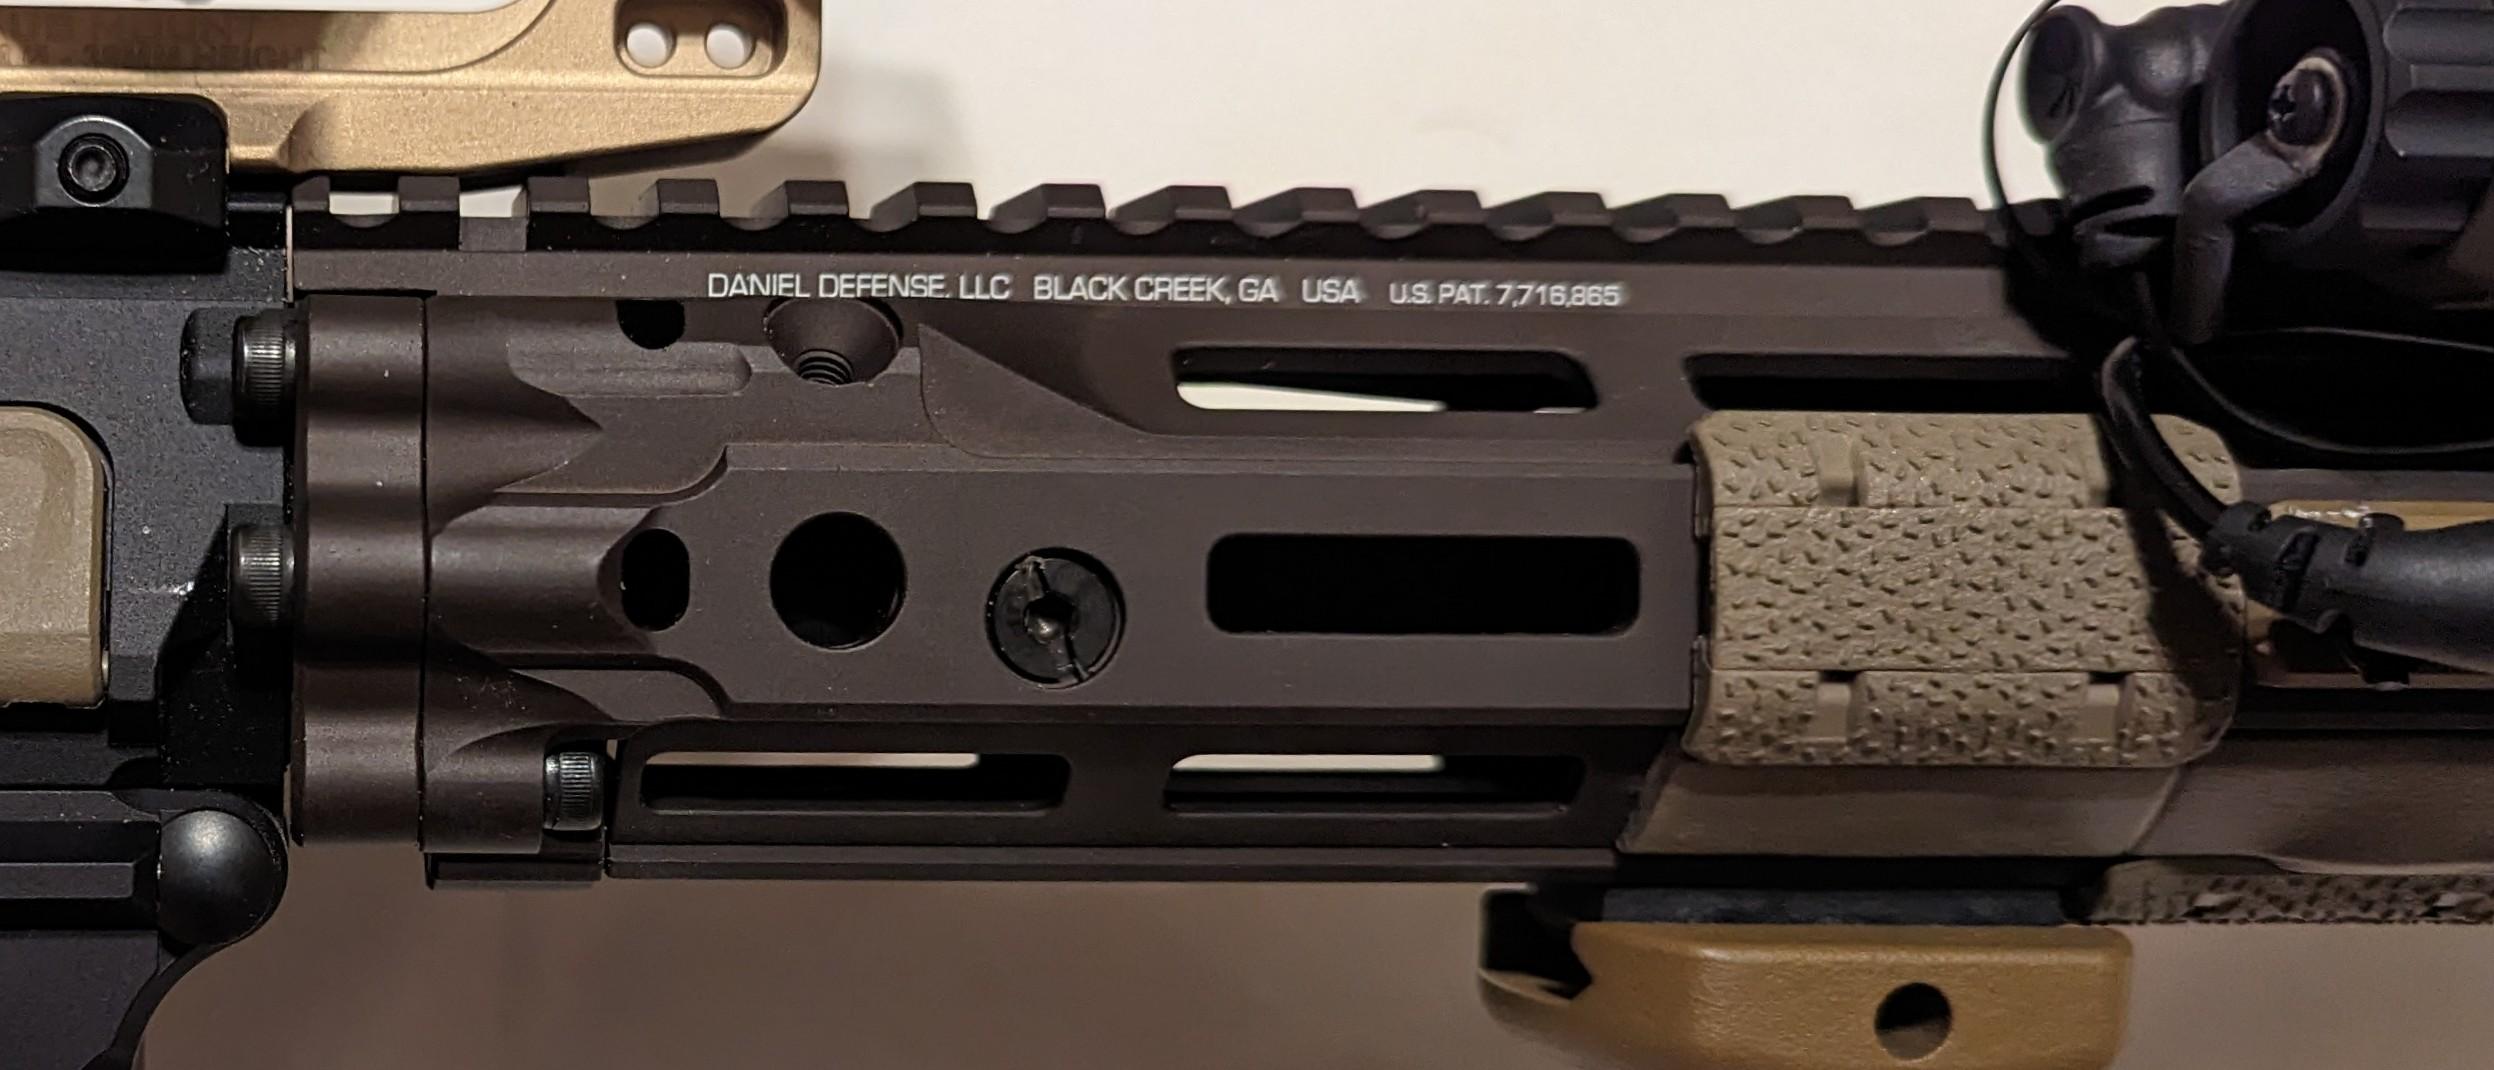
Aside from all those positive attributes, it was also an opportunity not just to get something new/different (compared to other M-LOK rails I use like the aforementioned Geissele models and KAC URX4s I have), but to get an actual Daniel Defense FDE (emphasis on DARK) brown colored rail, to get that same classic Block II look when combined with tan furniture and attachments, albeit in a modern form factor.
I went with the 10.5″ length over the 9.5″ and 12.5″ rail lengths because with the 12.5″ Hodge barrel it made for the same barrel to rail length ratio as the Block II M4A1 with it’s ~2″ offset (14.5″ barrel/12.25″ rail vs 12.5″ barrel/10.5″ rail), further playing into the GPR-K idea; it’s just a smaller M4A1-like rifle without getting small enough to cross into the MK18’s CQR form factor and dimensions.
In a roundabout way, the GPR-K is like a “Block III” version of the Block II M4A1 GL/SSC (Grenade Launcher, Sound Suppressor Capable) upper that featured a unicorn/unobtanium 11.79″ length of the Daniel Defense RIS II rail, by virtue of their shared 12.5″ barrel length (which informed the low end barrel length parameter of the GPR configuration) and the upgraded M-LOK version of the DD RIS rail.
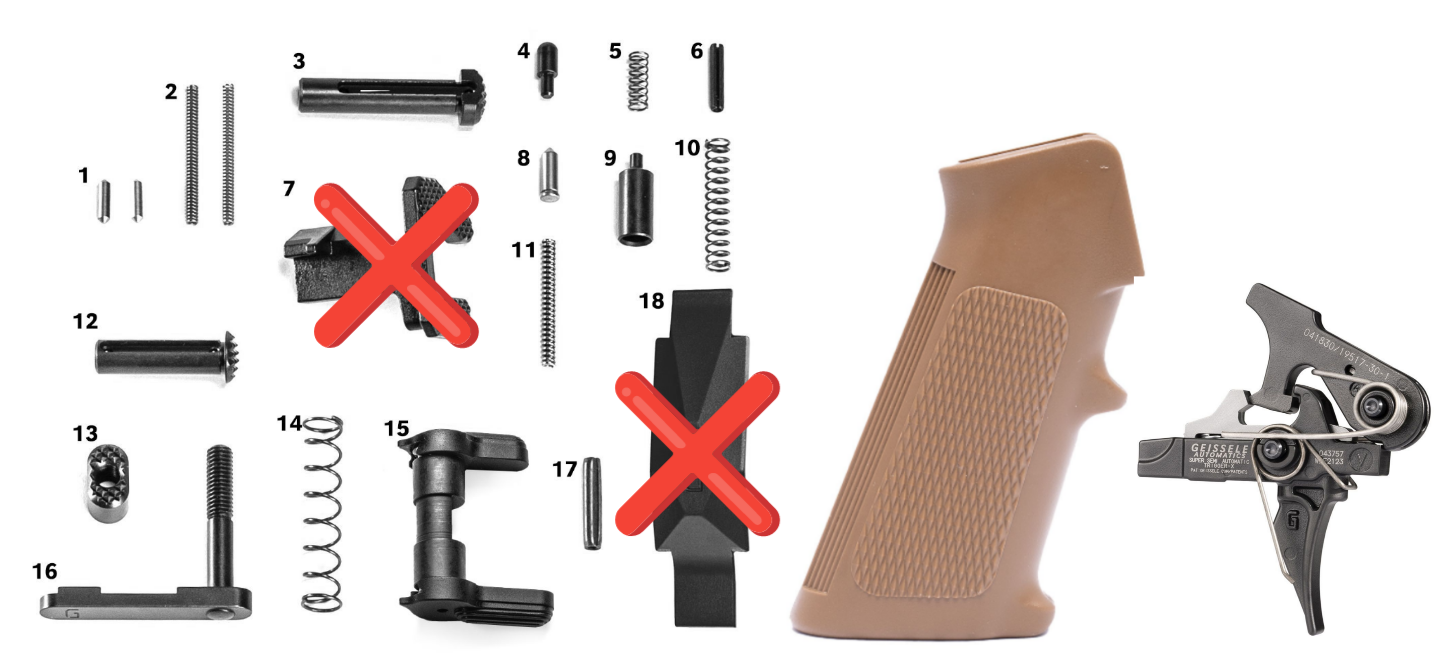
LPK Assembly: One of the main reasons I went to Geissele was for lower receiver components, so I ended up getting… practically all of them while I was there.
I grabbed a Coyote A2 grip for two reasons; for one I liked the Coyote polymer color Geissele came up with and knew it would jive with the Block II aesthetic I was going with, and two, I’ve always been comfortable with A2 grips. Some like to gripe about ‘em, ergonomically speaking I’ve never had a problem with them, the grip angle is almost ubiquitous among aftermarket grips, and they’re pretty straightforward in that regard. The finger shelf never got in the way of my grip either. Plus there’s a cool “gov issue” vibe about them that stuck with me ever since they were a standard item on the KAC SR-25s.
The Super Duty LPK was also pretty much a thoughtless acquisition along the same lines as the Gas Block assembly; There’s springs and pins and detents and shit that need to go in the lower that weren’t included in the box from SilencerCo, might as well grab them from a reputable known quantity along the way. I didn’t need the trigger guard since it’s integrated on the SCO-15 lower, but all the other stuff (minus the Maritime Bolt Catch for obvious reasons) was needed, and I also checked the box for an ambidextrous safety while I was at it.
My takedown pins don’t have the knurling on them like you can see in the Super Duty LPK photos, so I’m not sure if these were spares I had laying around or if they just included the more standard variety in the kit for logistical purposes; I don’t care either way, they’re in spec and they do their job.
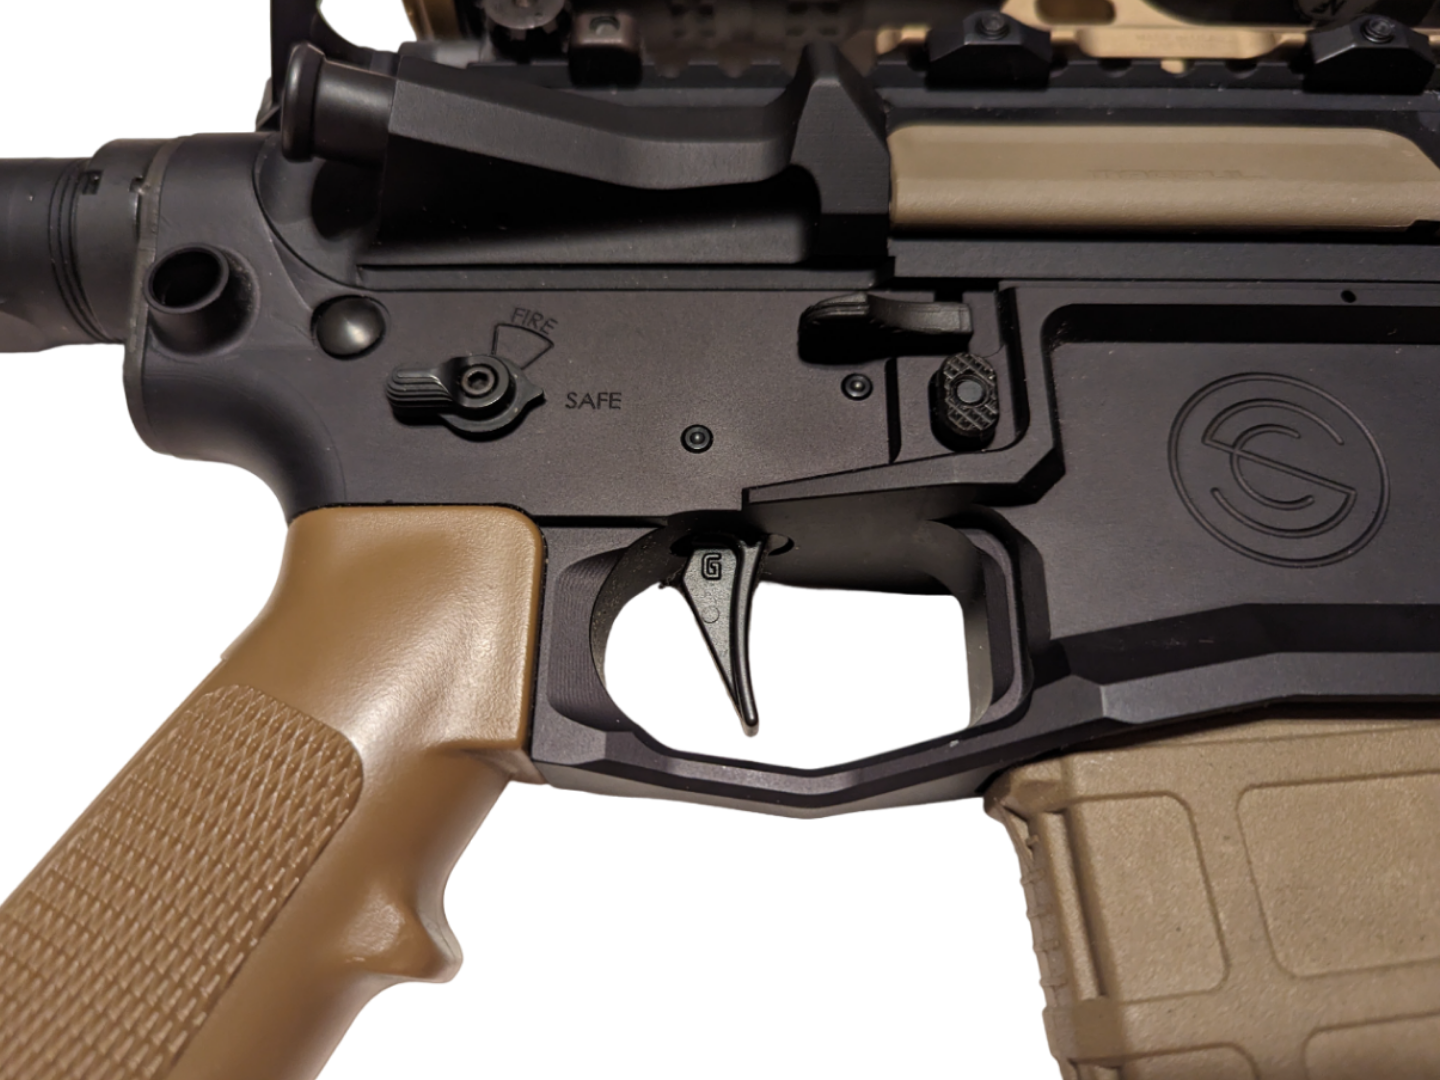
One of the most important aspects of any AR LPK is the trigger. I knew a long time ago I was gonna go with the SSA-X, it was just a matter of waiting for them to become available as a standalone item. When I first got to play with one (I think it was at SHOT 2022?) at the Geissele booth, I was told they would at first only be available in their in-house line of Super Duty rifles.
I knew that wouldn’t stay that way forever, so I was content to wait until I could eventually upgrade my entire fleet; I was immediately impressed with the ergonomic feel of the Lightning Bow trigger combined with the 2-stage take up and break we’ve come to expect from Geissele triggers over the last decade or so. This was the first item that got added to my cart when I hit the Geissele site.
I went with the SSA-X over the SSA-E X because I find the latter of the two more appropriate for precision-oriented configurations like an SPR, DMR, SASS, or CSASS setup, where the SSA has always been my go to general purpose trigger. The SSA-X is the same, but better. Going forward, I will be purchasing the SSA-X instead of the SSA.
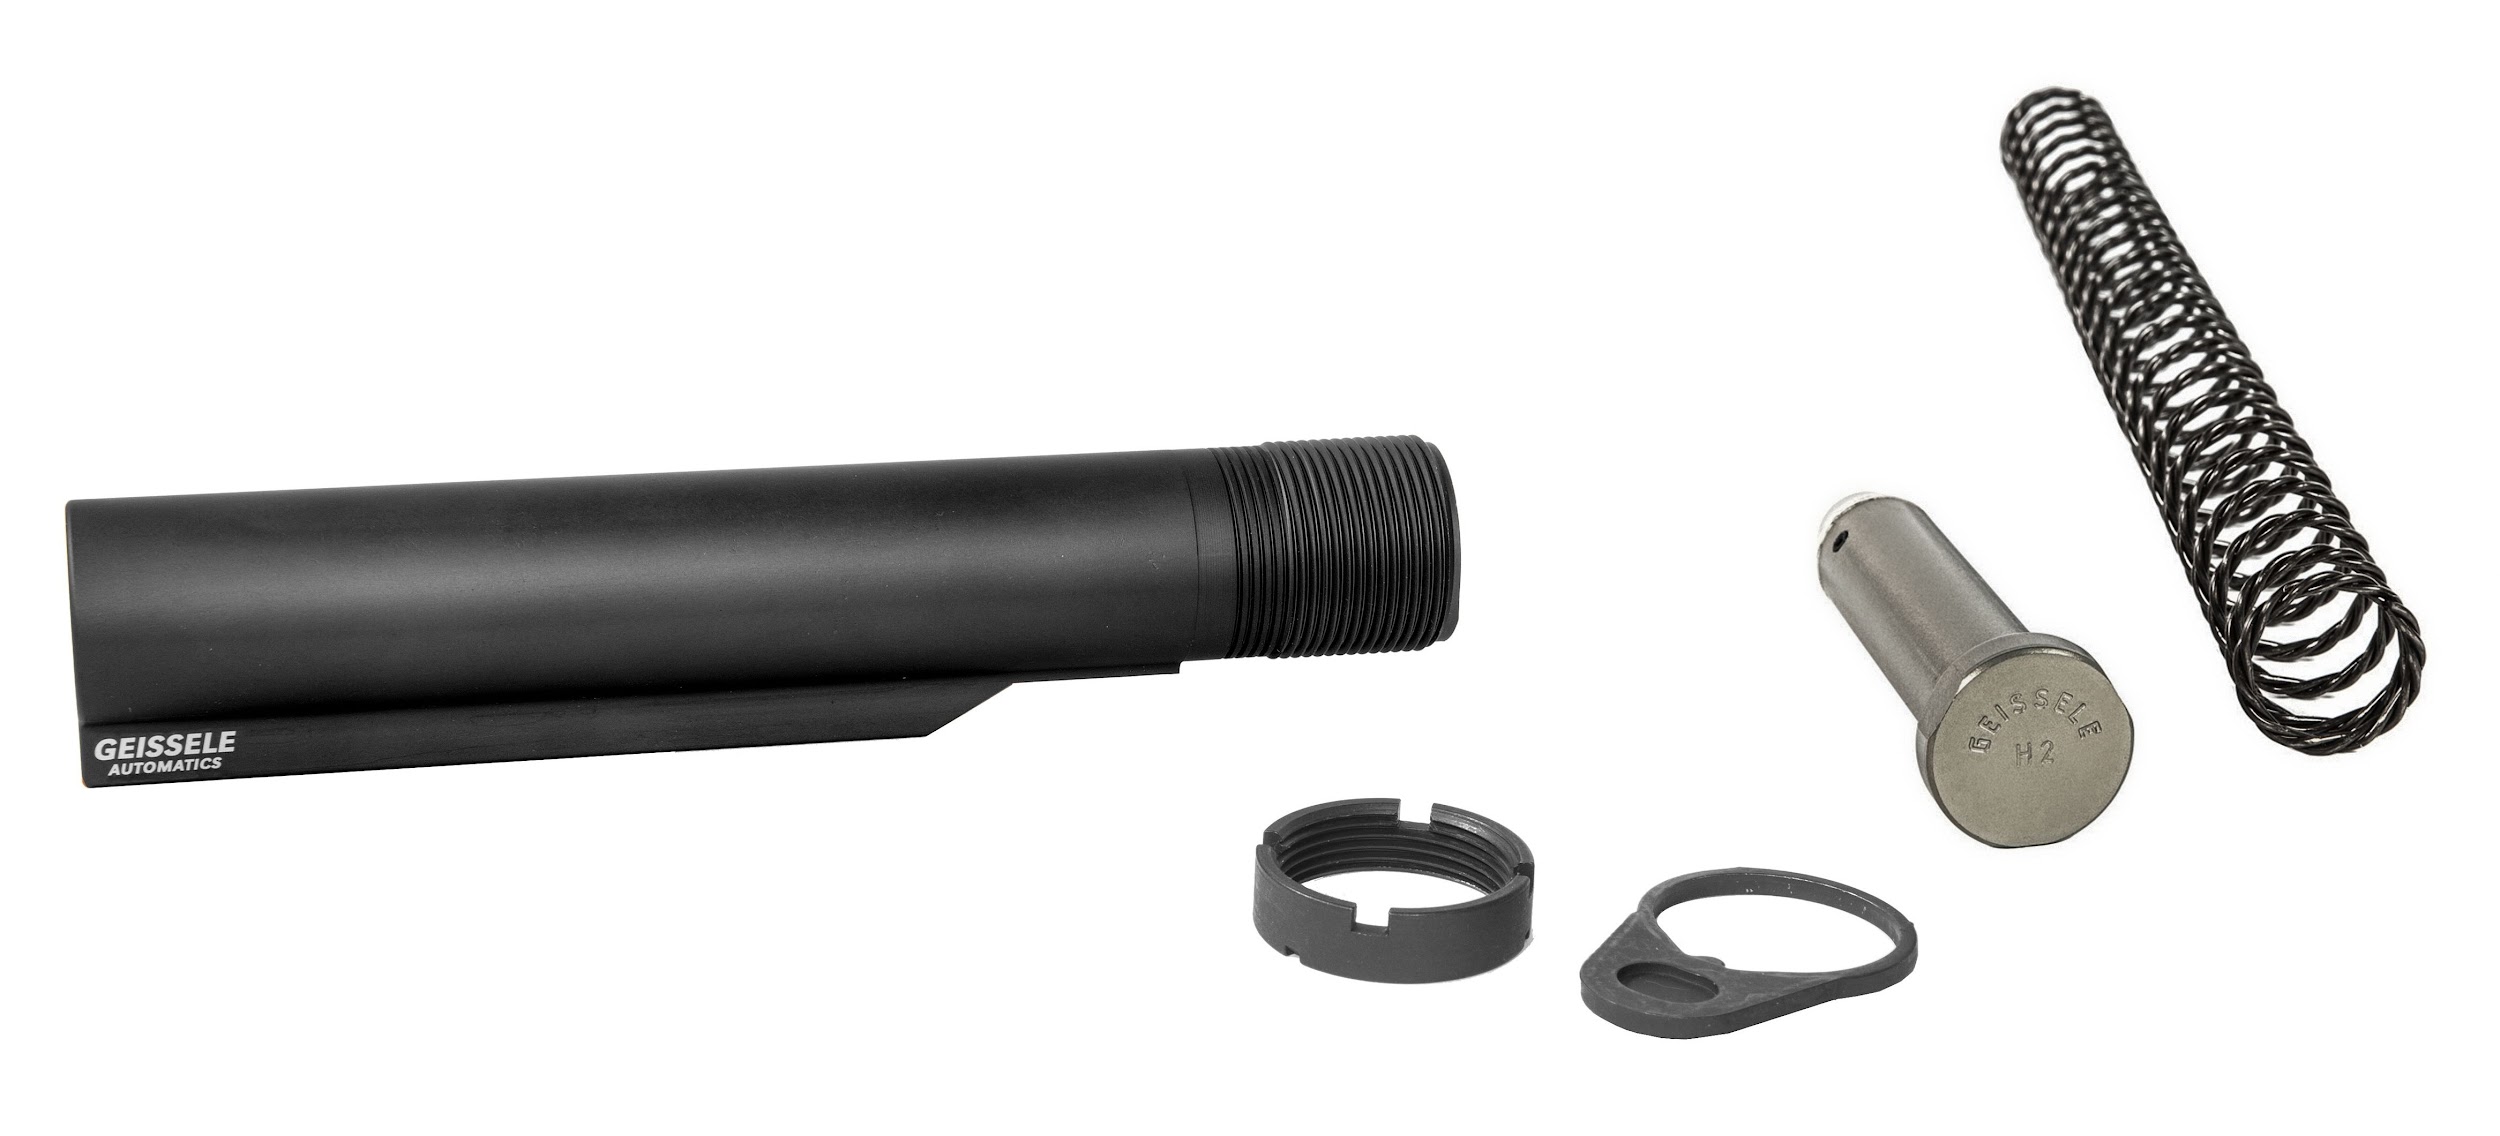
The “Buffer Assembly” as I like to call it, which encompasses the receiver extension tube, and the buffer and buffer spring that go inside of it, was another thoughtless add to the cart while I was there; I needed them anyway. I chose the H2 buffer because that’s what’s in most of my other rifles that are shot both suppressed and unsuppressed and they just work; I’m admittedly not so versed in the buffer weight and spring tweaking and tuning some are obsessive about, so I just stuck to what I know there and assumed the braided Super 42 spring would work along with it just as well, having never heard anything bad about it.
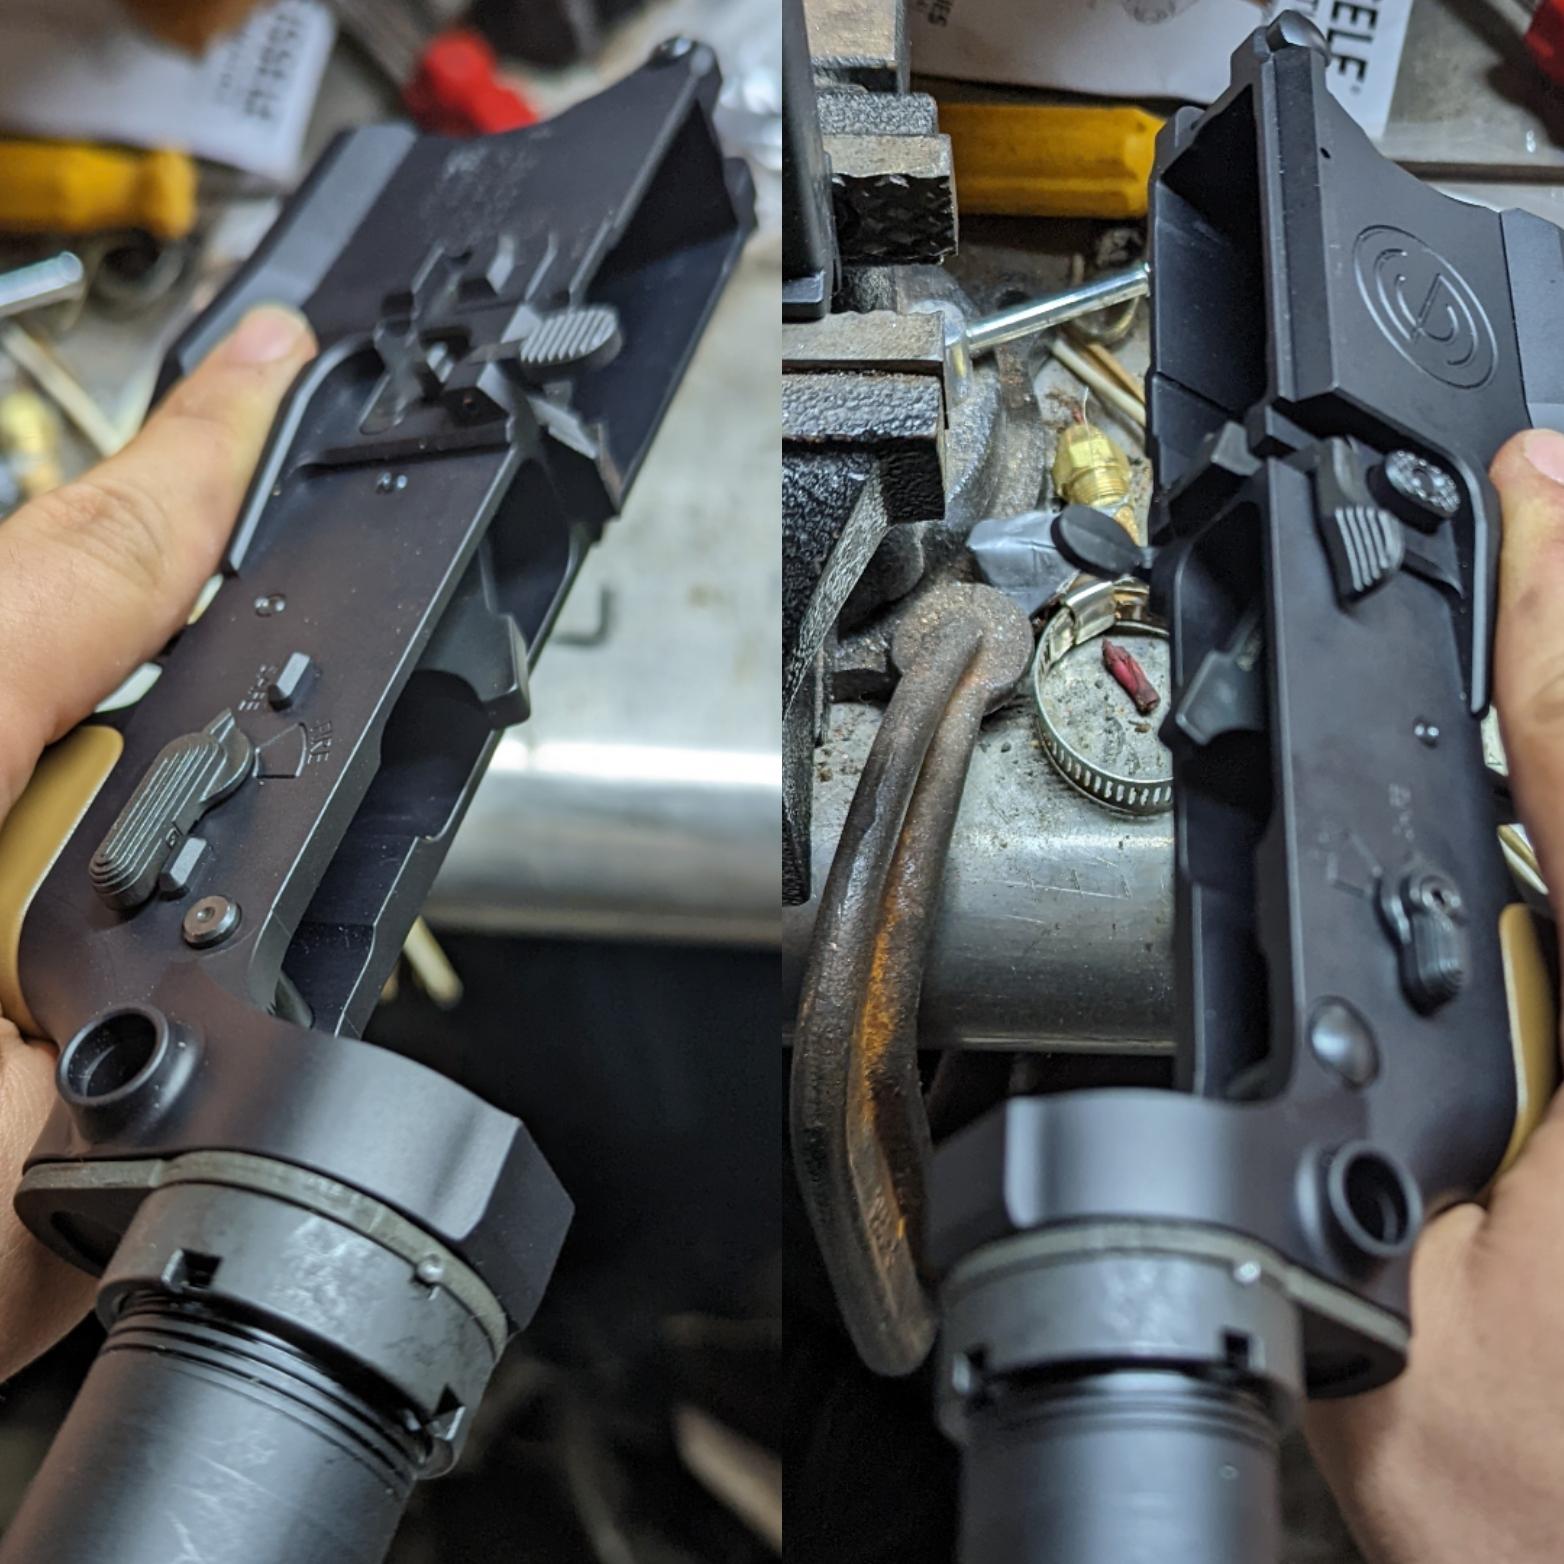
The reason I didn’t go with an QD end plate (like the Magpul ASAP-QD I typically use) is because the SCO-15 lower has integrated QD sockets at the rear of the receiver under where the receiver extension tube threads are, not unlike the older KAC SR-15 E3 IWS lowers back in the day. The generic End Plate & Castle Nut came with the buffer assembly; the castle nut is staked twice.
I’m sure some are wondering why I didn’t go with the A5 setup that’s popular in the market since I was putting a bunch of advanced beyond mil-spec components together anyway. Honestly, back when they first hit market, the A5 components were always impossible to find in stock anywhere cause of how fast they sold out, so I missed that hype train as it left the station all together. Eventually I decided it was better to not replace a standardized component for a proprietary one where the perceived benefit was overall minimal at best (to me at least), so again I stuck with what I knew and grabbed the tried and true mil-spec components you can find replacements for anywhere.
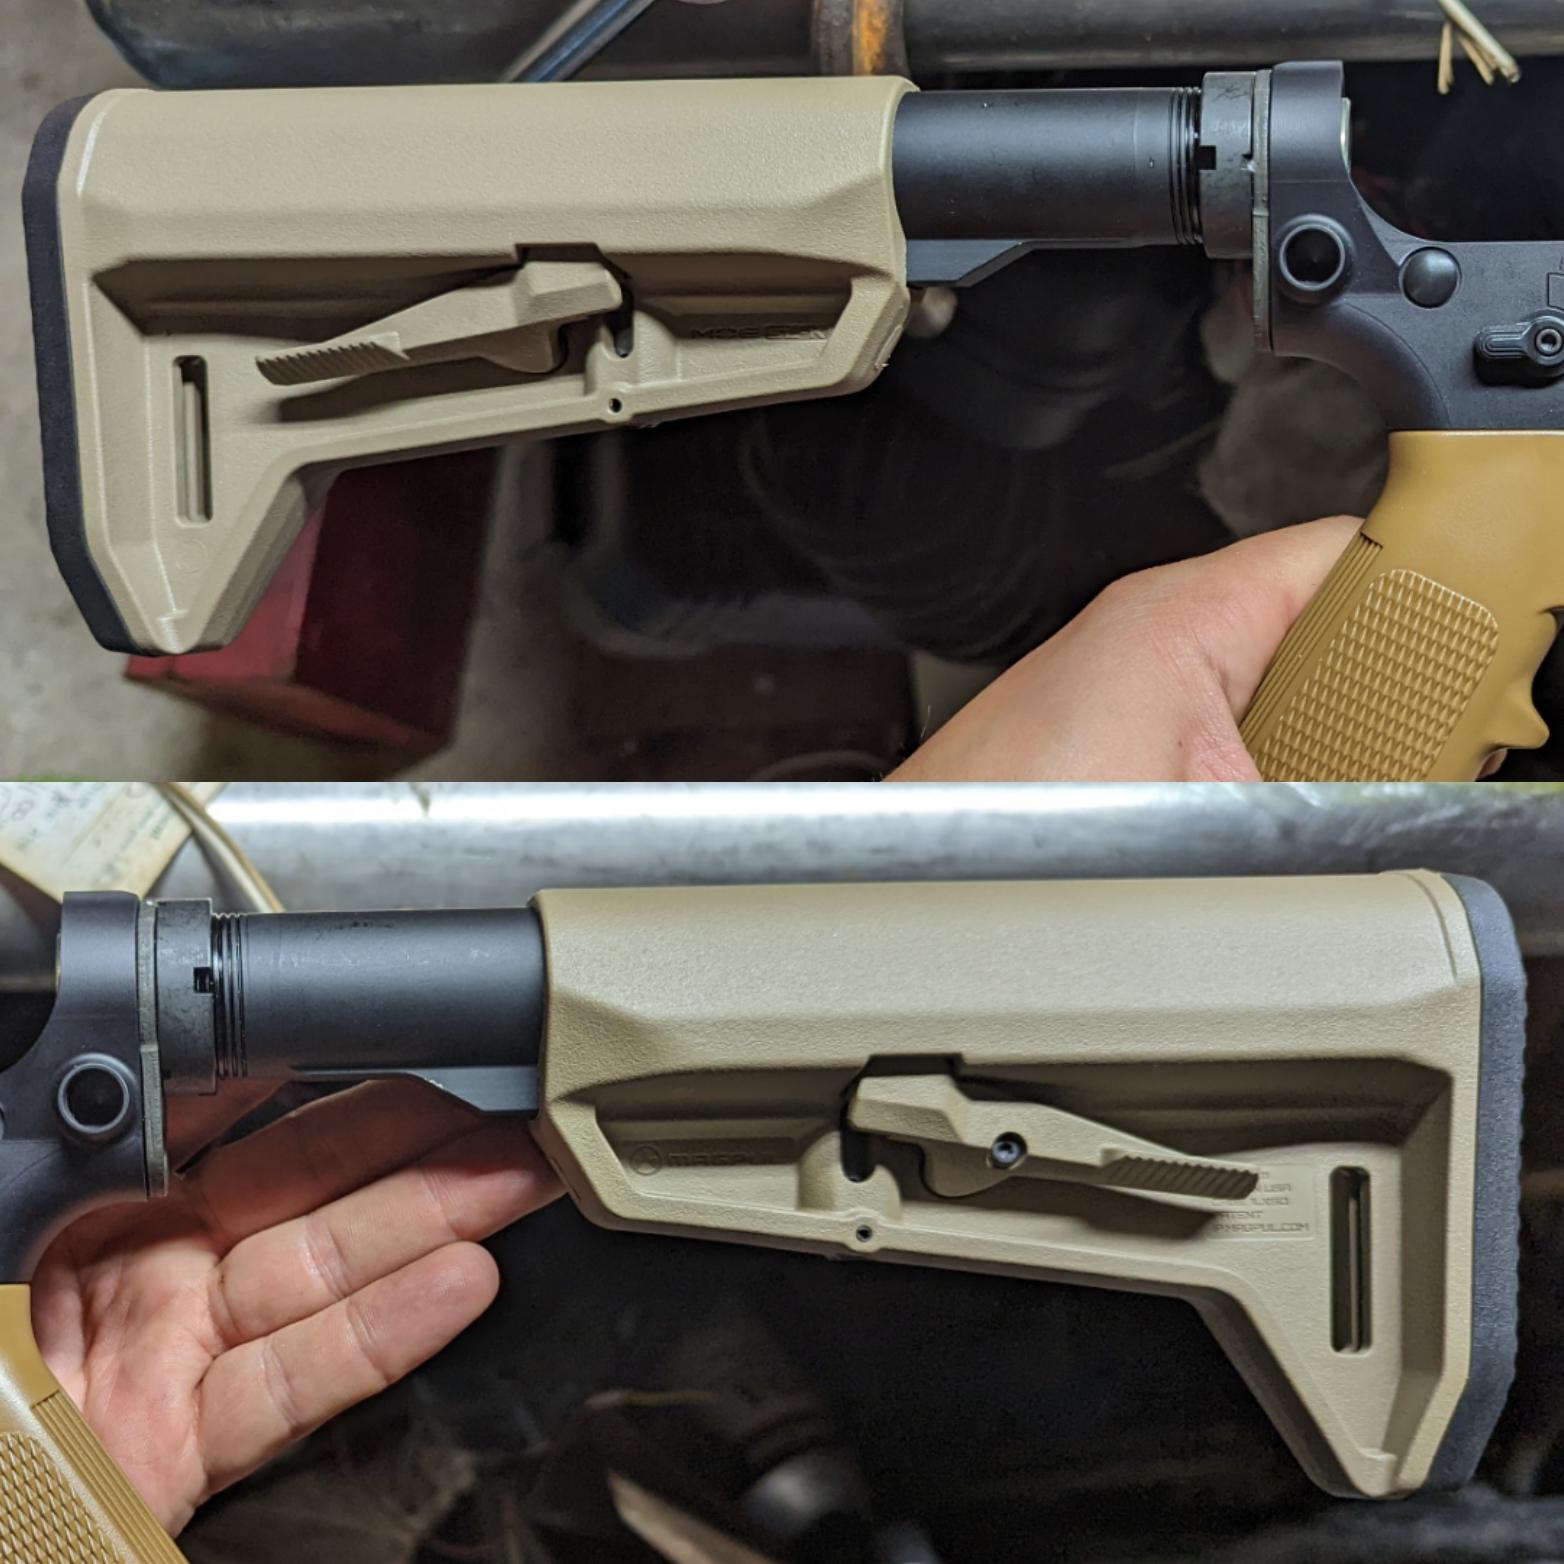
Stock: I’ve owned a Magpul SL-K before, but I sold it off along with the rifle it was attached to. Aesthetically speaking it’s basically a modern day version of the old school CAR-15 stock, with the obvious ergonomic upgrades Magpul engineered for all their Slim-Line series of stocks between the cheek weld and protected levers. All together, it was the goldilocks choice for the GPR-K: Not a full bodied stock like the SL or SL-S that might throw off the rear balance, not too small like the SL-M that’s better suited for PDW configurations. Otherwise, it’s a Magpul stock; not really much to say otherwise, at this point the quality and ingenuity of their products speaks for itself.
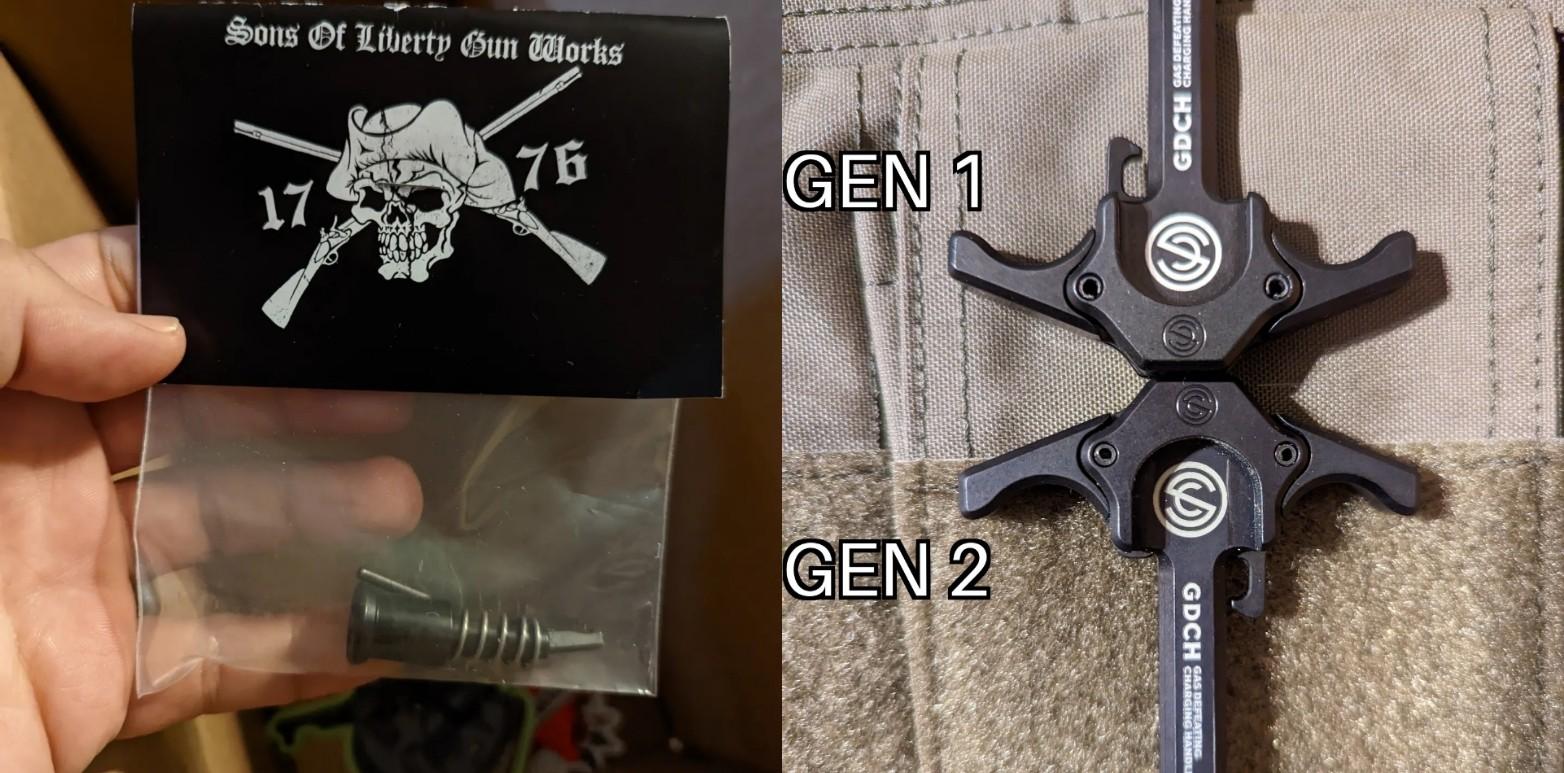
Forward Assist & Charging Handle: The Forward Assist assembly was another no-brainer throw it in the cart while I’m at Big Tex and keep it moving thing. SOLGW manufacture ensured that it would be in spec and do what it needed to do. It was my first time having to install one, where all the upper receivers I bought previously already had them installed. Took me a couple tries to get it done right but once it was done, yay great whatever the forward assist works like any other. Moving right along.
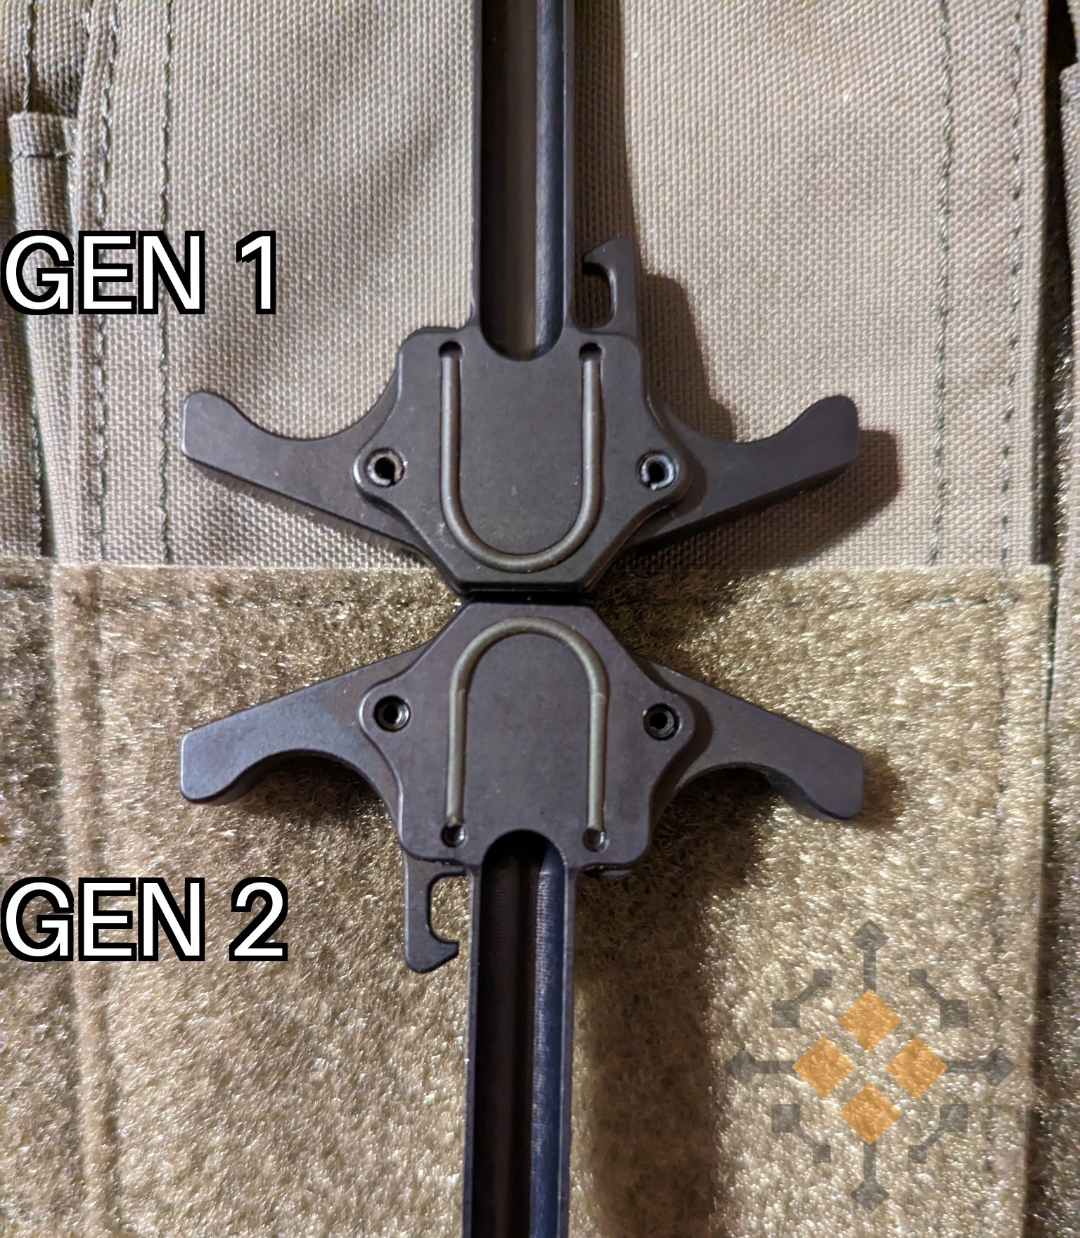
The Charging Handle was another “Well duh no shit” kind of thing, since I had it laying around waiting to be used already anyway. The one in the rifle now is the Gen 2 version of the SilencerCo “GDCH” (Gas Defeating Charging Handle); but I also have the Gen 1, both of which were gifted to me personally by a friend of mine that used to work there. The difference between the Gen 1 & 2 are the roll pins they use to attach the charging handle latches to the rest of the component, and the contour of the latches themselves. You can see a comparison image between the two here:
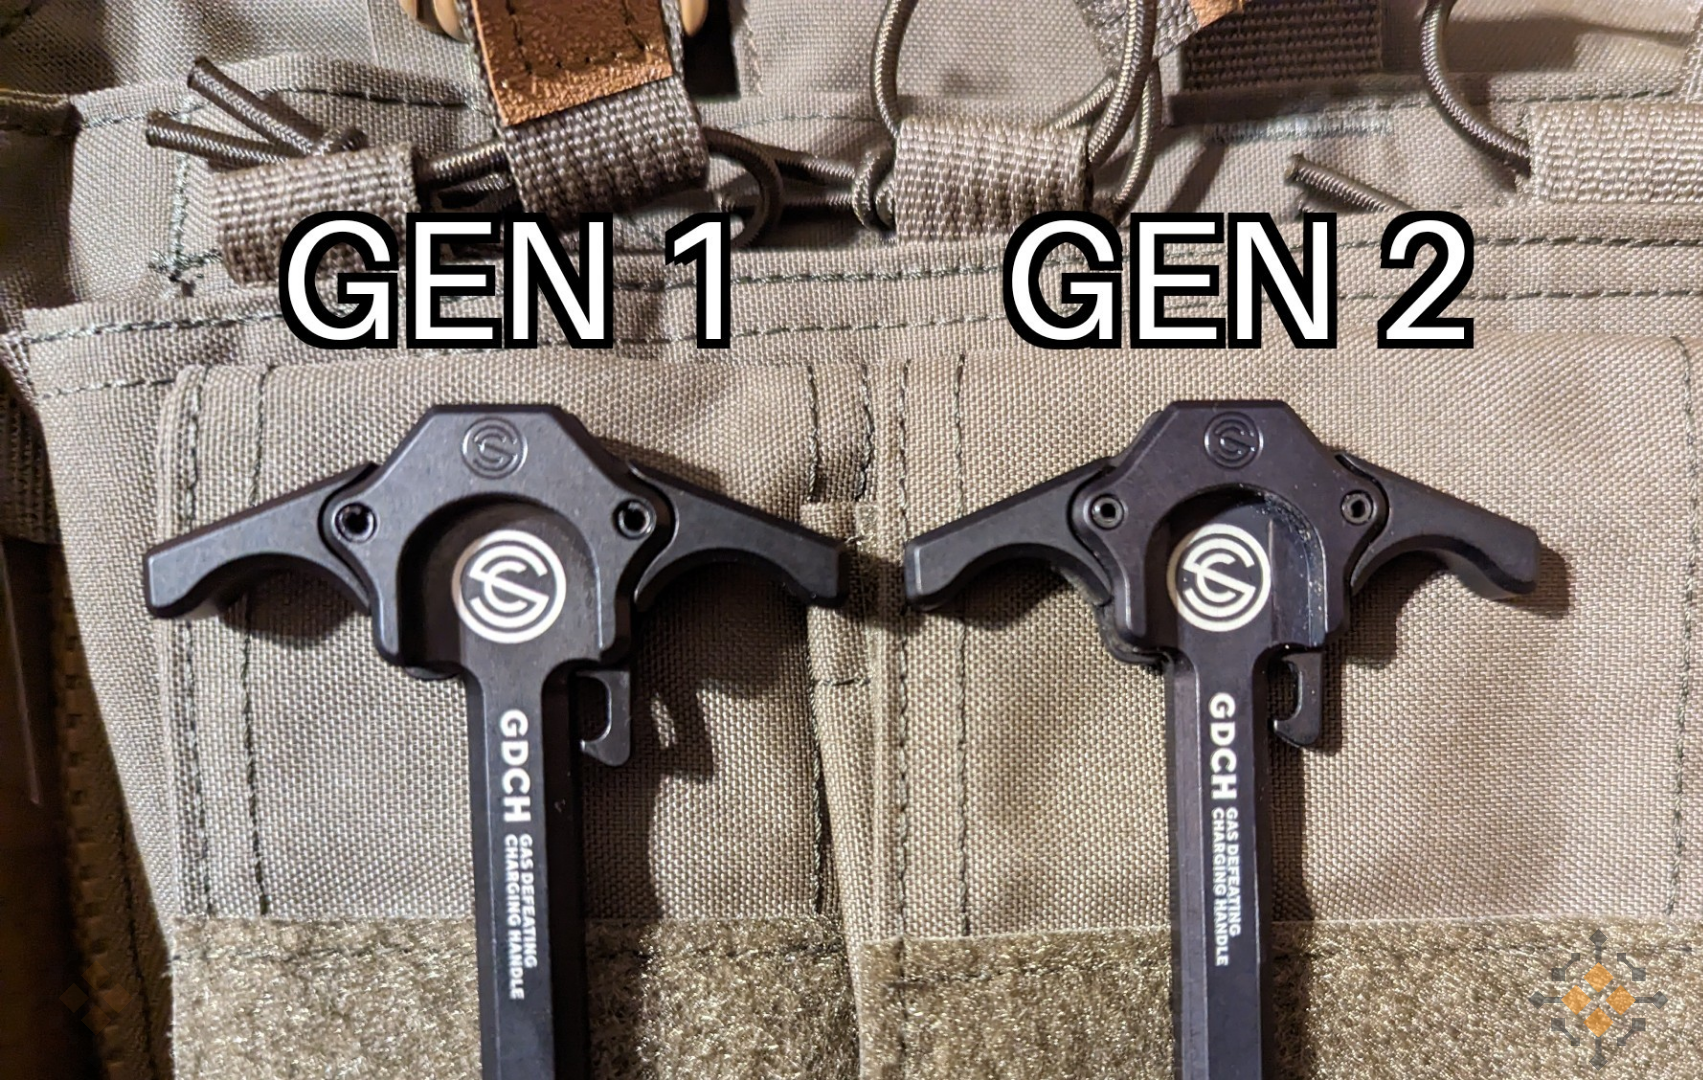
SilencerCo switched to tighter springs, and triple spun roll pins on the handles for Gen 2 instead of lighter springs and single spun pins in the Gen 1 design; The change was made necessary by the single spun roll pins walking up out of the charging handle after a while during standard use.
Allegedly, the Gen 1 roll pins were also breaking under sheer pull force, although my friend said he got up to 2200 pulls and was still using the same charging handle up to 17 months later at the time of the conversation (September 2022). He also specified that the “pin issue” had occurred with less than 1% of the 10,000 handles shipped to date and only occurred with first run units.
Having matched SCO-15 receivers made it kind of obvious to throw the SiCo charging handle into the upper rather than buying something I’d tend to grab otherwise like a Radian Raptor. The claim to fame for the GDCH is the rubber gasket thing that eliminates gas blowback when the rifle is suppressed, a common pitfall of the AR-15 charging handle design. You can see the demonstration video here; I have yet to check and see for myself, but I’ll include my findings in the range report once I take it to zero.
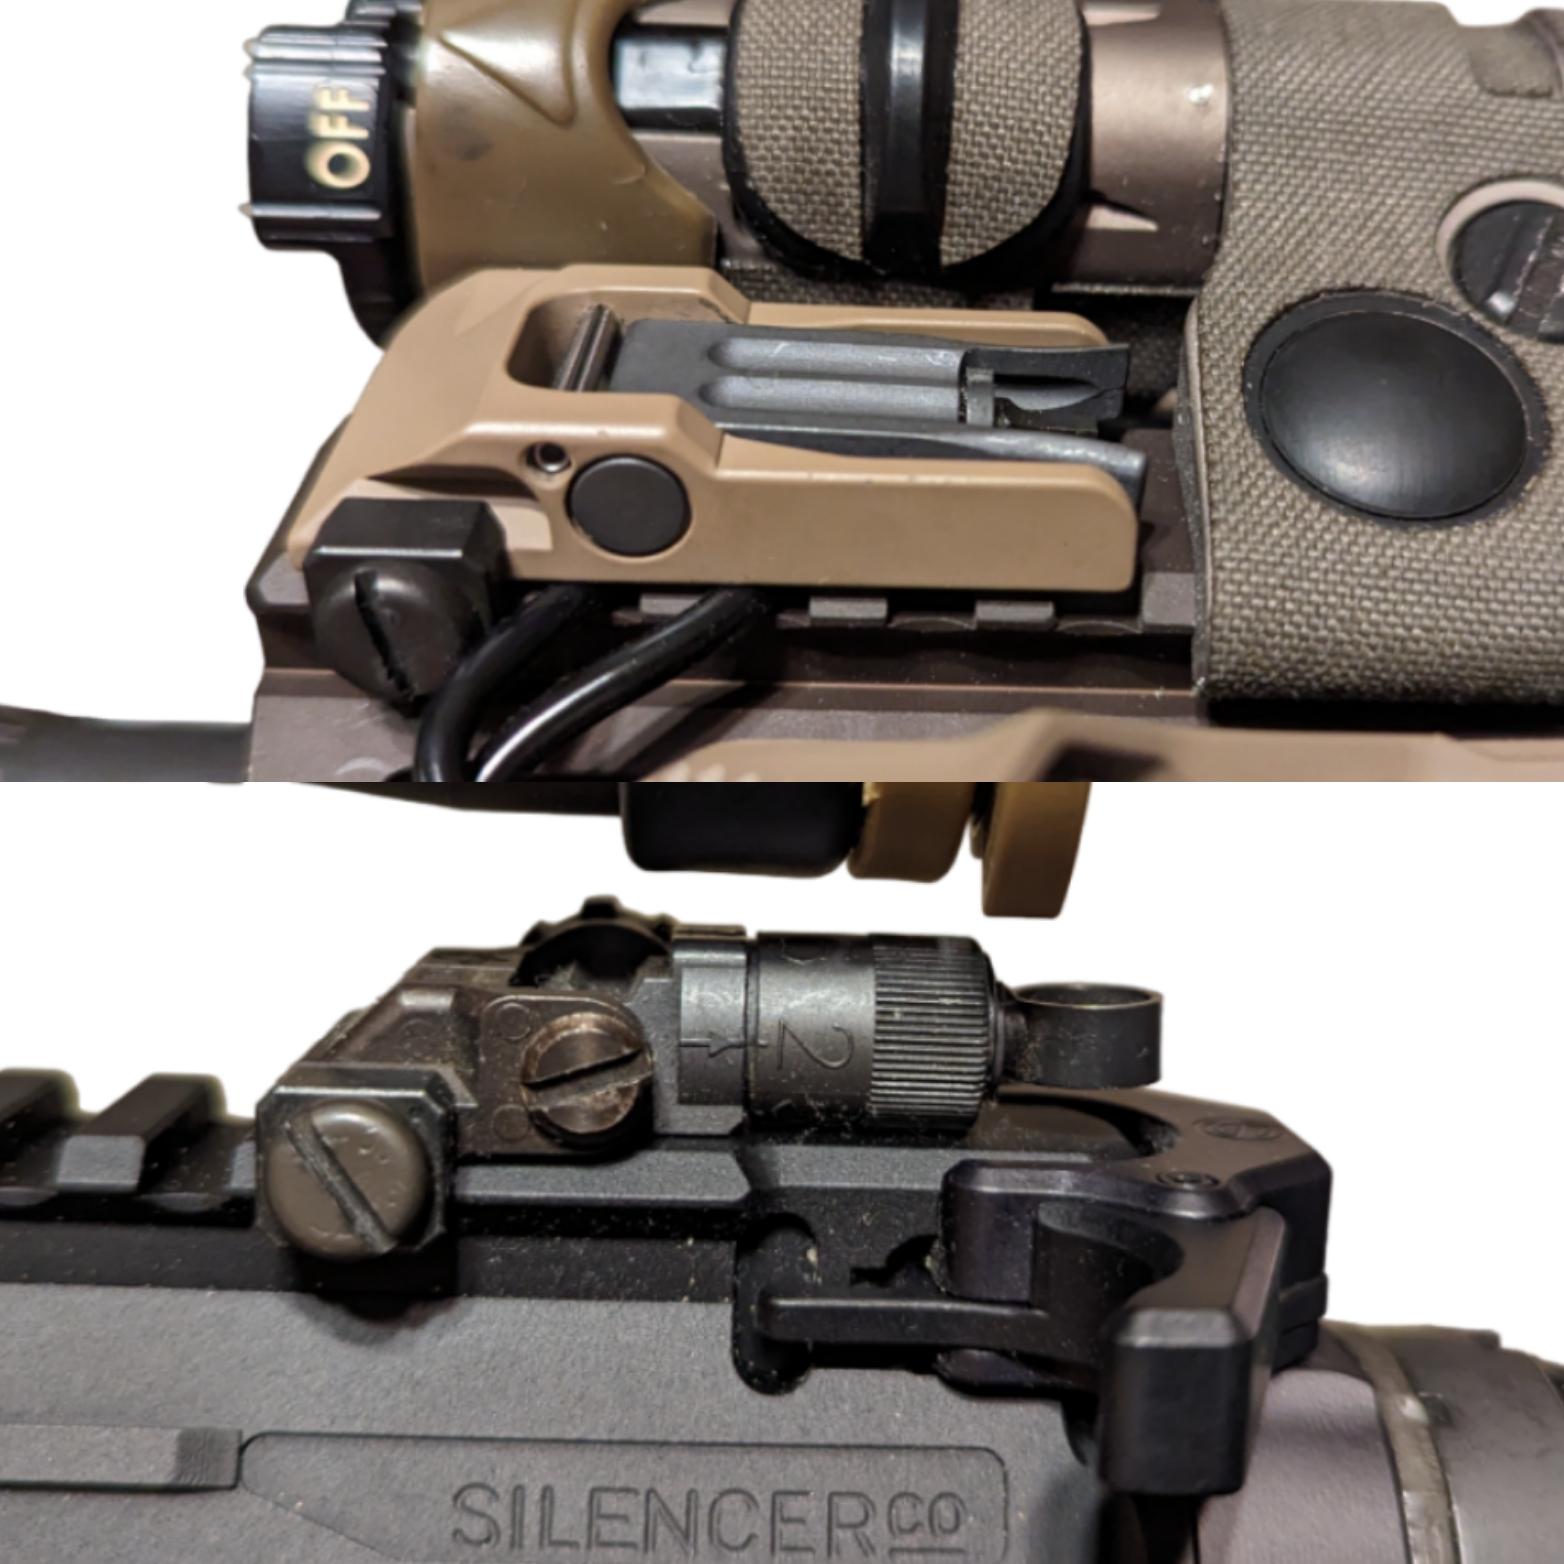
BUIS: I’ve been using KAC BUIS (Back-Up Iron Sights) for a long time, they’re some of the best in the game. The KAC Micro Rear BUIS is pretty straightforward, one small size aperture that you twist along the stem to adjust elevation the same way you would as an A2 rear sight, and a toolless adjustment knob for windage adjustment. Easy day.
The Micro Rear was a take-off from another gun that was basically a loaner I put together from parts I impulse-bought during a Black Friday sale; no real purpose to it, but there if I needed a testbed or spare parts. Originally I took the KAC Micro Front BUIS off that gun for this one too, but then my friend Jonathan had a cool idea.
He suggested I use a KAC MK12/MK18 style Front BUIS instead, for cable retention purposes. Basically, unlike the Micro or the Magpul MBUS Pro where the whole body of the front sight flips up and down, the MK12/MK18 version does the same thing but the base of the iron sight stays down, and doesn’t uncover the top rail under it when it’s deployed.
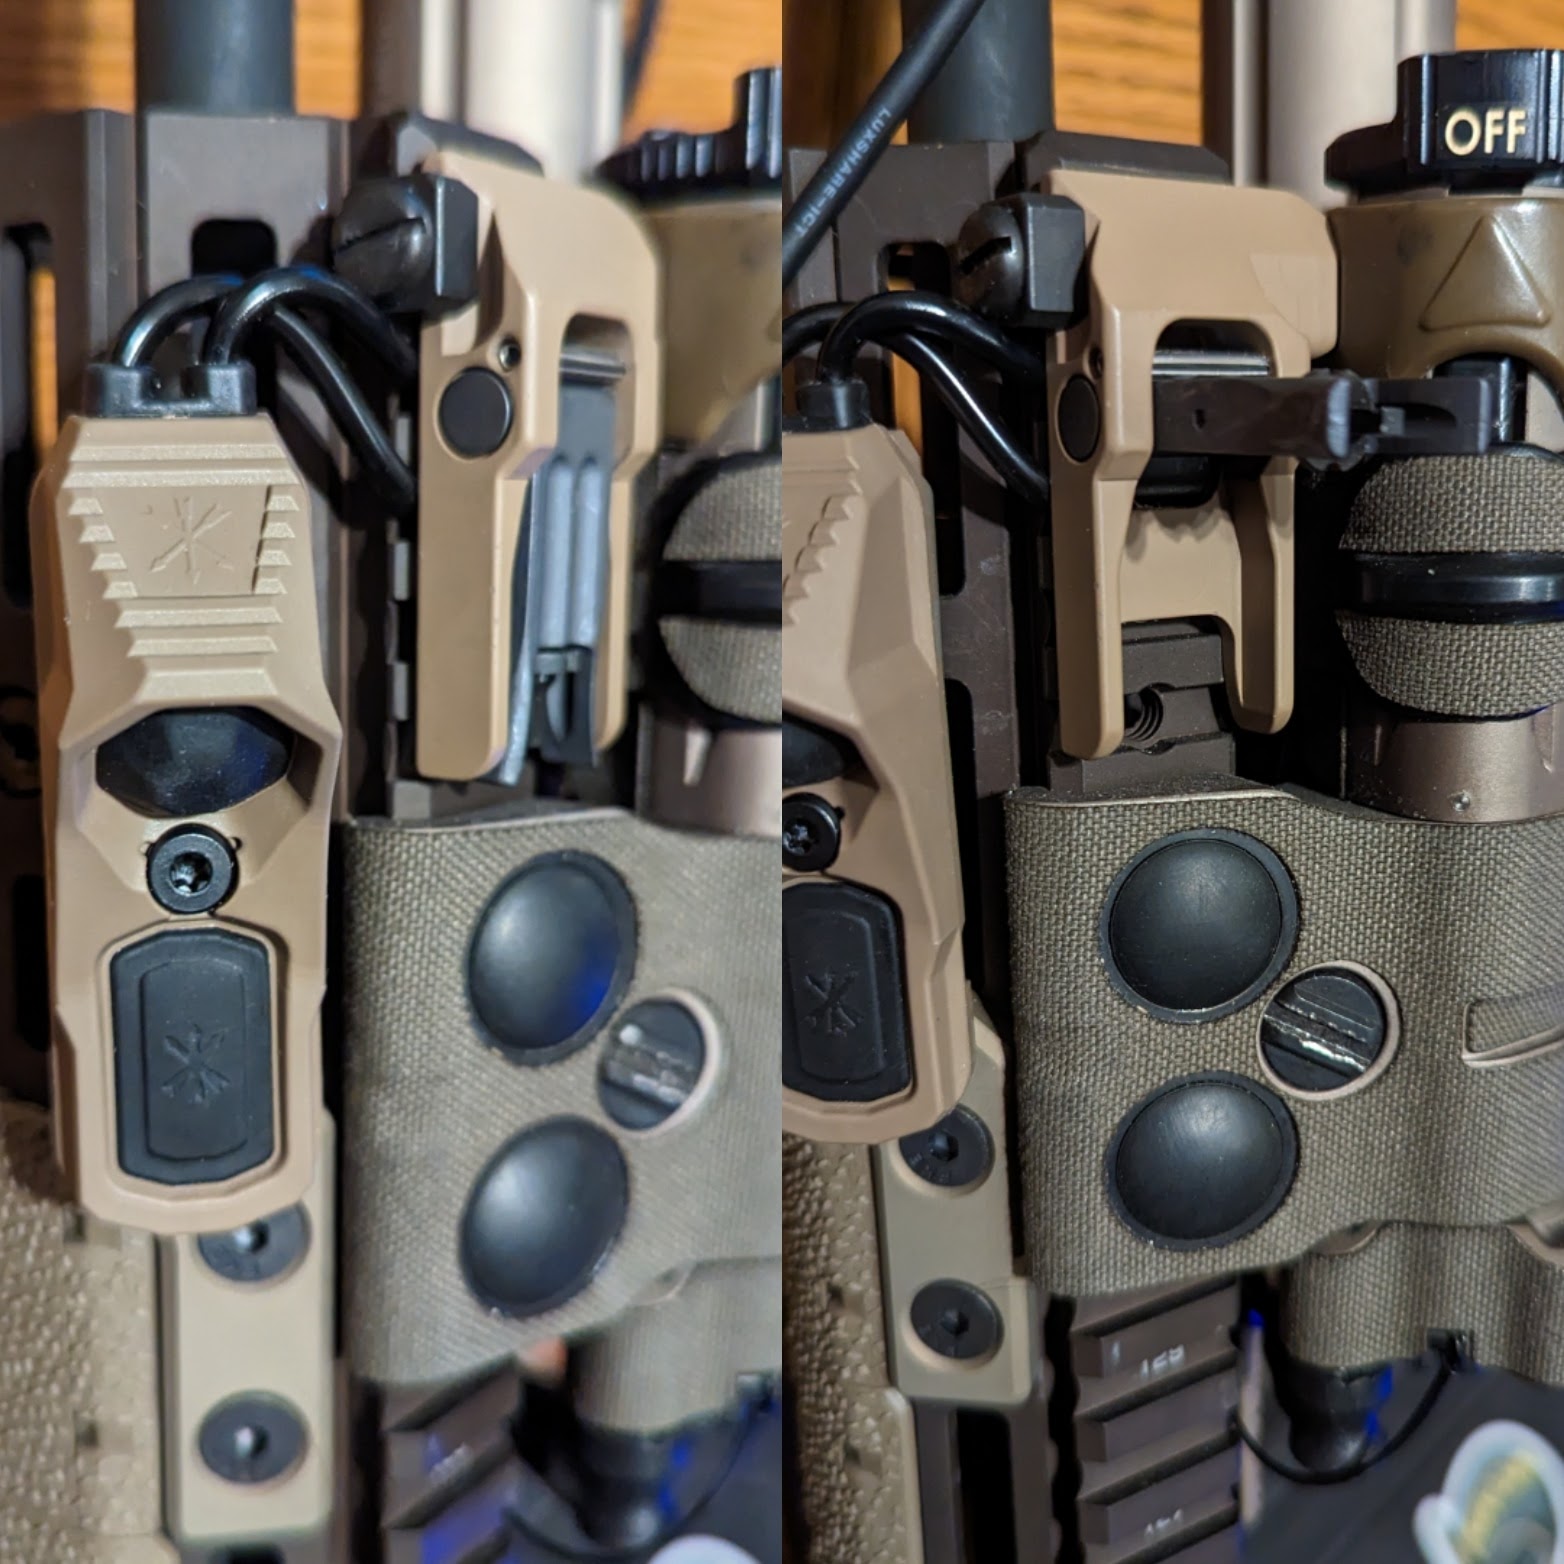
By routing the cables through the slots on the top rail and trapping them under the base of the MK12/MK18 Front BUIS, it was much easier to manage and direct the cables from where they started over to the other side of the rail where the enablers they plugged into are located. I’ll get more into that later when we discuss the switchology of the rifle.
I have the MK12/MK18 Front BUIS on two of my other rifles, and they’re the older anodized “taupe” variety that had a Field Drab-like green-ish tan color to them. I could not find a taupe version of this sight anywhere, which is typical since KAC stuff has been hard to find ever since the pandemic. With the help of a friend I ended up securing one of newer manufacture; at some point KAC switched from anodizing to cerakote, so this Taupe is the same color as the M110 and everything metal attached to it as it ships from the factory. Still fits with the Block II aesthetic and does what I need it to do, so it’s all good.
I’m sure some ballbags in the audience are having an aneurysm over the fact that I have flip up BUIS while the LPVO mount isn’t a QD model; if not that, there are others that act like they get street cred for going without irons on their gun because they have quality optics that they’re assuming won’t ever break.
I’m not suggesting they will break, but as far as I’m concerned, irons are part of the rifle itself no matter what, just like they were back in the day when it was those or sniper-grade glass to pick from before smaller and more refined combat optics came into being. No rifle leaves home without them. They weigh next to nothing and I’ve got room for them so they’ll stay there.
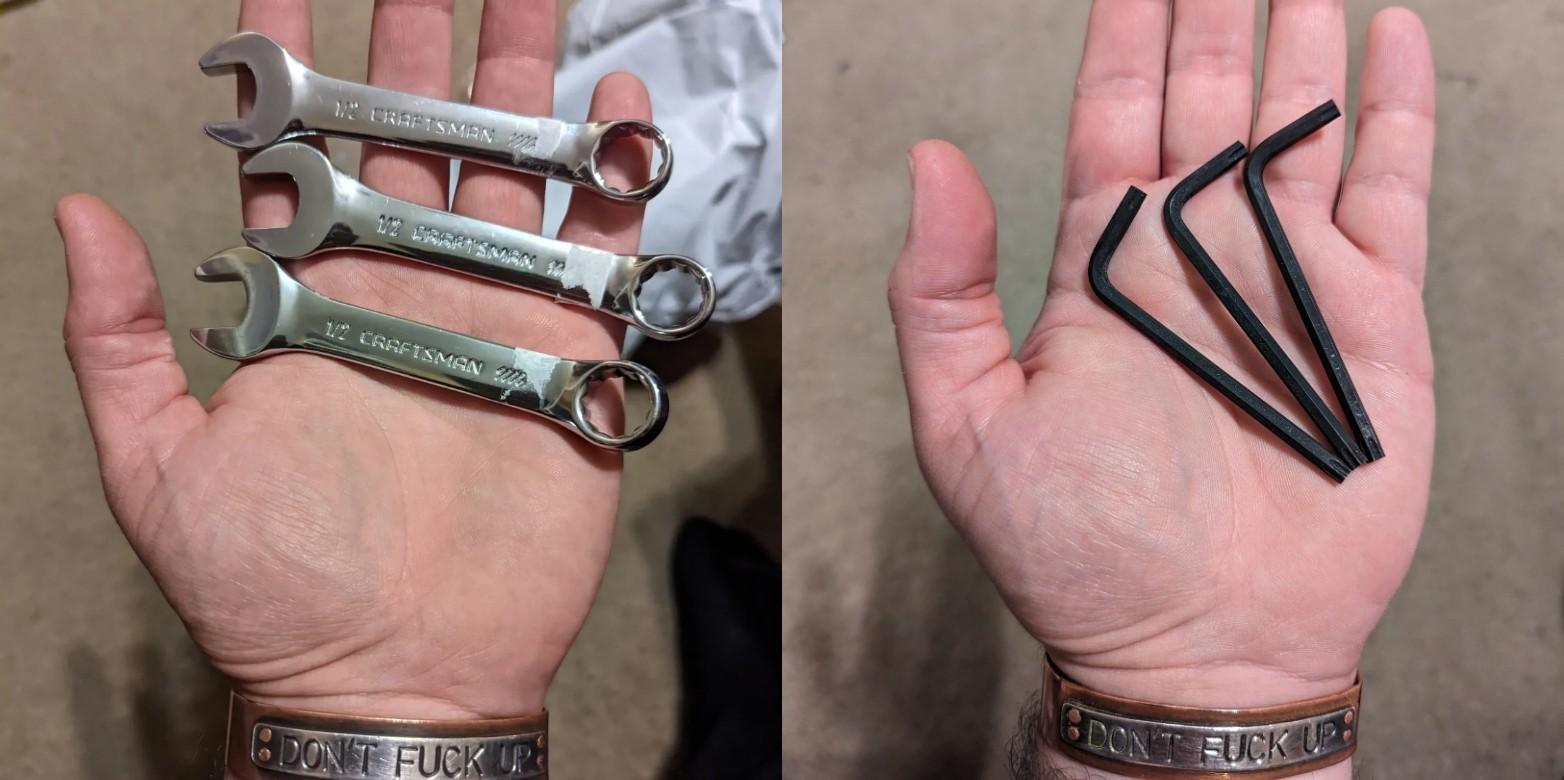
In the meantime, “QD” is a mindset. Whether it’s a short half inch wrench or a smaller Allen or hex key sized for the bolts or screws that secure the optic mount to the rifle, those small hand tools easily ride in your admin or GP pouch on your kit, ready to bust out and jettison the optics package to dump in your bag if it has a problem and becomes inoperable in the heat of the moment. If that bothers you, shut the fuck up I don’t care.
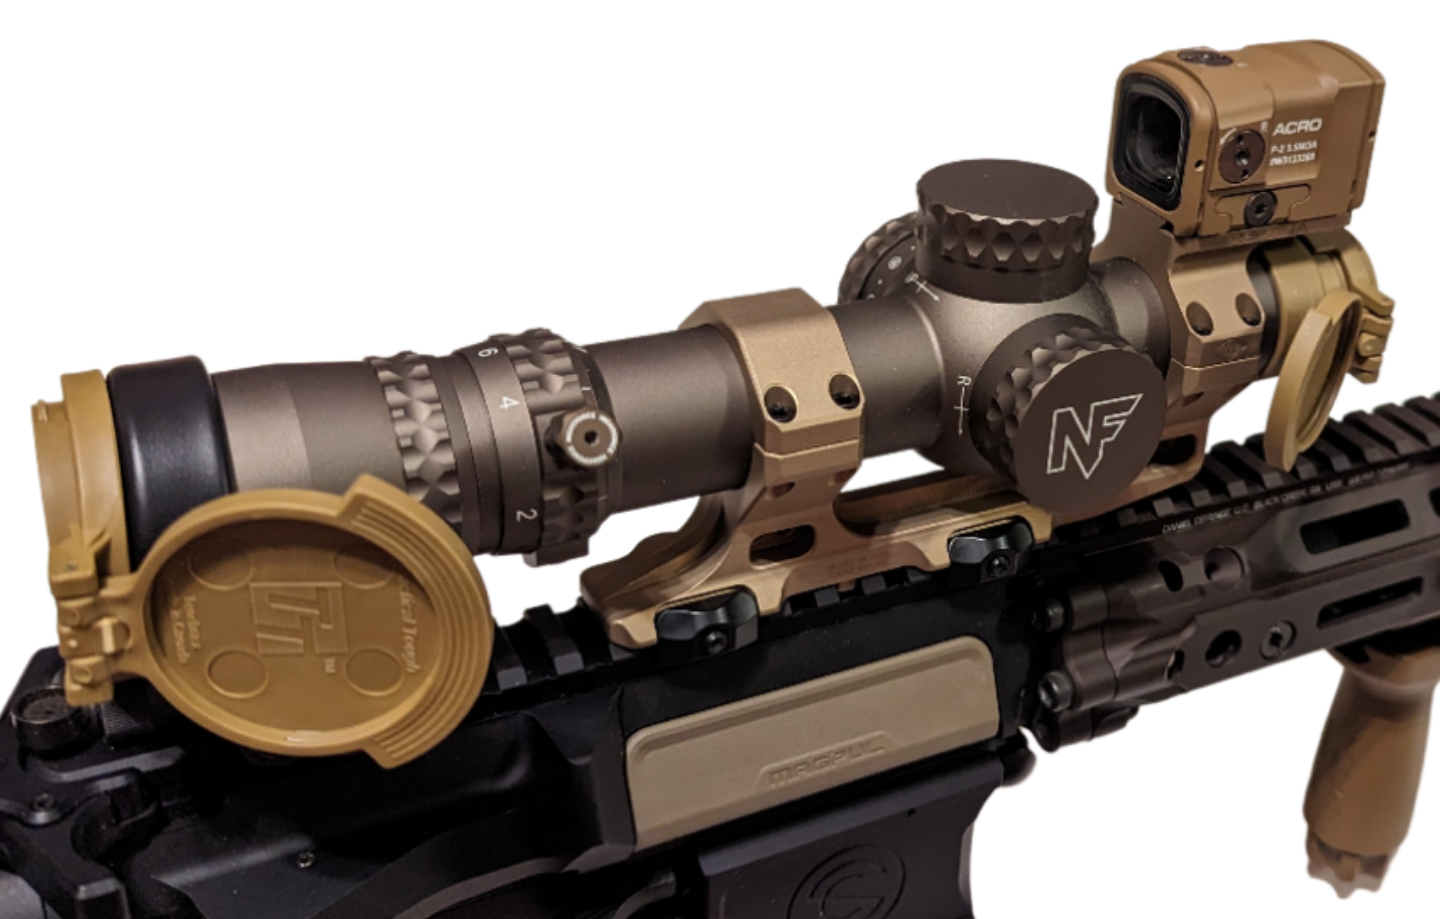
Optics Assembly: Speaking of optics package, let’s get into that. Most prominent is the LPVO, the NightForce NX8 1-8x Gen 2. I don’t know if NF internally refers to it as Gen 2, but I do because there are two noteworthy changes or upgrades from the NX8’s original configuration.
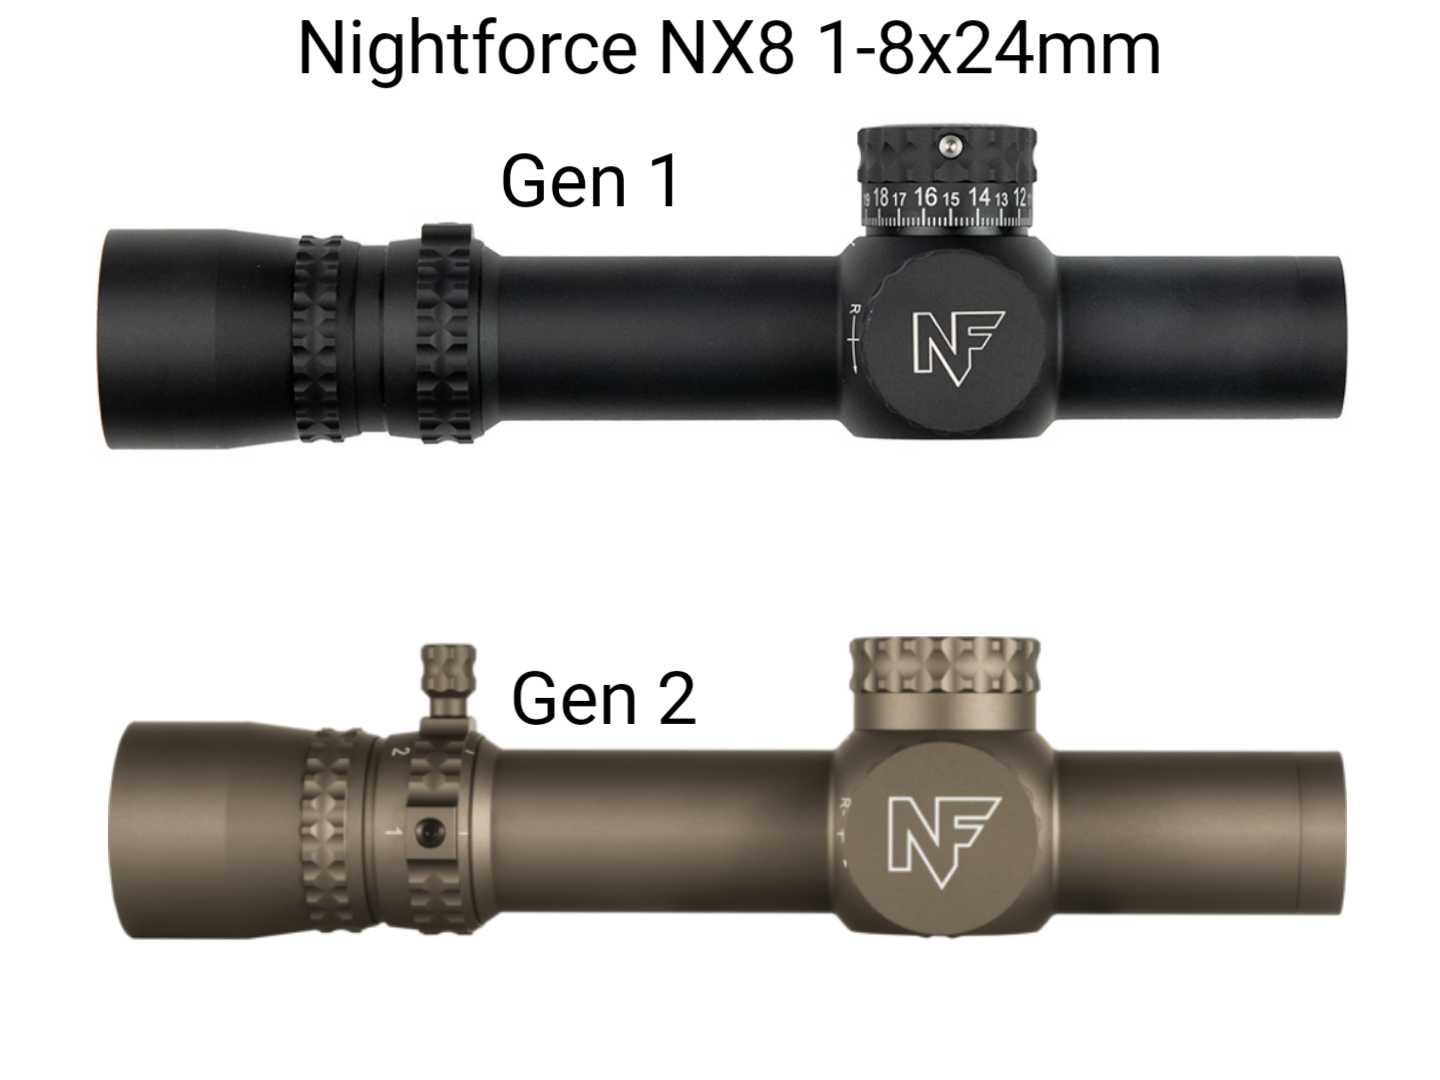
1.) Capped turrets. This means putting an MRDS at 1200 over the scope is a go because the capped turrets aren’t as tall as the previous locking turrets, so they won’t obstruct the sight picture through the MRDS.
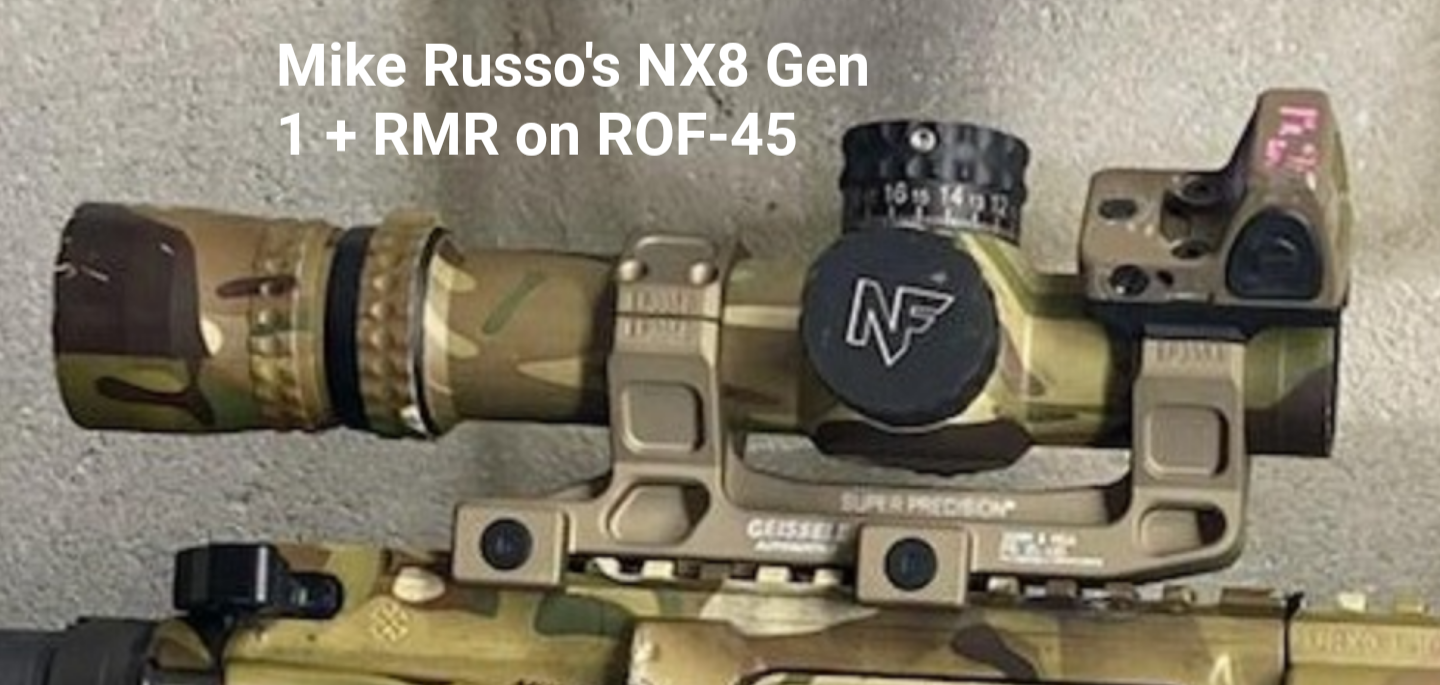
Mike Russo, a friend of mine and an accomplished competitive shooter in the rifle realm via Quantified Performance, ran into this problem with his own NX8, and had to mount his MRDS at an angle via the Reptilia ROF-45. He made it work, but that comes with its own complications as it relates to offset relative to the bore and zeroing.
2.) Reticle. Originally the NX8 came with a rather barebones T shaped reticle called FC-MIL (or FC-MOA if you’re an unsophisticated pleb) that really wasn’t much to write home about given how little information it provided the shooter upon aiming, and therefore made holds for windage and using the reticle for ranging more guesswork than a precise and confident estimate.
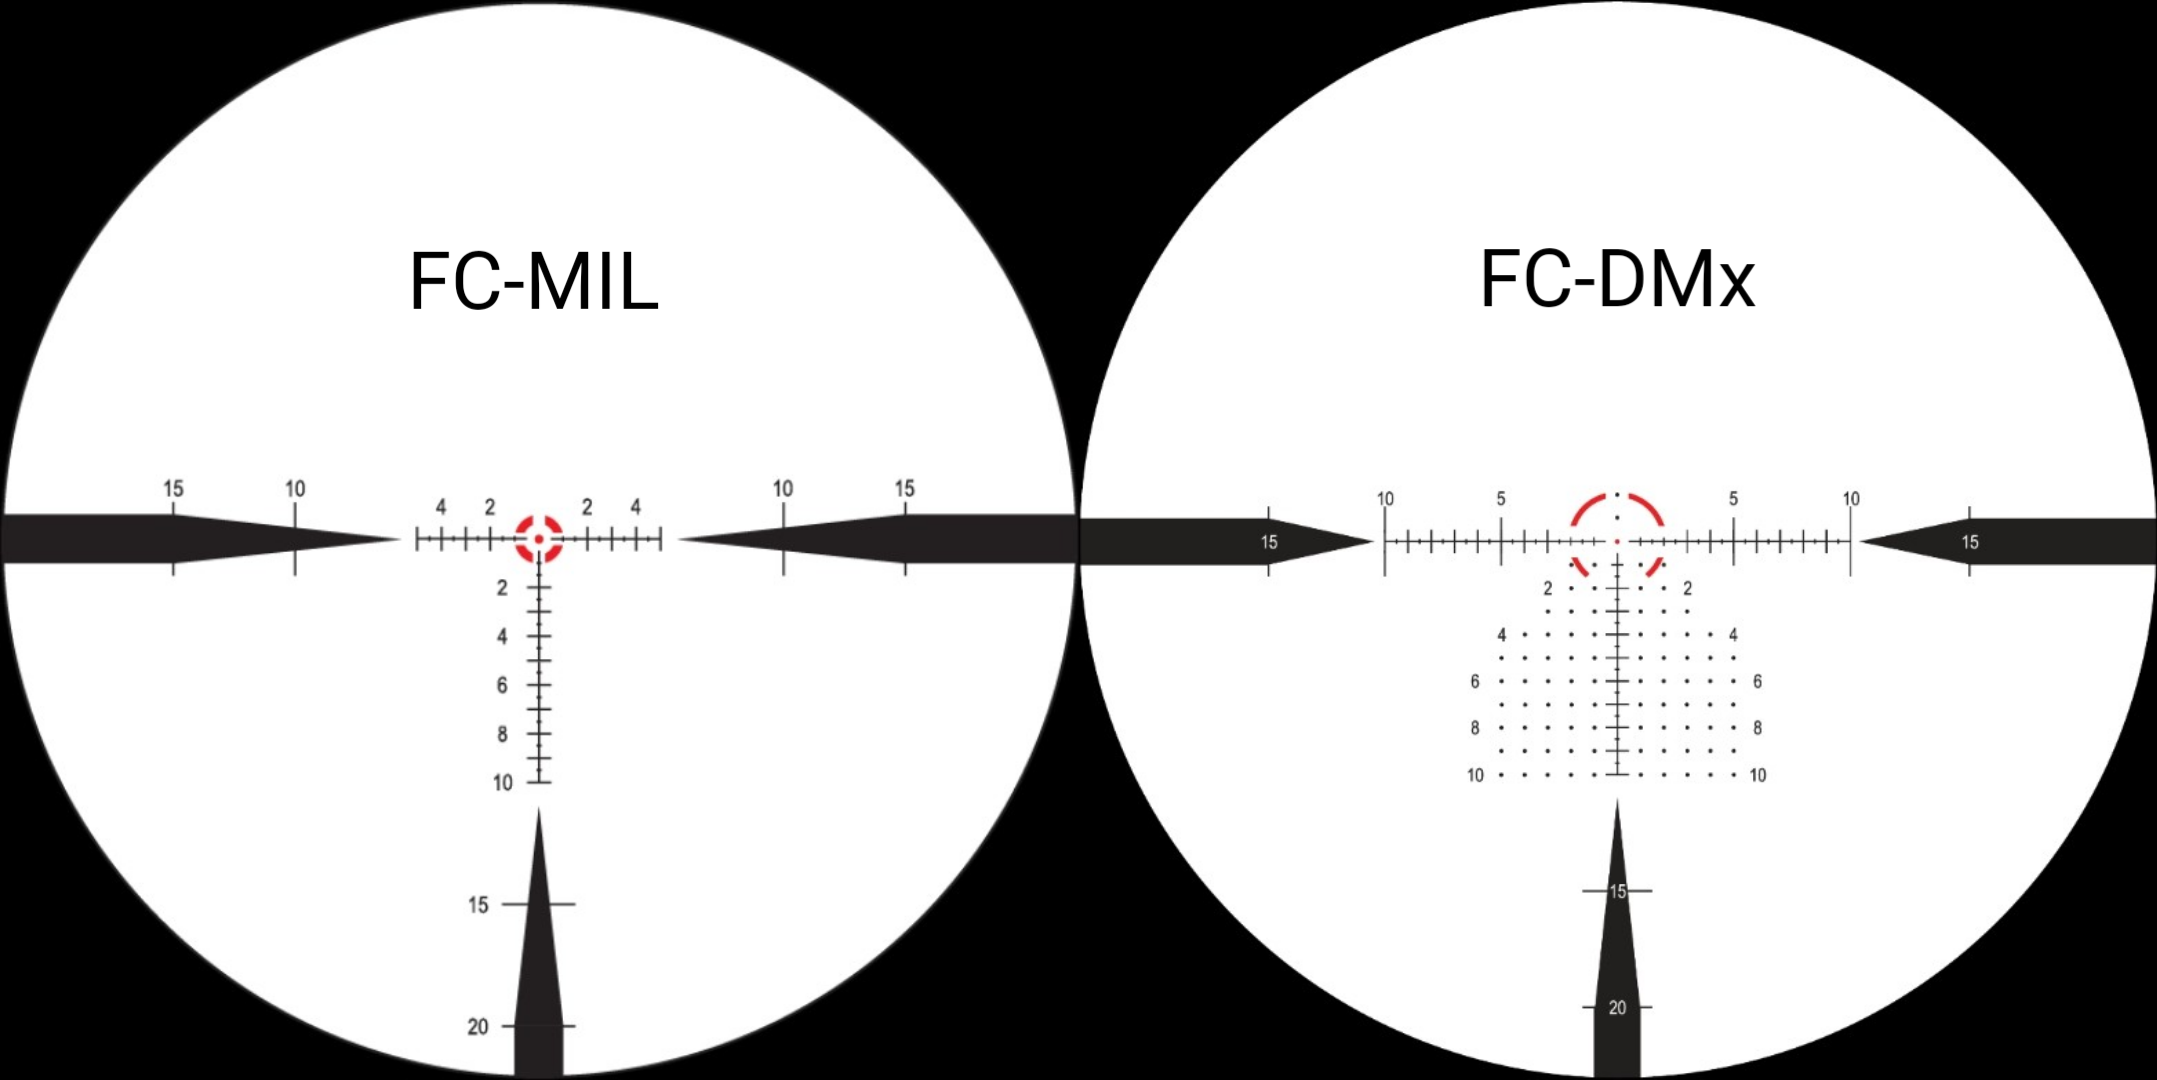
Now, the NX8 is available with the FC-DMx reticle that was previously only available in the 1-8x ATACR, originally as the FC-DM. Being more of a tree/grid style reticle, windage and ranging estimations (not to mention zeroing) are a lot faster and easier to do, which really helps you get the most out of the combined capability of the 8x magnification and the ballistic performance of the barrel (provided you’re using quality ammo of course).
When the NX8 first came out, having sampled it side by side with the ATACR 1-8x the year they debuted at SHOT, I was very unimpressed. I’ll admit, I used to talk a gang of shit about the 1-8x NX8. Between the meager FC-MIL/MOA reticle, and the tight/wonky eye box that came with trying to use the 8x magnification through a 30mm tube in first focal plane, it was an immediate yuck. To its credit however, I’ve always described the NX8 1-8x as the modern day ACOG: Smaller and therefore lighter, taking up less room in the process compared to other LPVOs, still with a tight eye box and eye relief, but with twice the magnification.
I would eventually go on to buy two FC-DM reticle equipped 1-8x ATACRs, one of which I flipped for my first Vortex Razor HD Gen III 1-10x when those came around. But when the new NX8 came out with the above two upgrades, I said you know what, now that’s a fair trade. The capped turrets allowed for an enhancement configuration I was already in favor of, and the much more useful reticle was a fair trade in exchange for the tight eye box. For that, I’d be willing to work around it.
Of course, Dark Earth in color because tanodizing always looks hot and it fit the Block II aesthetic we’d already started seeing on URGIs that followed the same color scheme (and therefore colloquially and unofficially became known as “Block III”) fitted with tanodized Vortex Razor HD Gen IIs.
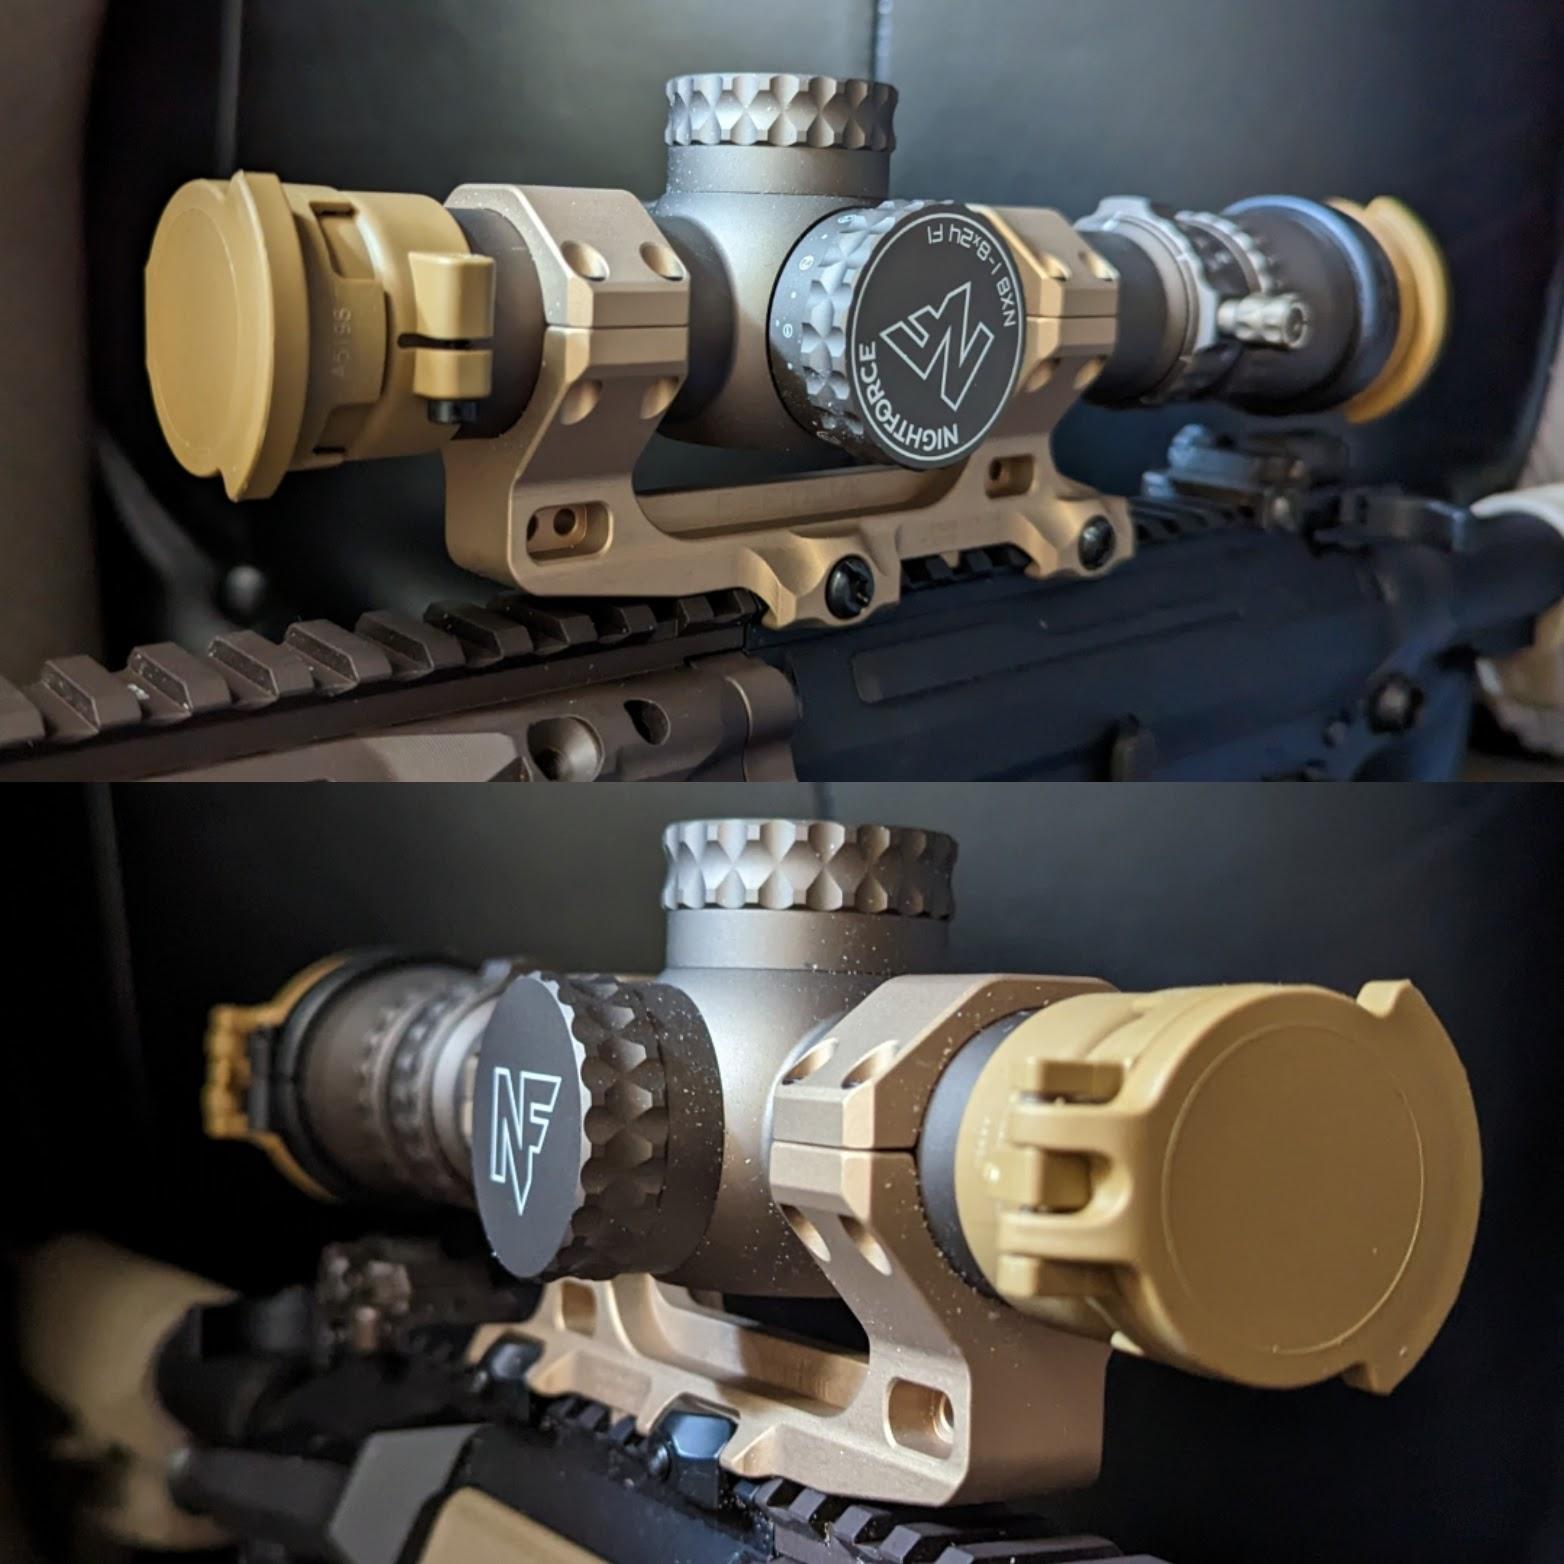
The lens caps were a fun challenge to surmount. Basically, the 1-8x ATACRs being made for the URGI/Block III M4A1s were also Dark Earth, but they were unobtanium outside of that contract until NightForce made them commercially available and applied the finish to other models of the ATACR and NX8 series in the process. Said unobtanium ATACRs shipped with Tenebraex flip open scope covers in the RAL8000 color, which look sharp when contrasted against the Dark Earth anodizing.
But when the Dark Earth NX8s came around, there was no likewise RAL8000 Tenebraex scope caps to include with them… Not officially, at least. While the production team at NF simply hadn’t requested them to be made, Tenebraex DID make their scope caps in RAL8000 for a very wide variety of scopes, including several different LPVO models on the market.
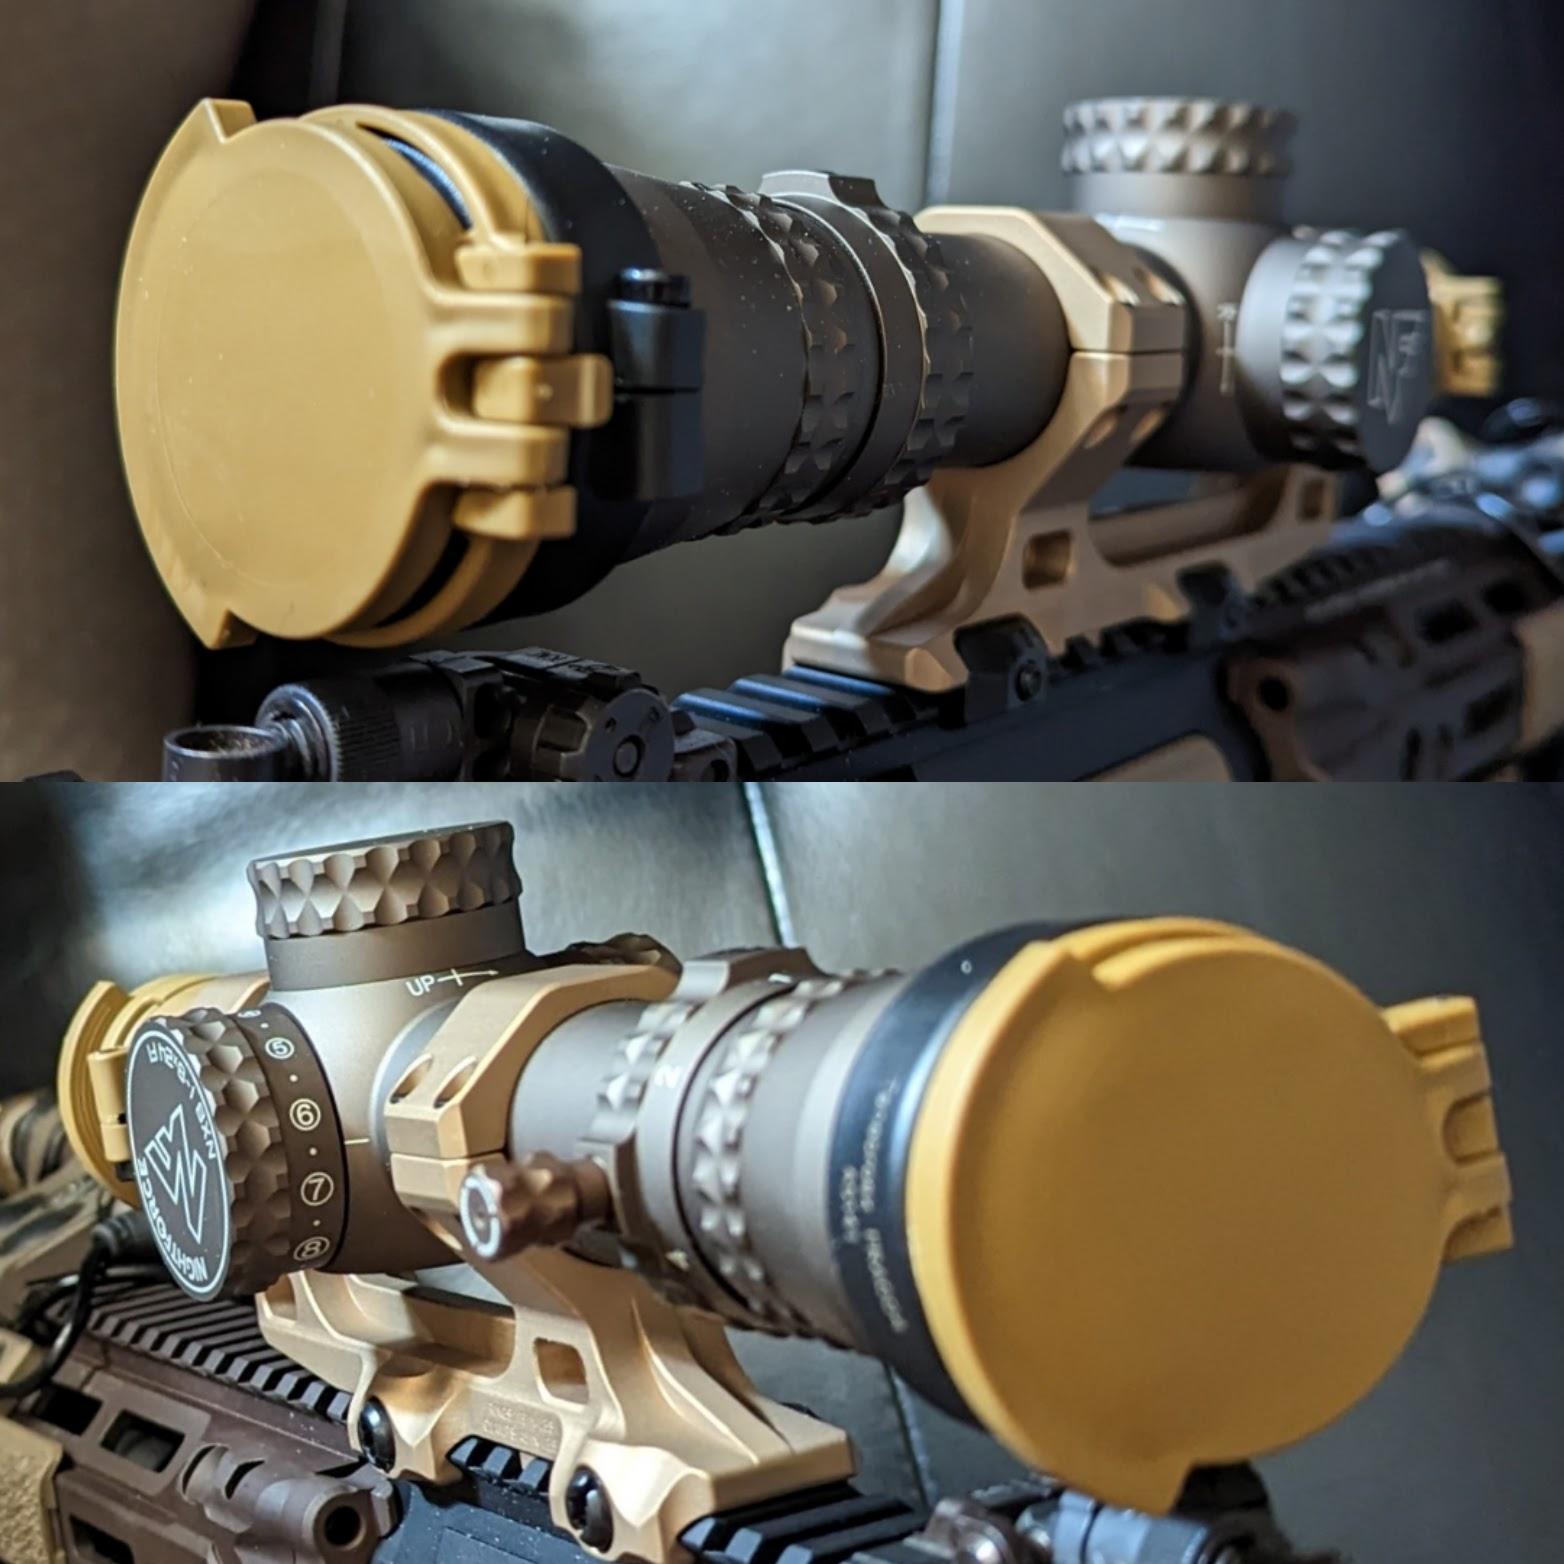
All I had to do was compare the dimensions of the NX8 to the scopes Tenebraex already made RAL8000 caps for, buy the closest sized existing models, and hope for the best. The front and rear caps I found were originally made for some old Leupold VX.R 1.25-4x20mm joint. The diameter measurements for the objective (front lens) and ocular (rear lens) on the NX8 1-8x are 30mm and 1.57″/39.8mm, respectively. On the Leupold VX.R 1.25-4x, they are 30mm & 1.59″/40.6mm, front and back respectively.
So, the front diameter was the same between the two, the rear was off by a mere .02 inches; I was willing to roll the dice on that. When they arrived, they both fit onto the body of the scope just fine, and further tensioning the torque screw a little bit ensured they wouldn’t move, which I tested with a tug on both sides, successfully. Easy money.

The LPVO mount was both an opportunity and a contingency. Plan A was for a scope mount for another company I was supposed to T&E before things on their end went south and the mount ended up never happening. So since I didn’t have a 30mm mount to begin with and needed to find one, and I’d been telling people that Geissele, Badger, and Reptilia are the way to go for scope mounts, but I only owned the first two up to that point, I said you know what, fuck it. Bout time I got a Reptilia mount since I recommend them to everyone anyway.
Pretty simple, that’s really all there was to it; Tanodized 30mm scope mount that accepts 1200 MRDS ring mount caps: ACQUIRED
Sticking with the same manufacturer was easy enough, but had I gone with Geissele up front for the mount, I would have ended up with a Reptilia ROF-90 ring cap to 1200 mount an Aimpoint ACRO either way. Same as I did last time around for my existing GPR with the Razor III 1-10x & ACRO up top, only 30mm instead of 34mm this time around. Another no-brainer acquisition.
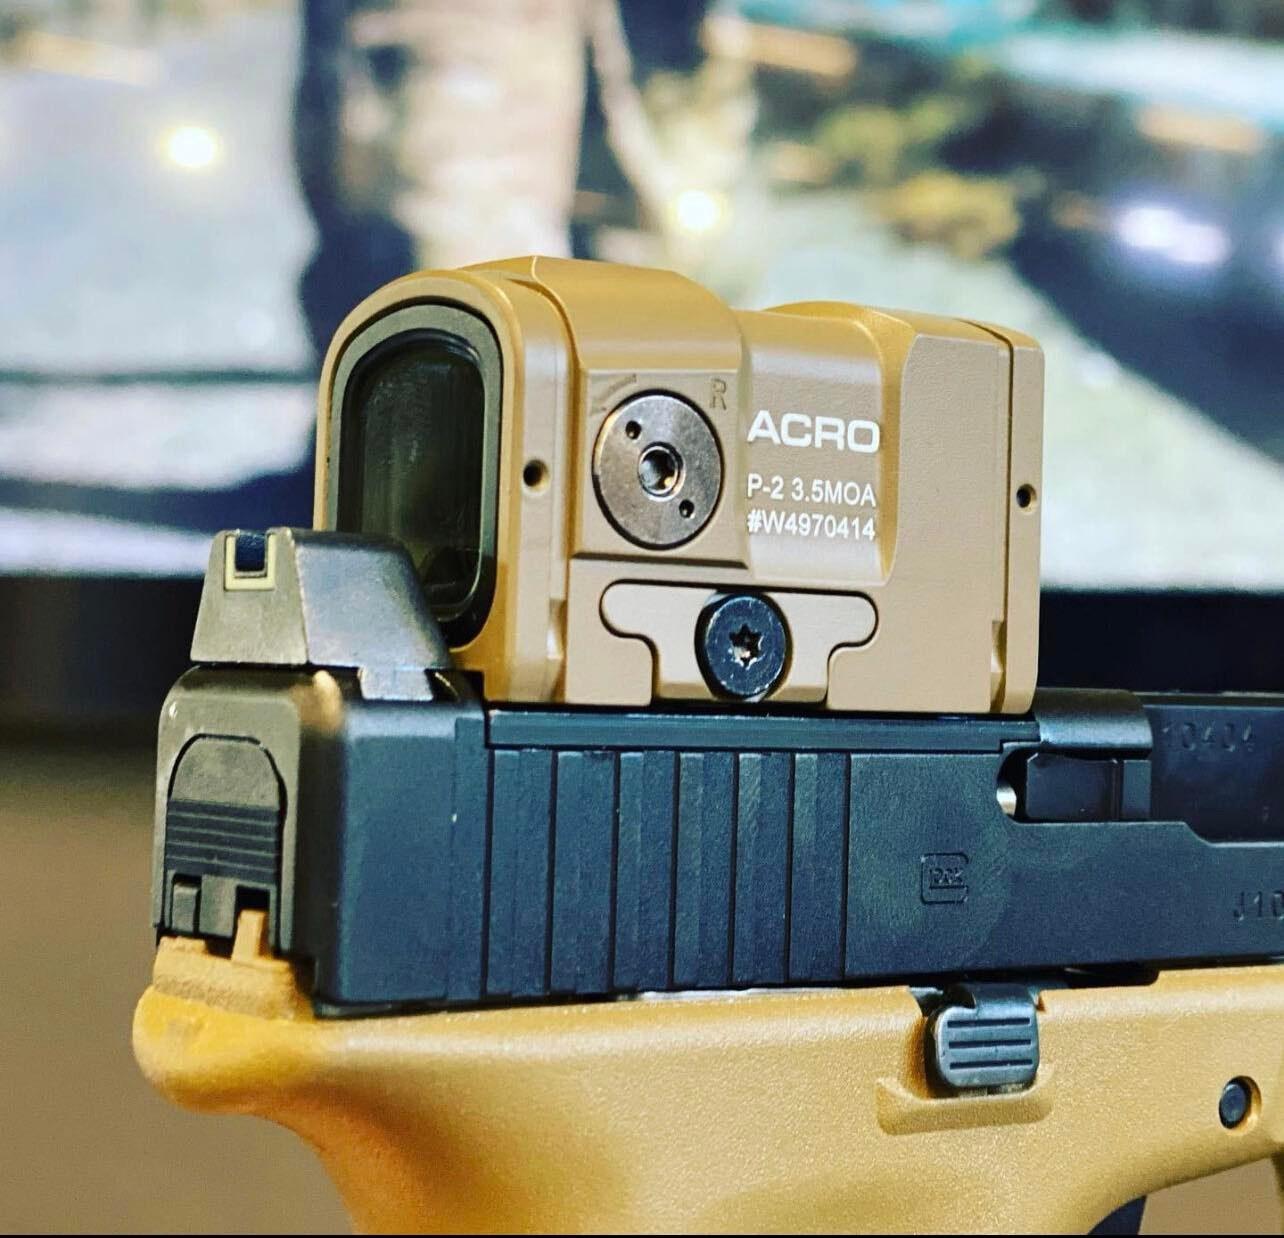
The ACRO P-2 is my go to MRDS, for pistol and rifle. So I knew I would be on the hunt for one, but I wanted one in tan ever since it was revealed that Aimpoint was making them with a tan finish at one of the European industry trade shows. Unfortunately, it turned out that those were slotted only for a foreign contract. But then they ended up becoming available via B&T, only I didn’t feel like paying $625+ for a tan ACRO and a mount I would have no use for, and it only came in a bundle.
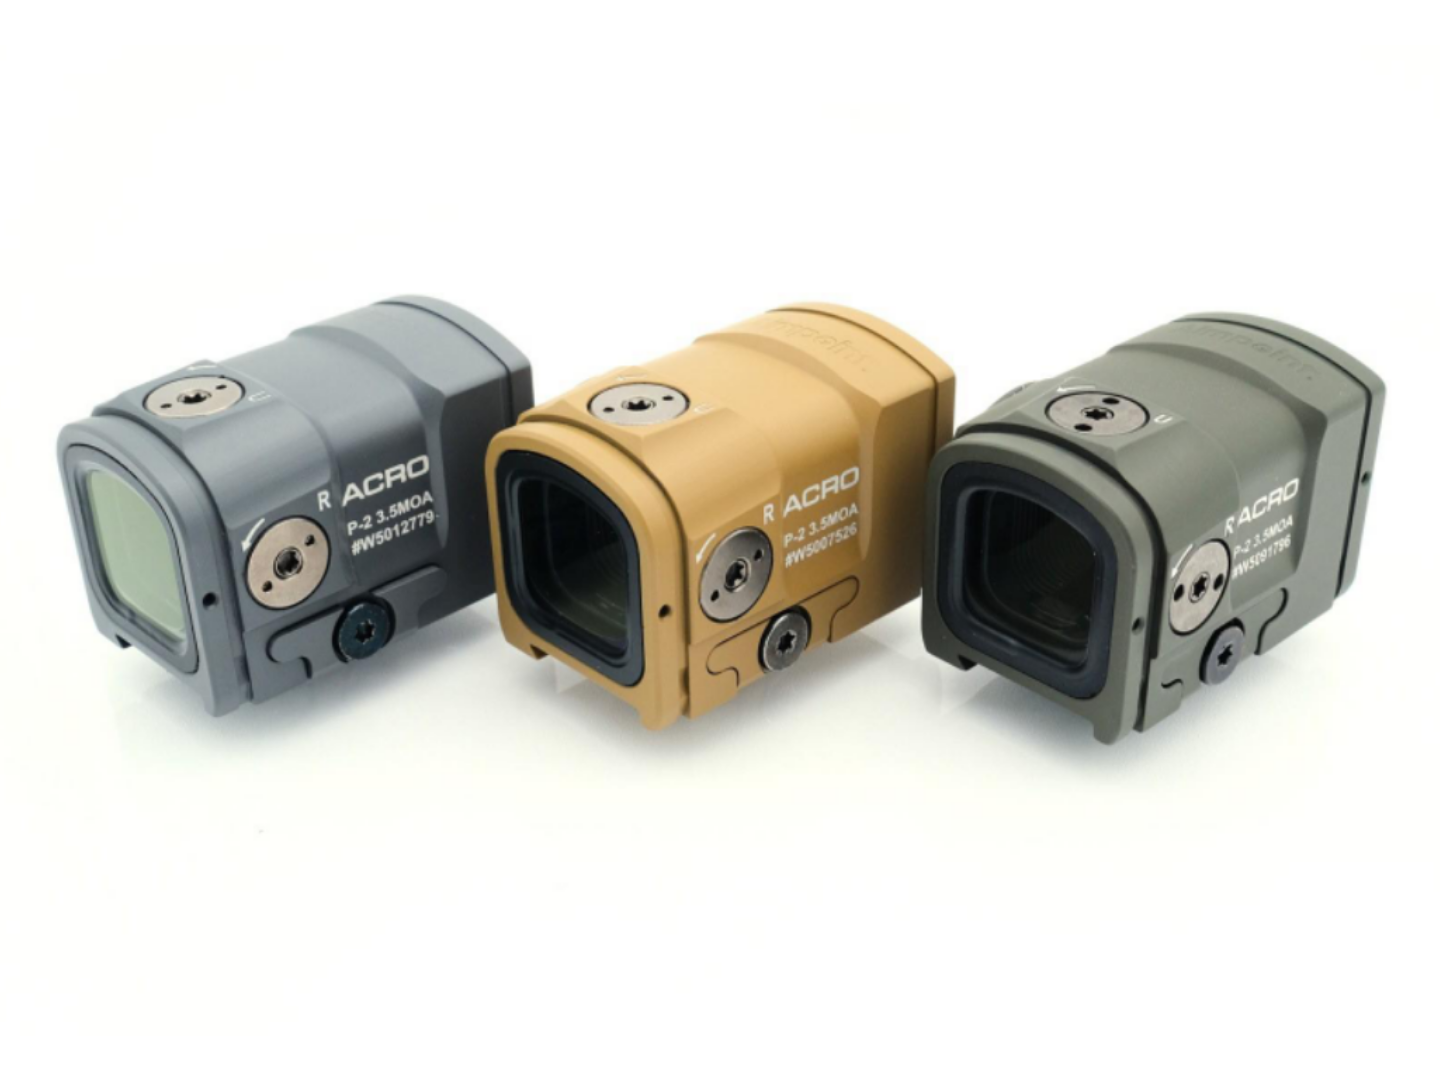
Fortunately, the homie Kevin Bawol had for a while been advertising that he was selling ACRO P-2s cerakoted WHATEVER color you wanted as long as Cerakote made the colors available. But the cool part to that was he had figured out how to match the factory logo and laser etching to reapply it after refinishing the optic. So for all intents and purposes, they looked like factory ACROs when it was all said and done.
I hit him up and scooped a re-lasered P-2 that was refinished with Troy Coyote Brown cerakote. It looked real sharp and played right into the Block II/50 Shades of FDE look while offering a uniqueness in that it was a slightly different color than the more sand looking tan ACROs we first saw on display in Europe. I parked it on top of the LPVO on the ROF-90 mount, turned it on, and there she sits waiting to be zeroed as of this writing.
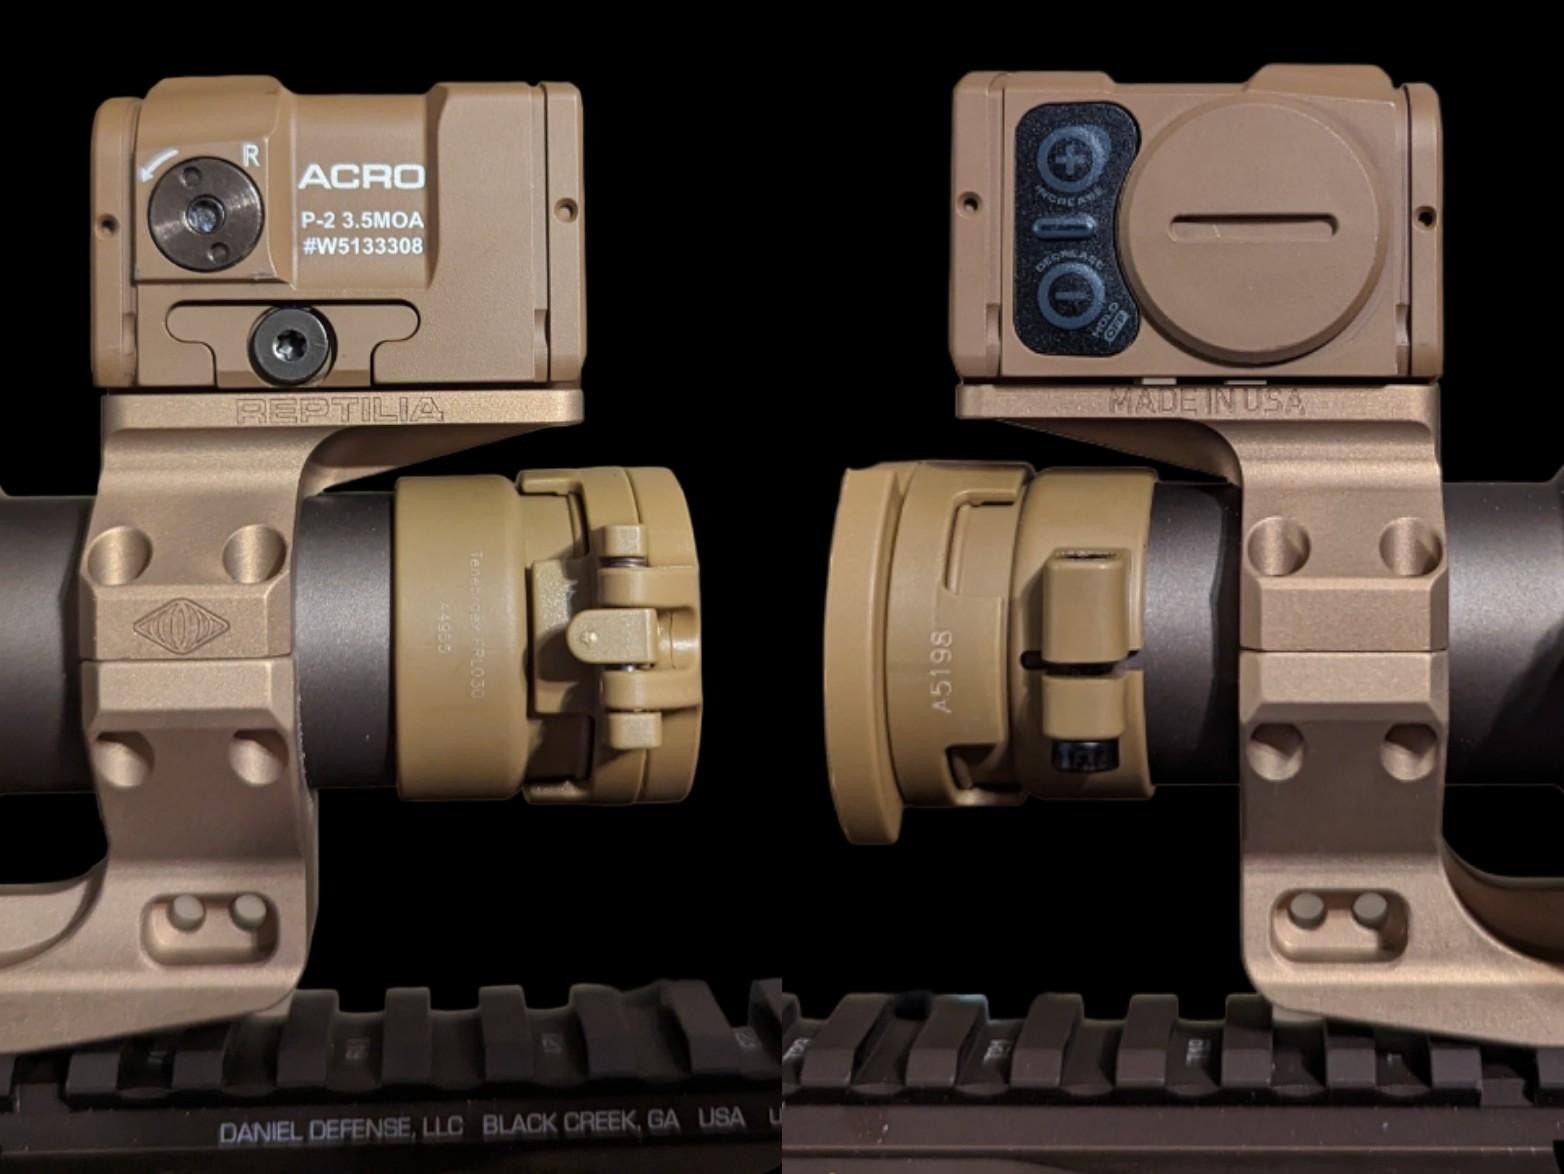
With the ACRO on top of the LPVO, I immediately get natural passive aiming capability as it relates to night vision. The height of the scope mount basically acts like a “tallboy” mount that provides the height for the MRDS that’s conducive to passive aiming (aiming through the optic while wearing night vision, as opposed to aiming with the IR pointer and risking exposing your position to adversaries equipped with night vision, as we’ve discussed previously). I’ve done this twice before, so it wasn’t even something I had to stop and figure out this time around.
Now as far as day optic use goes, I’m among those that will treat the MRDS as the go-to 1x aiming method once it’s present over the LPVO, which gets left on a higher magnified setting, anything from 4x to 8x depending on what I need, with 4x being akin to an ACOG or Elcan. With this, you immediately have both at your disposal; all you need to do is pick up your head into a chin weld, or drop down into a cheek weld.

Dropping down: Chin weld to cheek weld
It also helps to use the MRDS to “track” a target before dropping down into the magnification, where you’ll find your reticle is looking right at whatever your MRDS was looking at, before taking the shot. You’ll see something similar on spotting scopes, where an MRDS will be mounted over the scope to help the spotter track and identify targets faster rather than having to track through the magnification, which can be a bitch as you’re well aware.
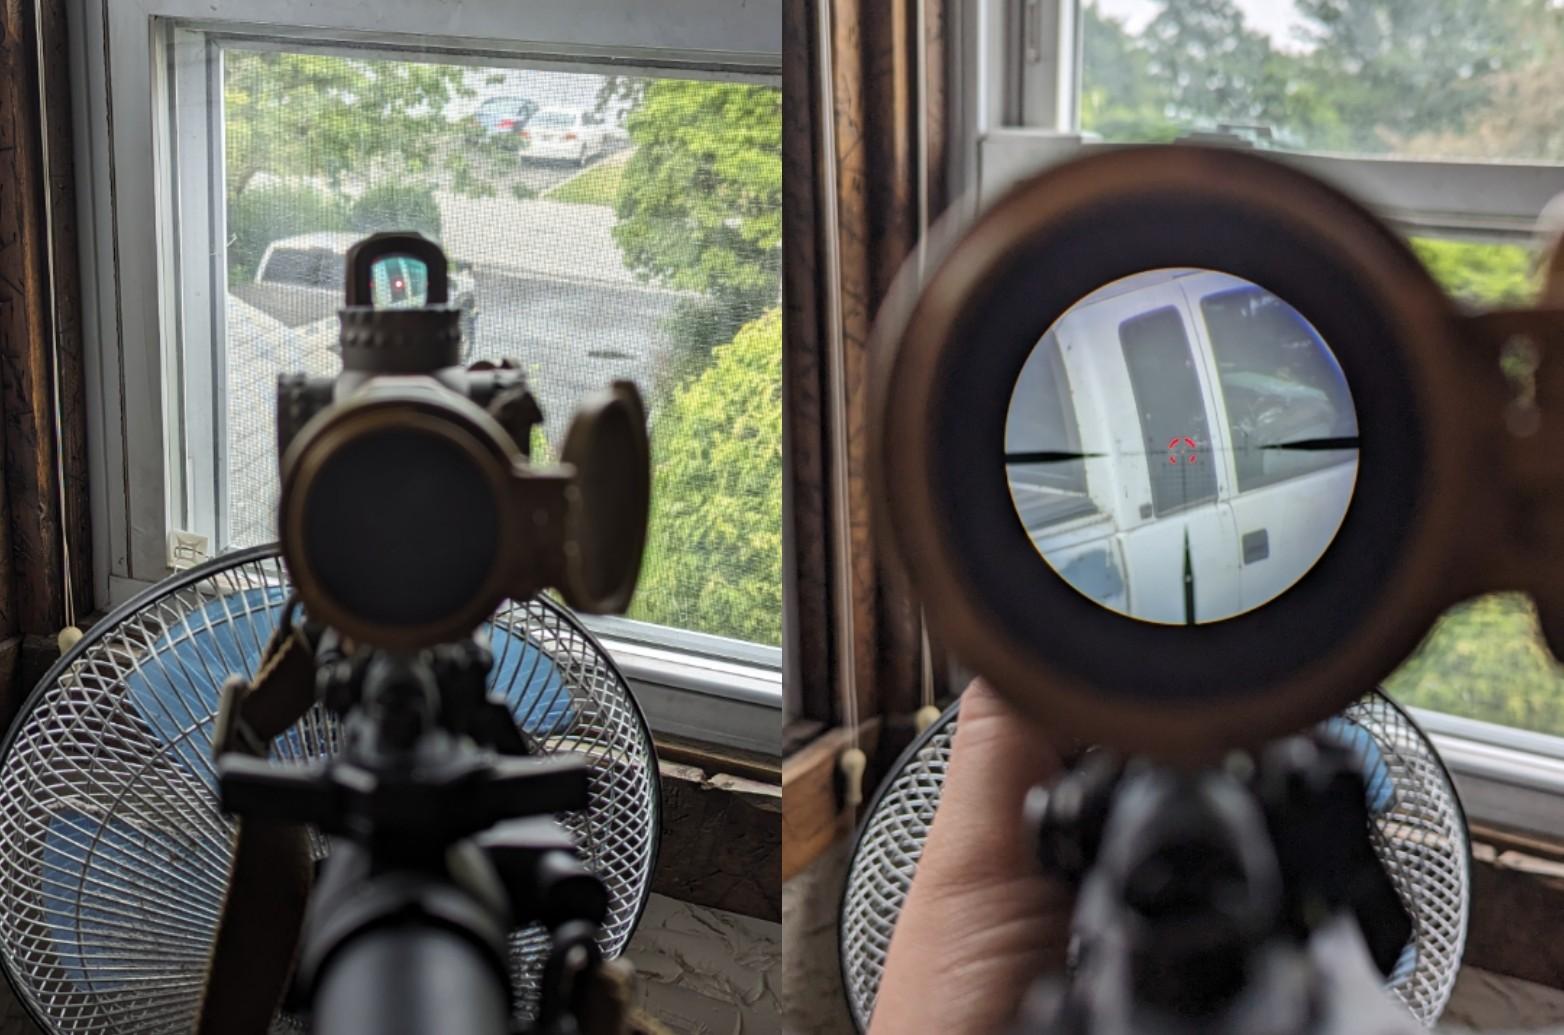
Dropping down, from the other side: 1x to 6x
The MRDS as the primary 1x optic just hits my eye better with its unlimited eye relief, which also makes it good for awkward positional shooting compared to still yet having to obtain proper eye relief to use the LPVO on 1x. It’s certainly not bad at all through the NX8, and I’d do it without pause if something happened to my ACRO. But while the ACRO is up there working as expected, it makes more sense to me to leave the LPVO on a magnified setting instead of having basically two 1x optics and then needing to take the time to crank up the magnification.
Some people can’t wrap their heads around this and bitch and complain and talk shit, asking why don’t I just use bigger glass at that point. I don’t need all that glass for this rifle and its intended purpose, so I’m not going to carry the extra weight, and I’m not going into rifle configuration mission creep where I put big glass on an SBR thinking it can do SBR and SPR stuff and end up not being able to either of those functions well. So if someone can’t be bothered to understand because they’re too good to hear it, whatever, I don’t care. I get it, you get it, others get it, keep it moving.
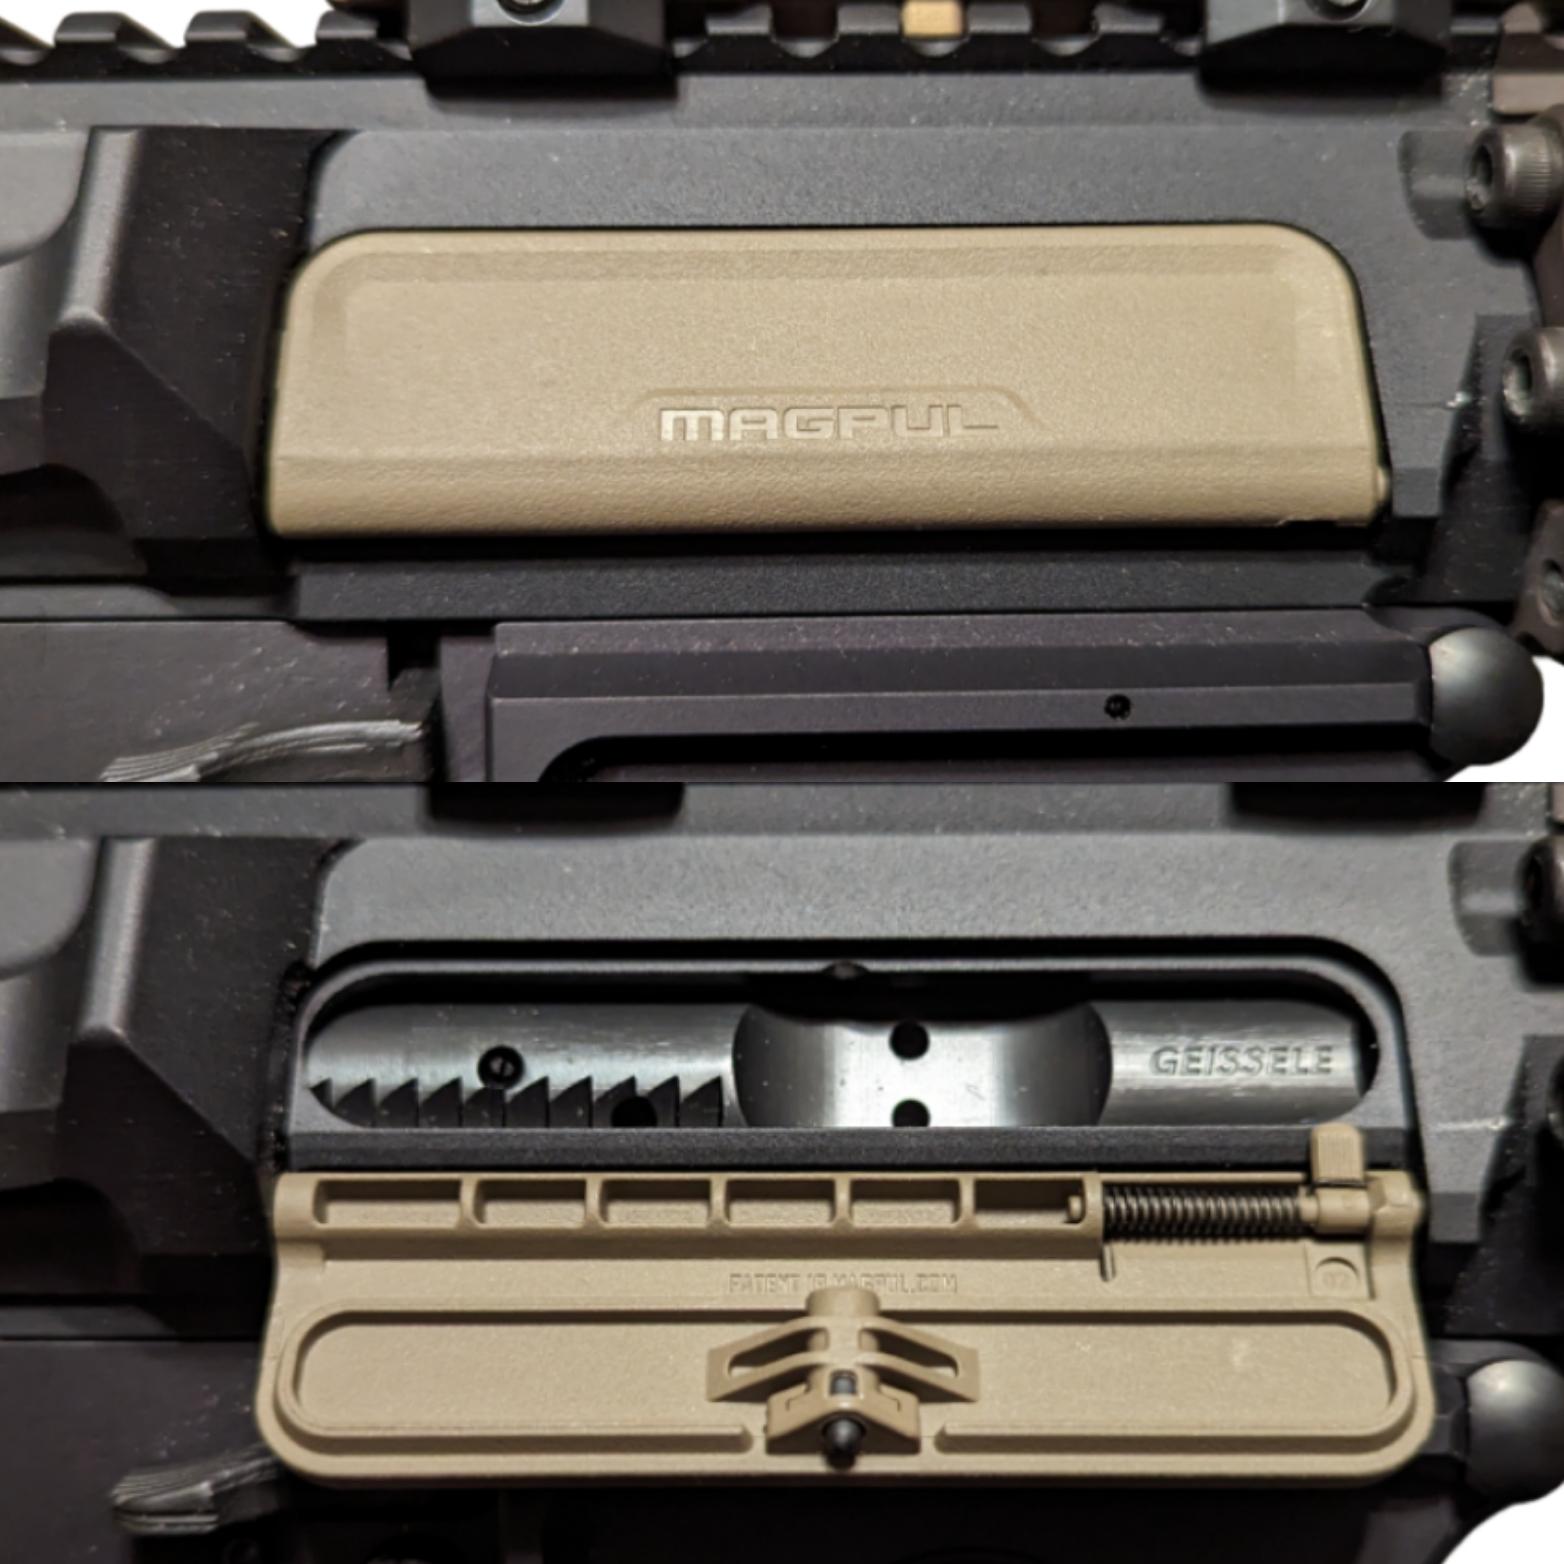
Polymer Accessories: Rounding out the ergonomic polymers, I chose Magpul and a newcomer to finish this off.
I went with the Magpul Enhanced Ejection Port Cover because I thought an FDE dust cover combined with all the other tan stuff on the gun would look cool against the black receivers, and because apparently they were really easy to install. True story both ways. Going forward, I really see no point in buying any other Ejection Port Cover, given how incredibly easy and therefore convenient it was to get on there.
They’re very streamlined in appearance, they come in the usual Magpul colors, they’re cost effective, and you won’t have trouble finding them in stock for the fact that there are rabid fanboys waiting in the wings to blow their wad on a collection of them. The funny thing to me about this thing was remembering all the shade people threw at HK & Daniel Defense for using polymer dust covers in the past, but when Magpul did it they were cool with it. Pepperidge Farm remembers, ya fucks.
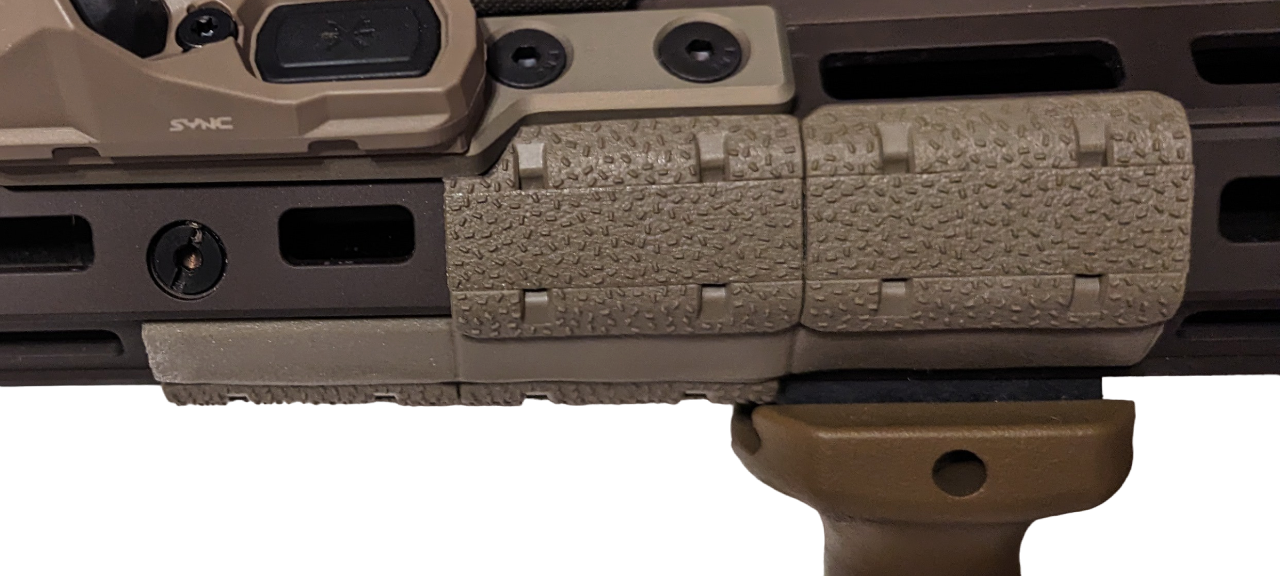
When it comes to M-LOK Rail Cover Panels, Magpul Type 2s are the GOAT. Also cost effective, also easy to install, also available in a variety of colors, aesthetically simple, and most importantly, ergonomically effective in terms of both grip surface and keeping your hands from getting burnt by a hot rail after a few high tempo volleys of fire.
“Well why’d you buy both?” Basically to cover up as much of the spots heat might hit my hand through the rail, or where my support hand touches the rail all together. The hard polymer Type 2s go on the 3:00, 6:00, and 9:00 sides of the rail. The soft rubbery Type 1s, being much narrower, go in the offset sides of the rail at 11:00, 1:00, 5:00 and 7:00. That seals everything up nicely to the point where if I’m not using gloves I’m not worried about the rail being too hot to get a grip on after a few quick magazines.
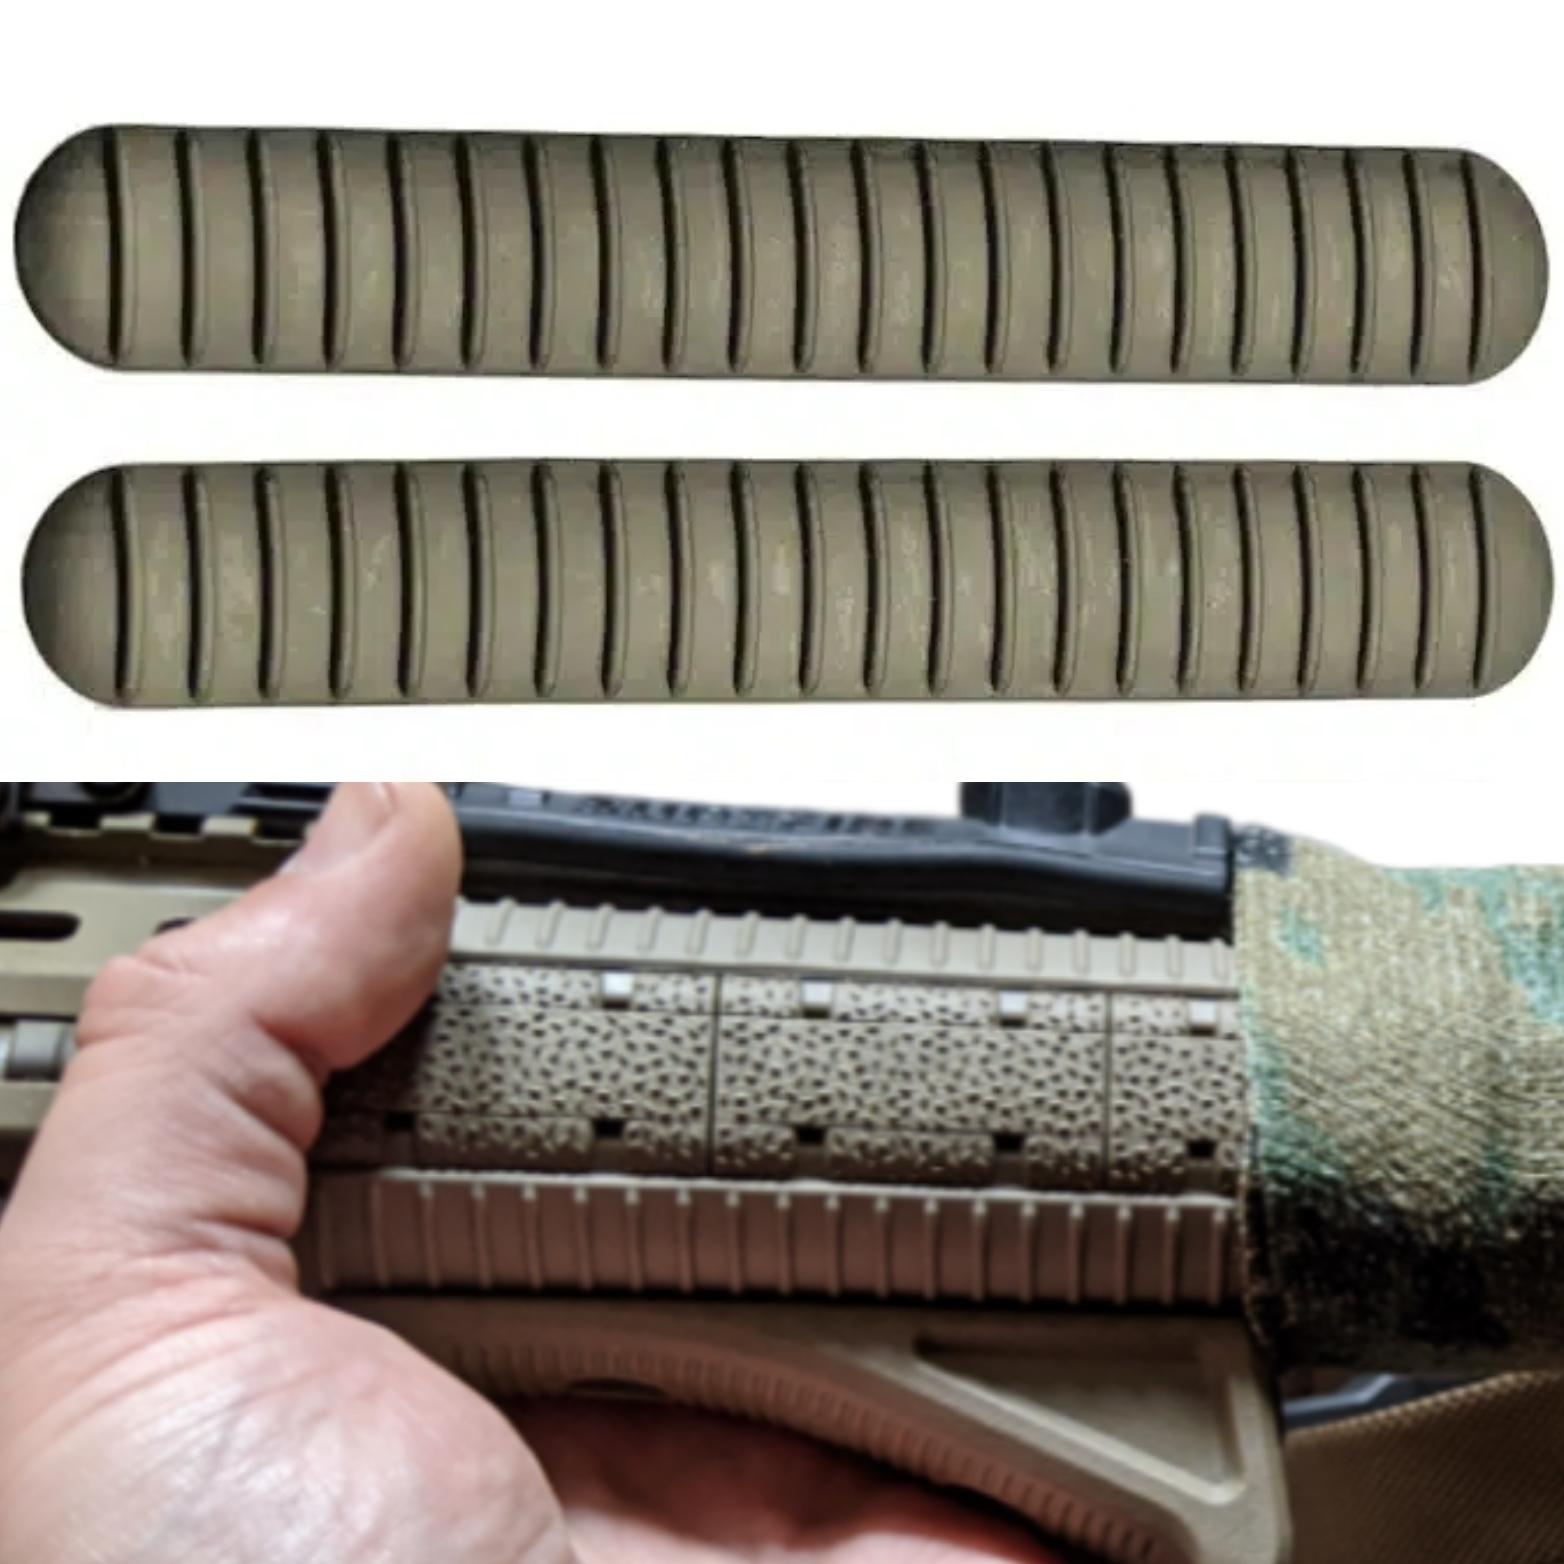
Alternatively to the Type 1s, if you want something more textured and you like the old school GWOT era aesthetic of the old KAC pic rail cover panels, B5 Systems makes rail cover spots that feel and install just the same, but they’re ribbed and look like mini KAC pic rail covers. I used them on my GPR, they’re legit. I grabbed Type 1s here cause the place I bought the Type 2s from already had both anyway so I just added them to the cart and kept it moving.
Now the VFG, I could have gone the easy way and went with a Magpul MVG in FDE and kept everything uniform. But the dude over at Onyx Arms made these cool stubby VFGs in both M-LOK and 1913 pic rail flavor, and they were available in Coyote like the A2 grip via cerakote. They look like the KAC broom handle style VFGs from back in the day but shorter, which saved me the trouble of having to find one to chop down.
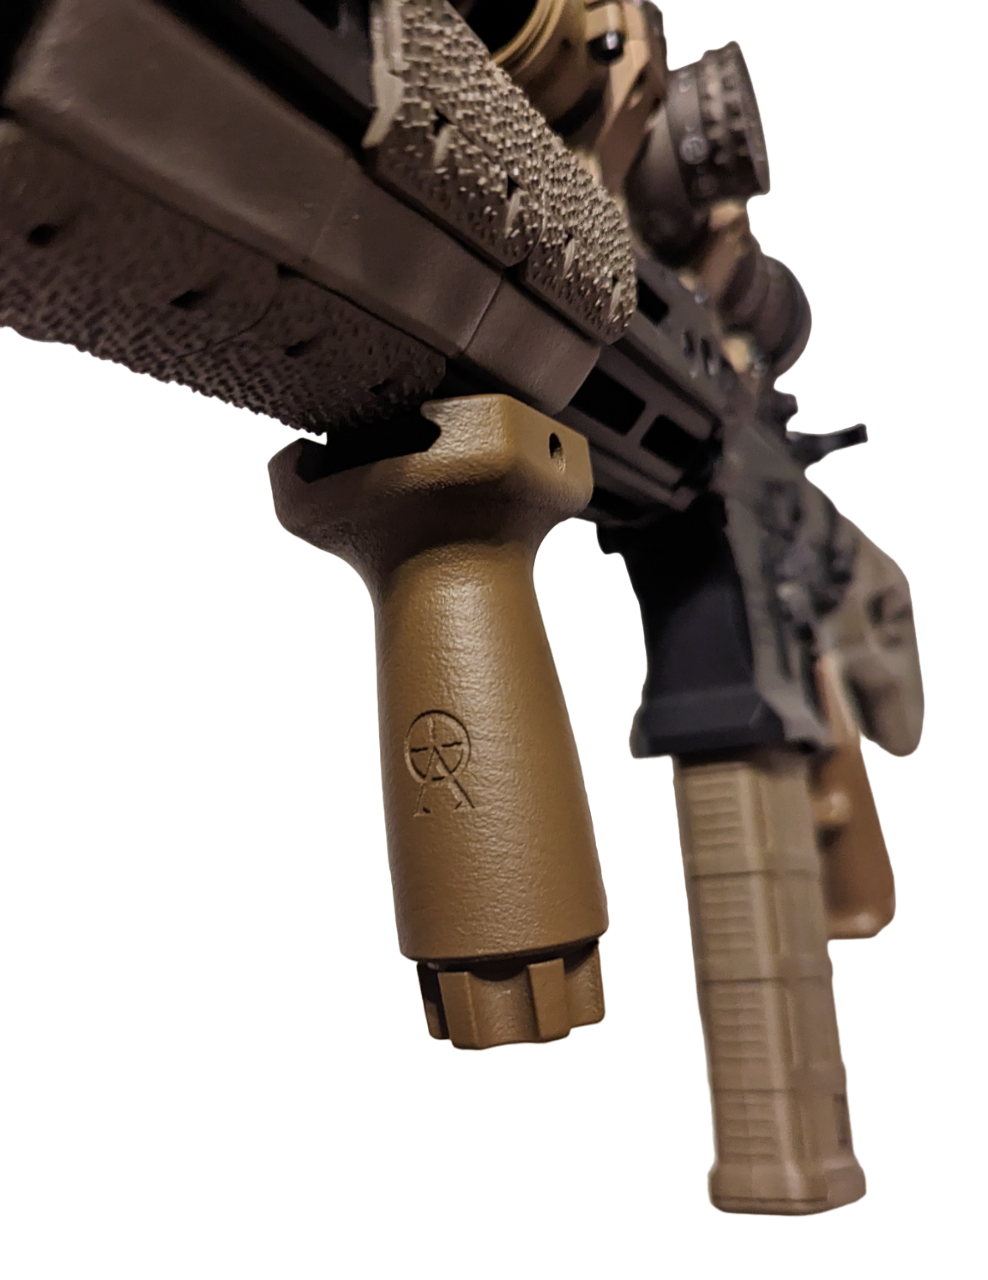
I went with the 1913 version because I’d already tried out the M-LOK version and wasn’t a fan of how wide apart the M-LOK screws are; because the mounting surface flares out as much as it does, the screws are like 1.25 M-LOK slots apart from each other. This means you can’t fit them within one M-LOK slot or evenly straddle it across two, you HAVE TO asymmetrically straddle it across two slots and therefore the positioning isn’t as flexible.
I’ve also changed the M-LOK one on my HK416 upper out for a 1913 version because I couldn’t ergonomically get the VFG where I wanted on the rail and my hand would end up in a fucked up position relative to my WML mount, the switches, and my MAWL buttons. The 1913 version fixed that, so I dug out an M-LOK one slot length polymer pic rail segment, bolted it to the rail, and attached the stubby VFG to it. It looks sharp, it feels good, it’s where it needs to be. Done deal.
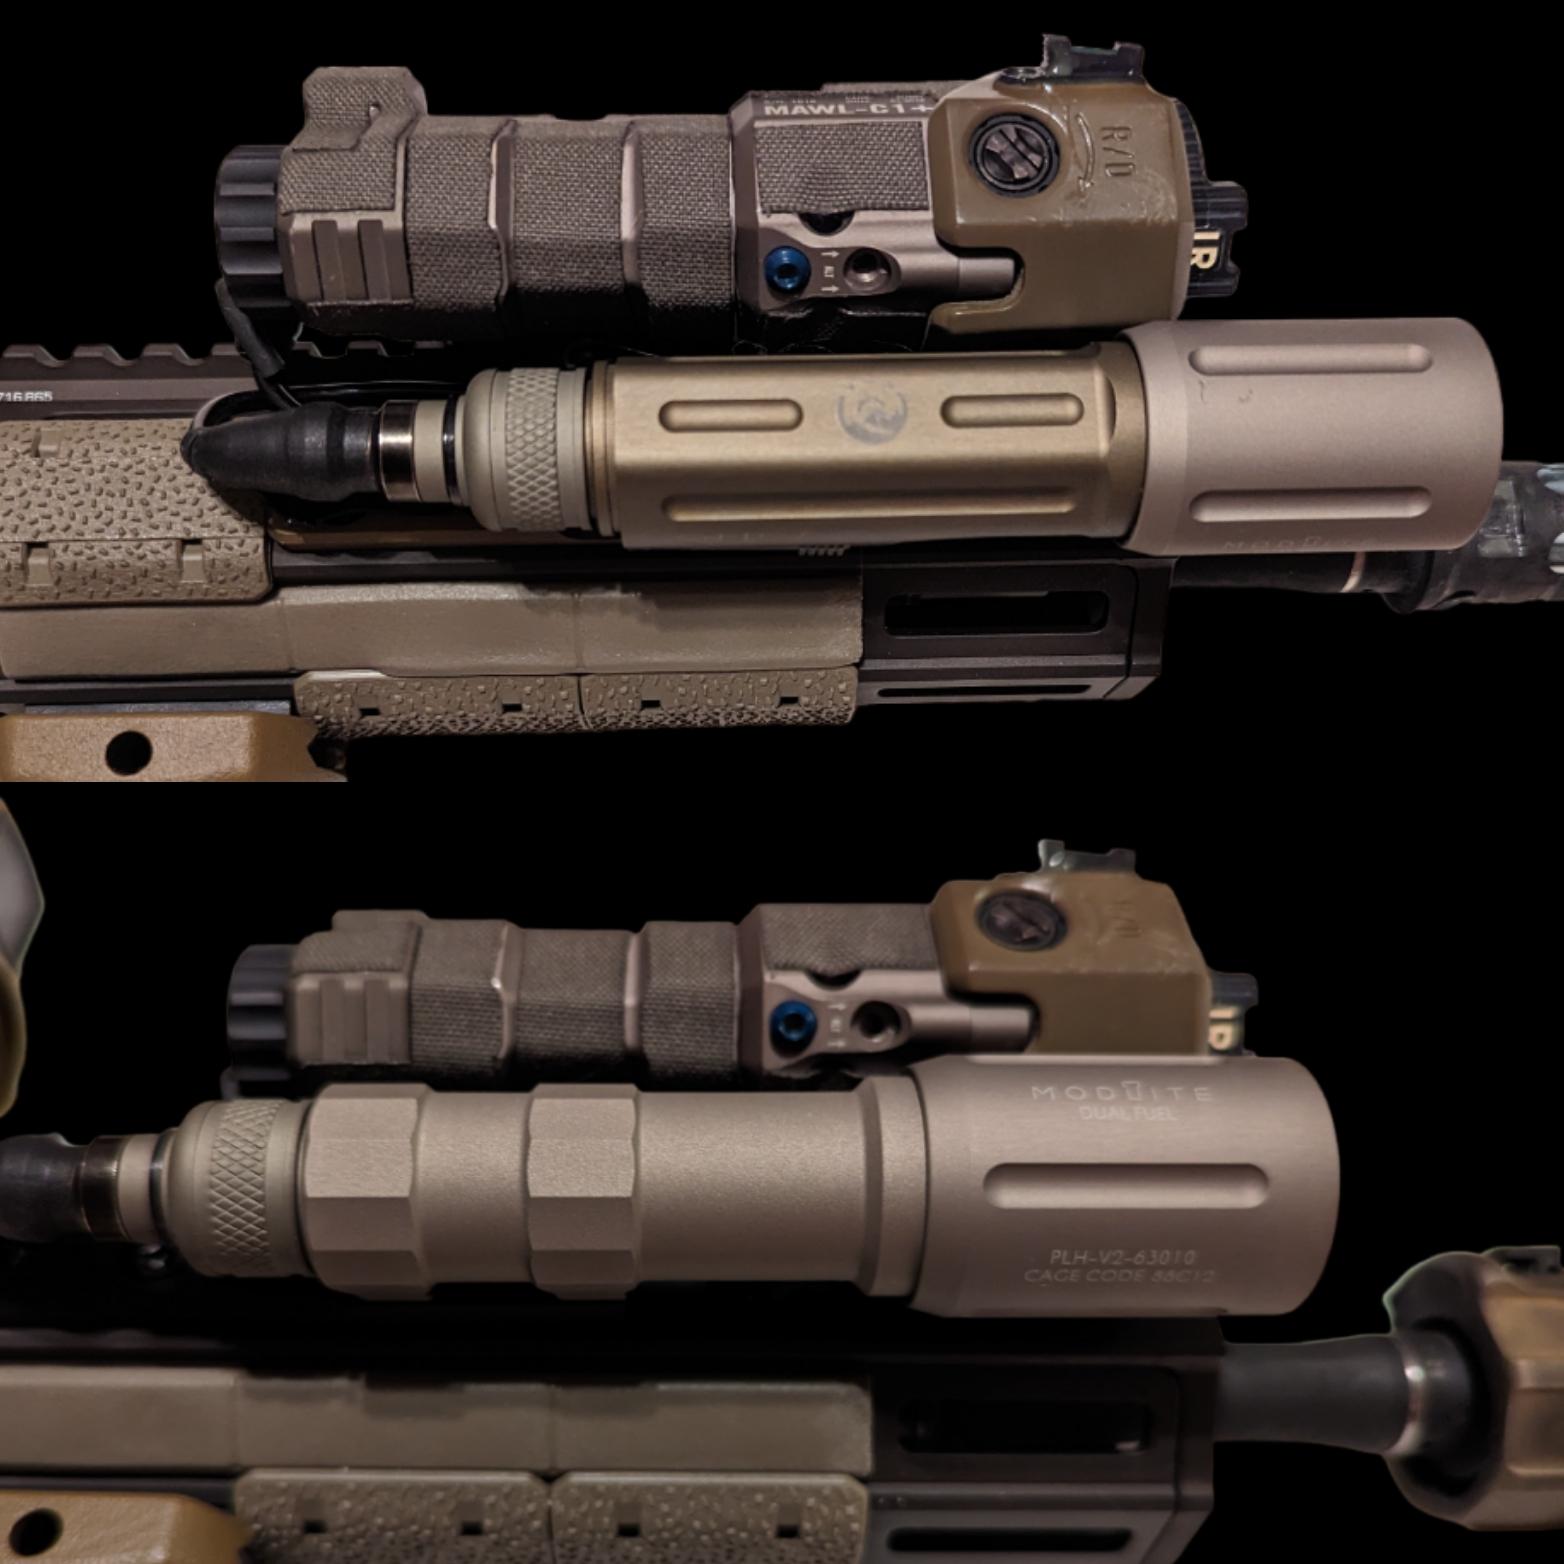
Electronic Enablers: Originally, in an attempt to save some coin by using what I already had laying around, I intended to use my ODG Onset light body and mount for this build as you can see here in these pictures I took initially, coupled with a Modlite PLHV2 Dual Fuel head and a Surefire plug tailcap.
Those last two were basically state of the art choices on either end; Ideally I would’ve grabbed a DS00 for the tailcap for switching redundancy, but I couldn’t find a tan one in stock. Until then, the UE cap will do fine. The Modlite PLHV2 Dual Fuel head was another “didn’t even have to think about it” selection; I’m standardized on the Surefire scout pattern and I intend to stay that way, so that ruled out Cloud Defensive. Malkoff is cost effective, but lesser in output and only comes in black.
As of this writing, Surefire hasn’t made the Turbo Scouts heads available on their own yet, so that wasn’t an option either. I didn’t realize the Modlite PLHV2 head was Dual Fuel; I didn’t seek it out intentionally. I’m guessing it’s what they’ve standardized on and now the PLHV2 & OKW heads are Dual Fuel across the board, which I find amusing since I remember the original response to Dual Fuel requests was a hard “No.” Either way, I have a few PLHV2 heads, they’re reliable, they’re bright, I know what to expect, nothing out of the norm here.
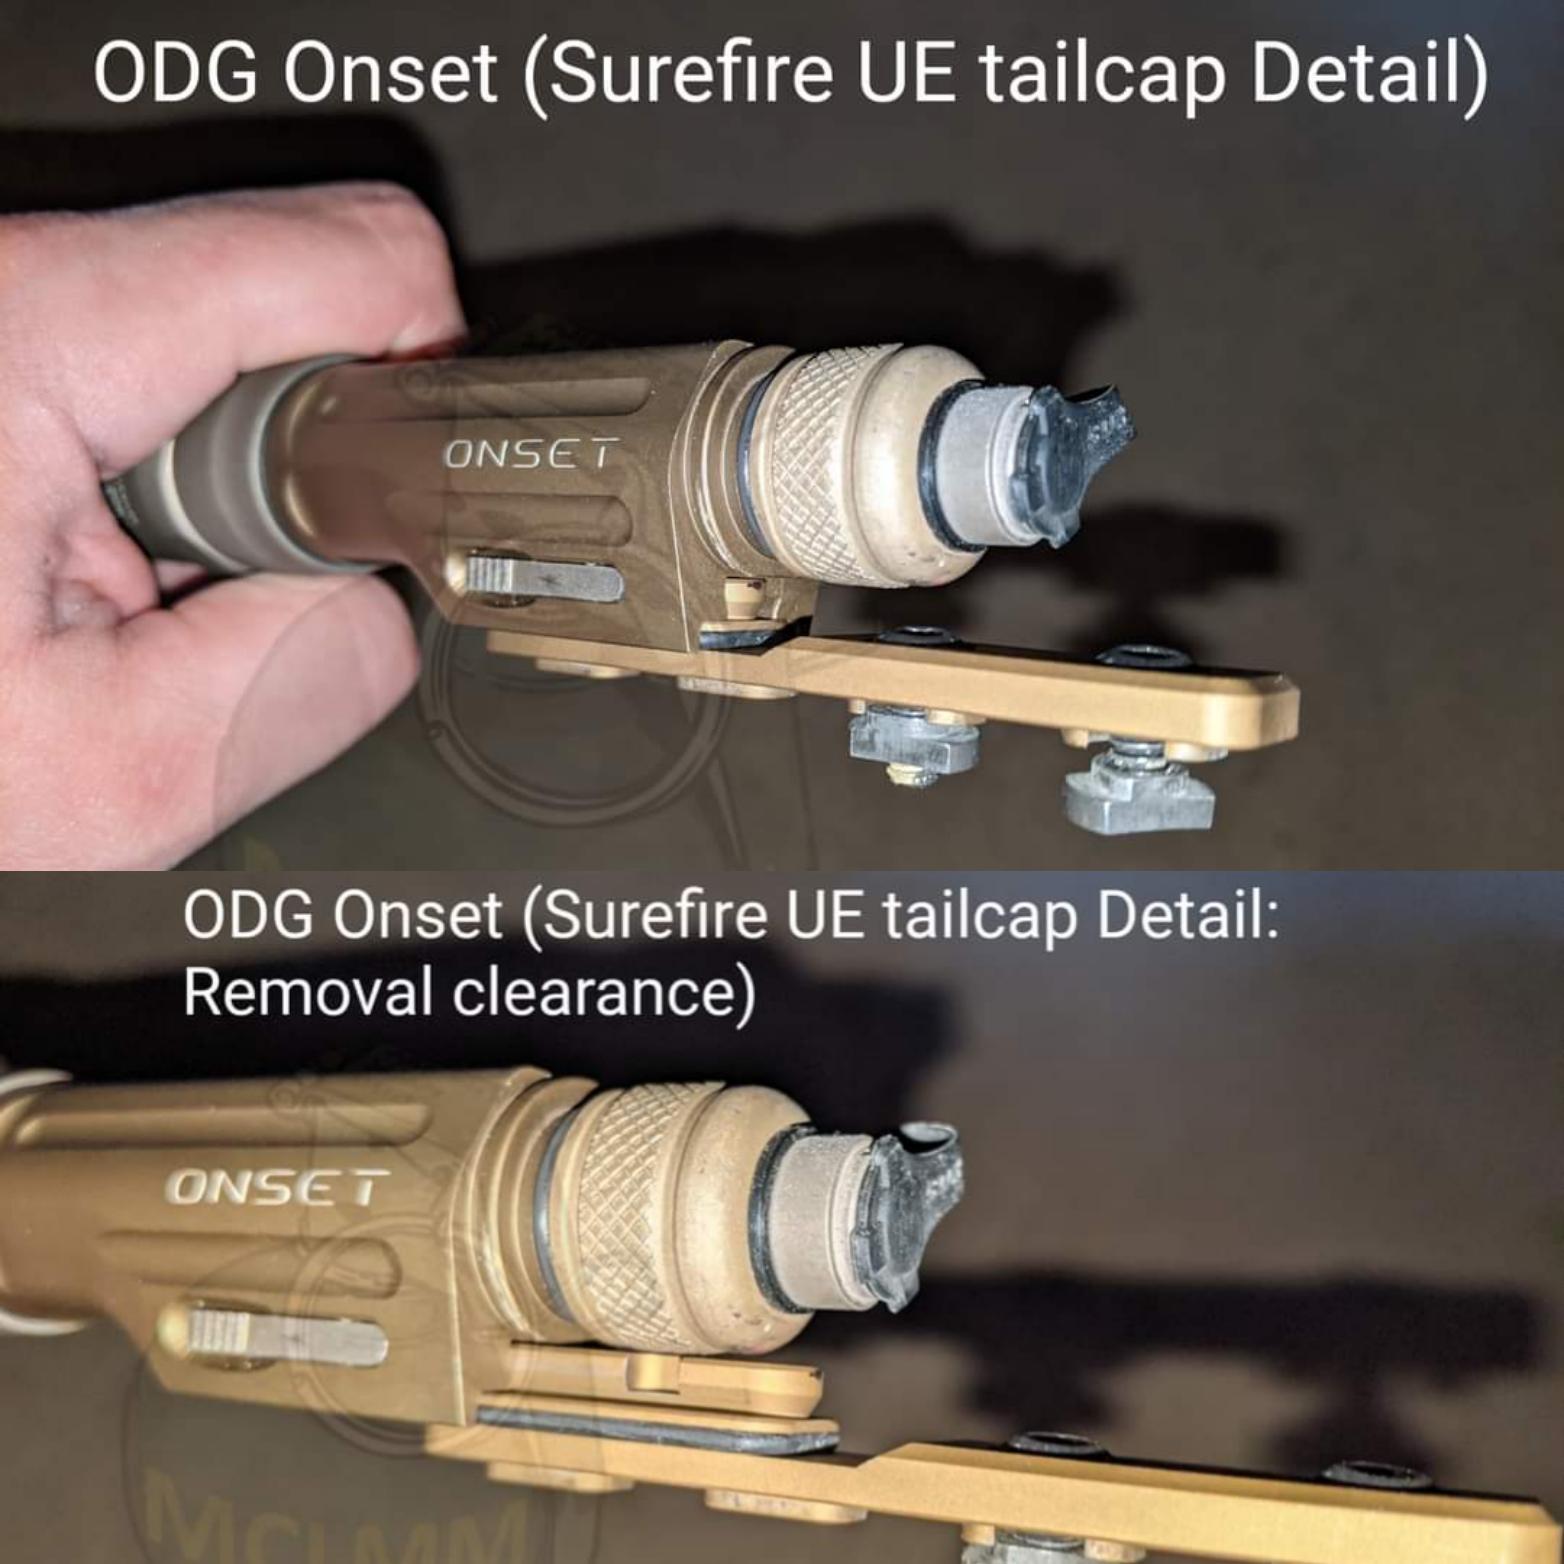
The ODG Onset attempted to offer a modular WML/handheld light suite by using an inline mount that the light body slid onto and locked into place via two clips, but could also be slid off and re-equipped with a different tail cap (if using remote switches on the rifle) and serve as a hand held.
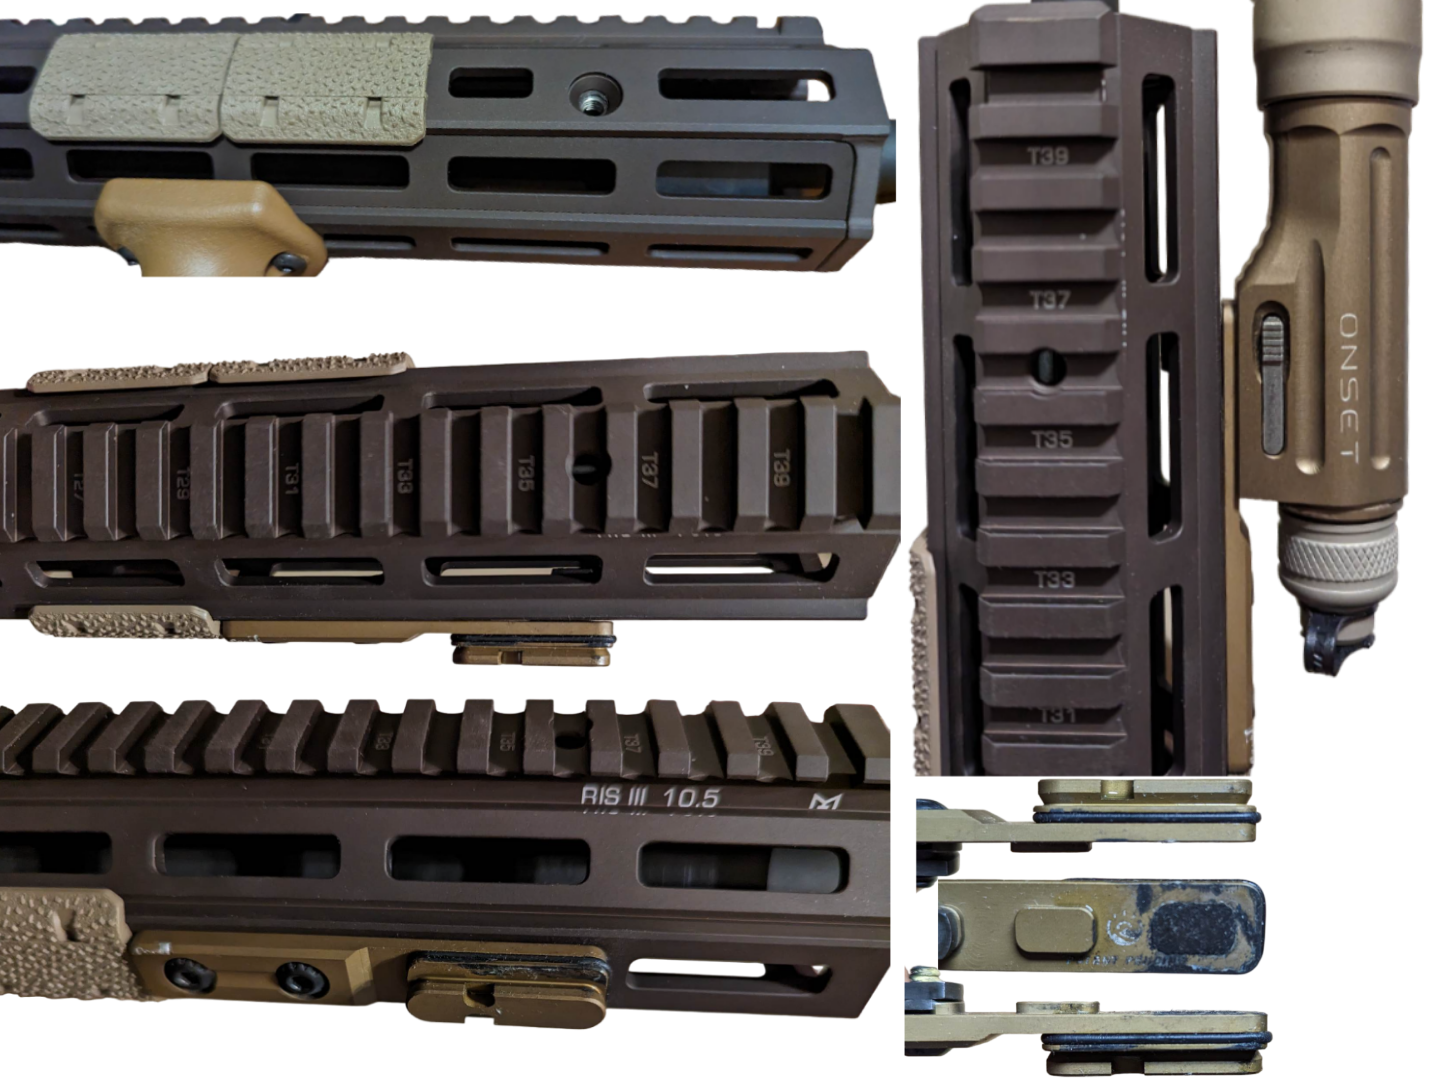
The idea was to save the end user money by being able to quickly and easily use the WML also as a hand held. I modified the inline mount by shaving off one of the M-LOK lugs so it would mount flat to the rail (one of the grenade launcher lug screws in the RIS III that necessitated only half of an M-LOK slot being available would have gotten in the way). But I found that once it was paired with the light head and tail cap, and mounted up under the MAWL, there were two problems:
1.) Having no other choice with inline mount positioning relative to the rail covers and cable length and everything else mounted onto the rail, the light head was forward of the rail just enough that even if I unscrewed it from the light body, I wouldn’t be able to get to the MAWL’s elevation adjustment screw; I would have to remove the whole light body from the inline mount. Which led to the next problem…
2.) Given the location of the clips on the light body and the fact that there’s one on each side that needs to be pushed simultaneously to defeat the retention and slide the light off the mount, when it was all put together, one of the two clips was buried pretty tight between the light body and the MAWL. So if I wanted to adjust the MAWL’s elevation, I’d have to take the whole light body off the mount, but to do that I needed to push in one clip, and get into this tight space between the MAWL and the light body using a knife or something and push it in at the same time, and that ended up being a pain in the ass, so… fuck that noise. Too much work, not enough benefit.
I grabbed another inline mount, this time from Arisaka since an offset mount isn’t really an option with the RIS III’s geometry. At the same time, I grabbed a tan 18650 Modlite body because honestly what other light body would I get at that point? Everything’s all Surefire Scout pattern here, so that was all in order. I put everything together, mounted it on the 3:00 side of the rail, and checked the alignment and clearance against the MAWL: Good to go
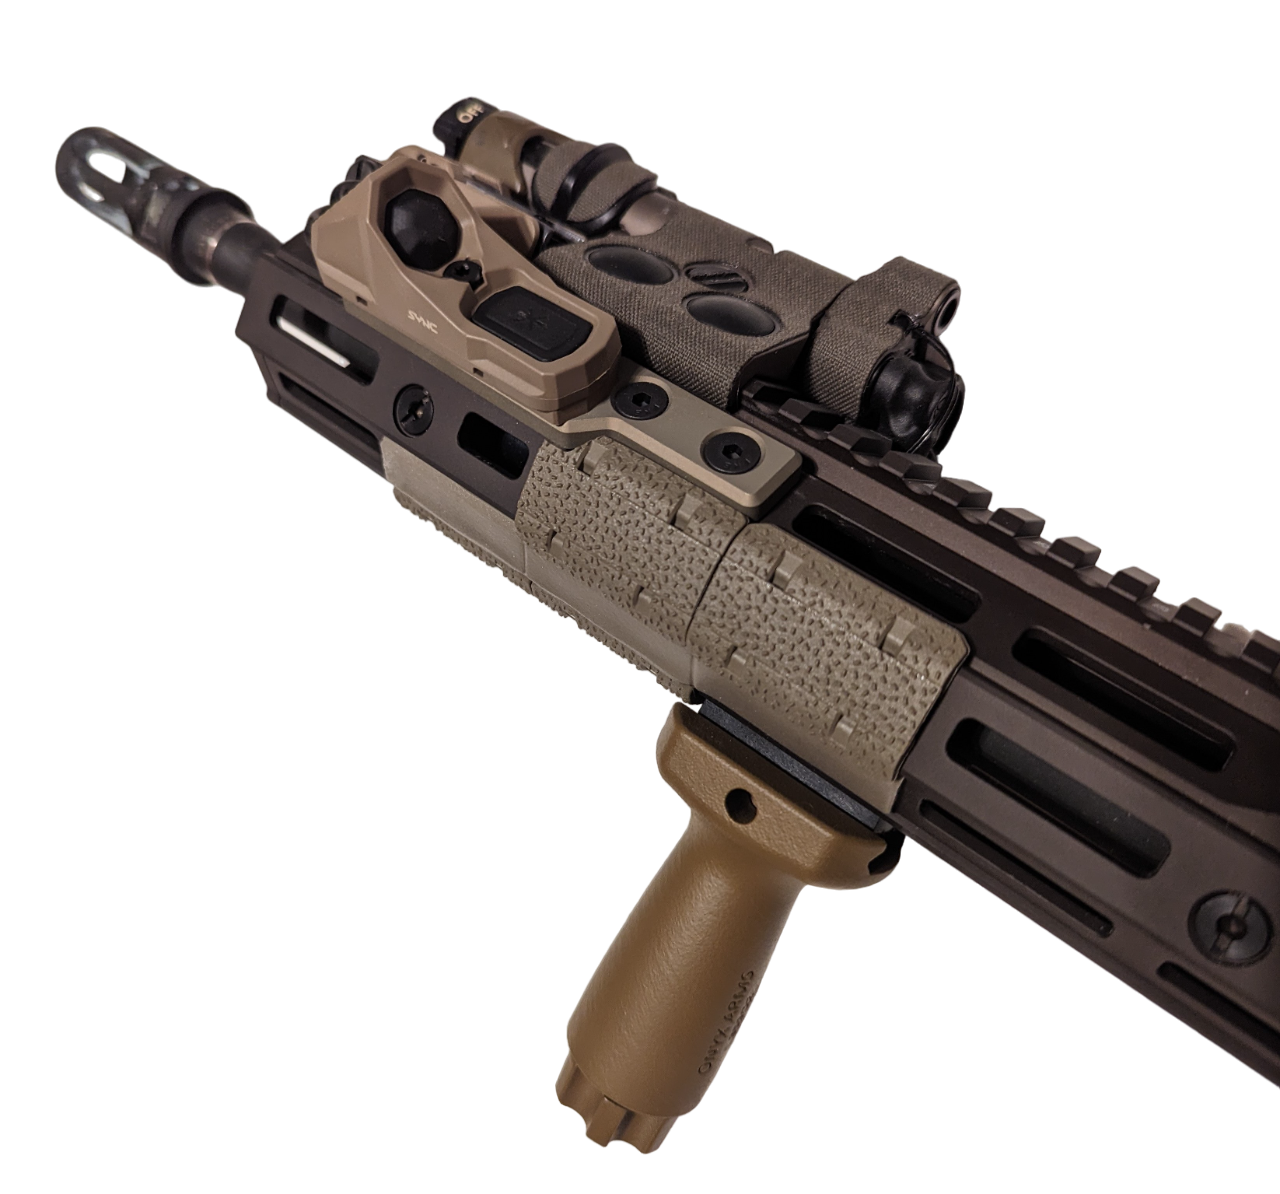
The AXON SYNC switch was announced during the week before SHOT 2023, and I ordered mine right then and there. I liked it cause it seemed like the combined the TAPS SYNC and HotButton by incorporating an angled Constant and Momentary On capable clicky style button with a momentary only pressure pad, where one of the buttons fired both white light and laser (on VIS mode), not unlike I was already doing with the TAPS SYNC.
However, I didn’t physically get my hands on it until I got back and go figure that the ones on display at the Unity booth didn’t have working lights attached to them, so I wouldn’t get to really mess with it until I got home. It was then that I realized, I had made an incorrect assumption.
I thought the angled clicky cap would work the white light alone, and that the pressure pad would fire BOTH the white light and the laser, where I would use the MAWL’s onboard buttons to fire the laser alone. I had it backwards. Clicky button fires BOTH white light and (VIS) laser, pressure pad fires LASER alone.
I thought the redundancy here was odd since it basically removed using one of the MAWL’s two buttons to from the equation, but it also meant (lacking a DS00) that if the laser was on, I no longer had the ability to fire only the white light. Hopefully Unity releases another version with flipped button firing sequences like I thought I was getting.
I’m not sure who asked for that, but I presume someone did, cause that was the answer I got for my next question: Why were there cables coming out of the front of the switch instead of the back? It would stand to reason that, since they’d have to lead from the switch to the light and laser, that they’d go from the rear of the former to the rear of the latter. Instead we’re going from the front of the switch to the rear of the enablers. But again, somebody asked for that, so whatever.
Originally I was bending the cables backward against themselves to route them alongside the switch, over the rail, and into the WML & MAWL. So there were two hard bends in the wire. Once Jonathan suggested using the MK12/MK18 Front BUIS to capture the cables on top of the RIS III rail, that became a soft bend to route the cables 90° rather than 180°, another soft bend back along the rail, and one hard bend to get the plugs into the sockets. But that was easy. First I had to figure out how to mount the thing.
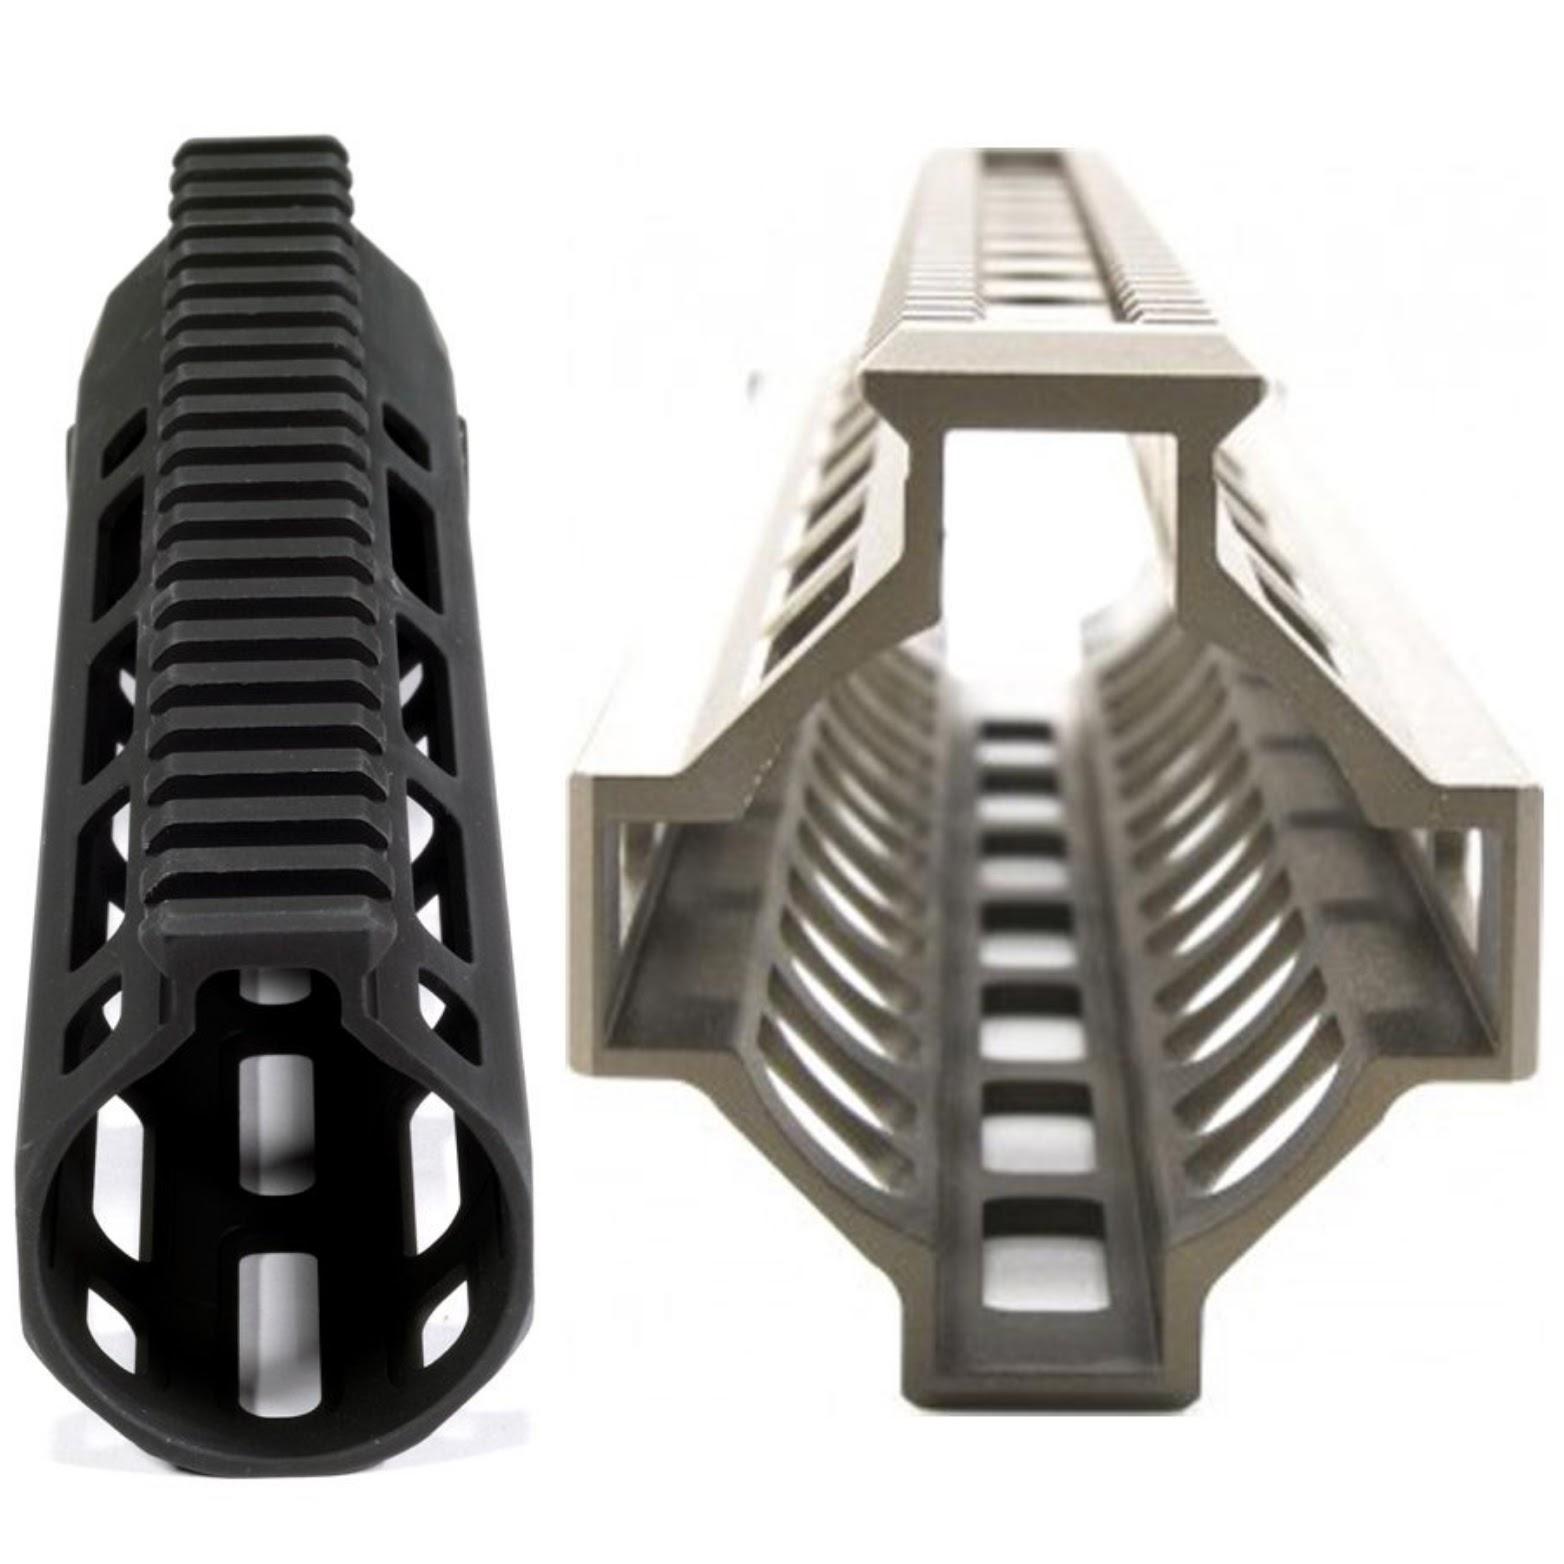
Left: URX4 (Octagonal) Right: MK8 (Cross)
The geometry of the RIS III is akin to the cross shaped rails on the market, like the Geissele MK8; unlike the surface to surface or point to point octagonal geometry of rails like the KAC URX4 where every M-LOK side of the rail touches the next adjacent M-LOK surface directly, the offset rails on a cross shaped rail are like, inset or “lower” between the two adjacent sides of rail.
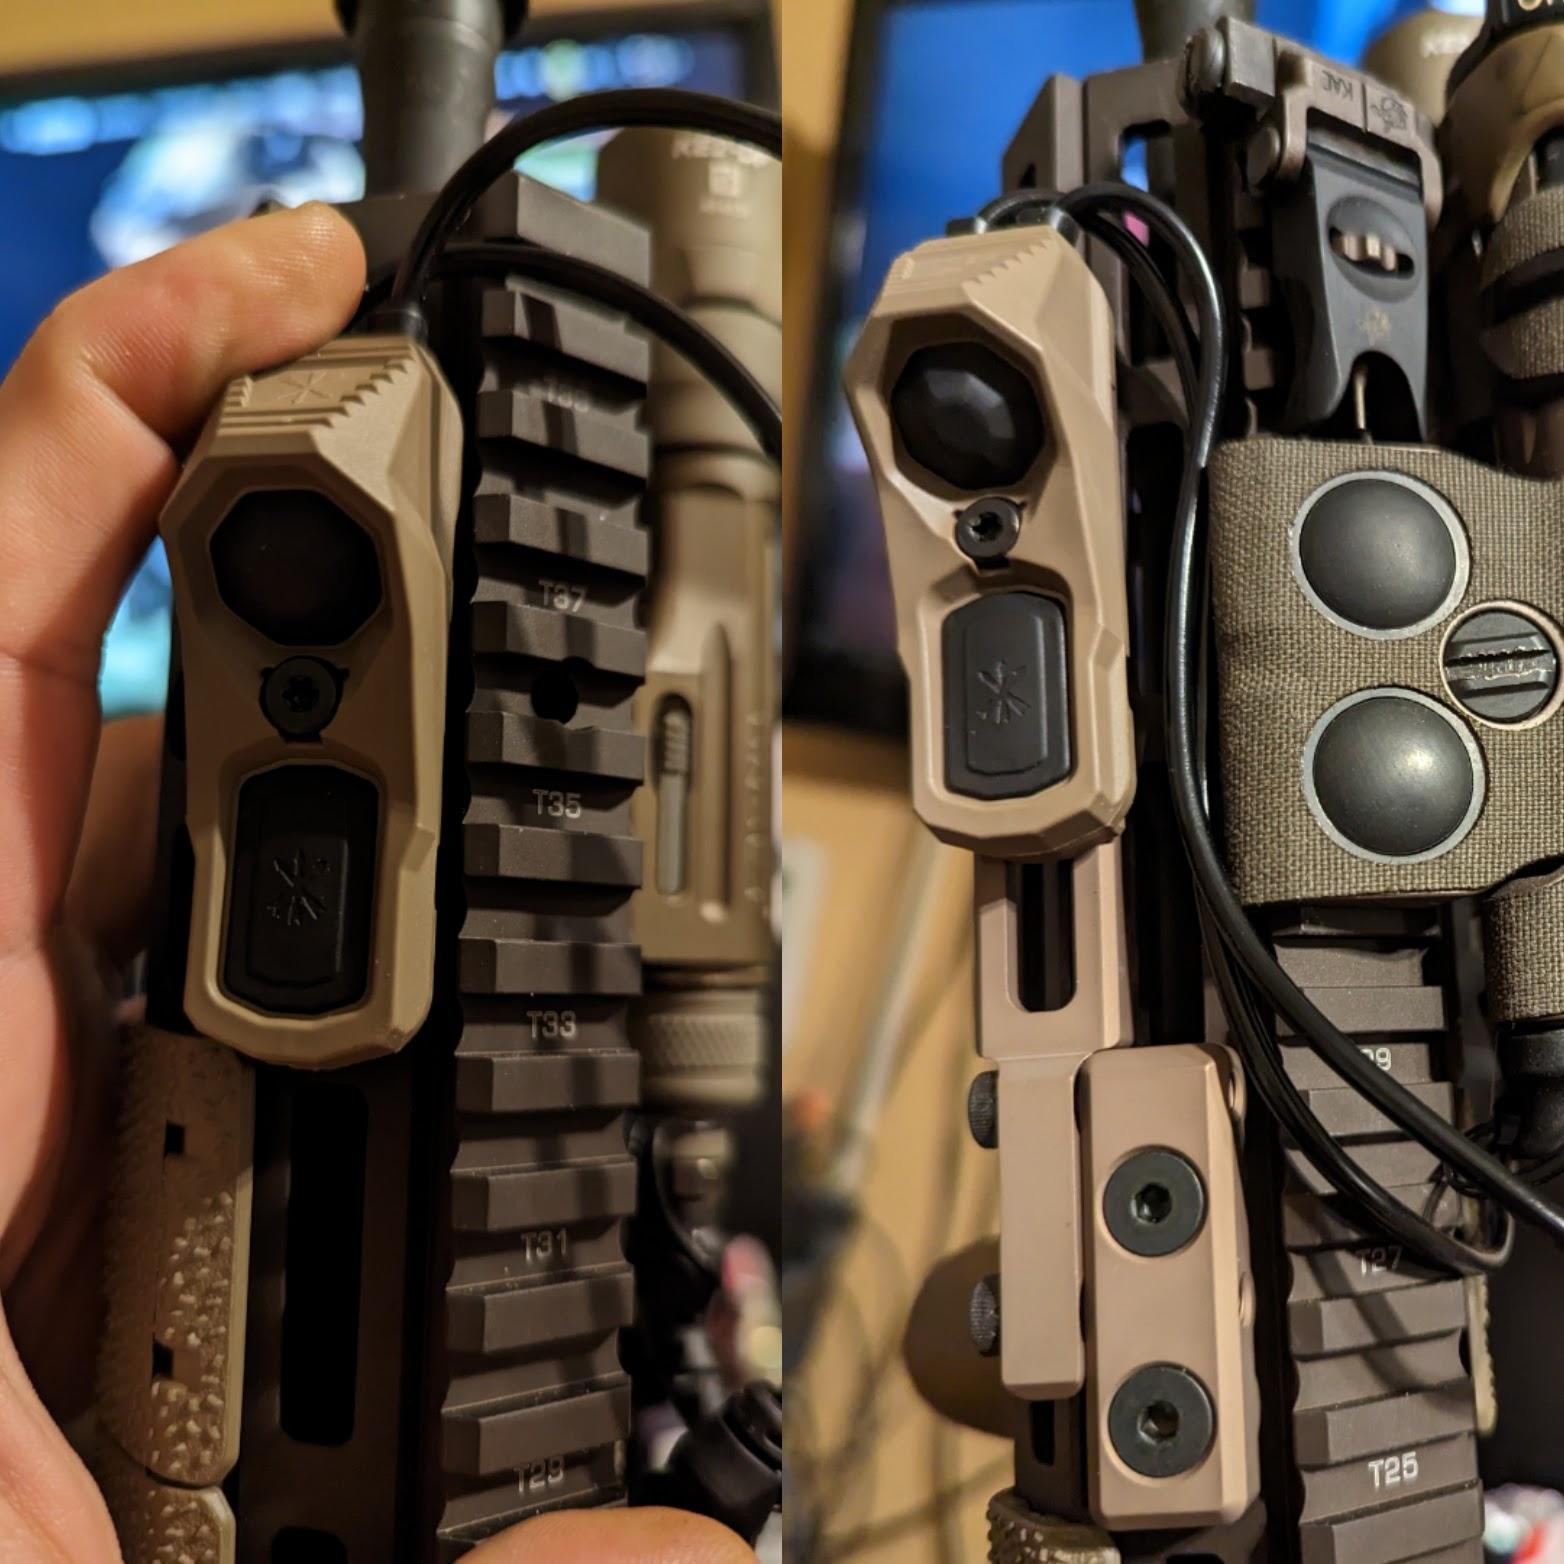
Left: AXON SYNC direct to rail
Right: AXON to OHM2 to rail
So when I bought the AXON SYNC with the M-LOK adapter, I figured oh okay no problem I’ll put it on the 1100 side of the rail and call it a day. Not quite. While I could have done that, I would have precluded the use of the top rail alongside the switch because it was so snug up against it, there was no room for the MAWL or Front BUIS overhang on the left side of the top rail. Shit.
But my buddy Nick got me hip to some shit I wasn’t aware of. He showed me the OHM2 mount Fernando Garcia over at Fernilab had developed and been selling; while it mounted directly to the offset portion of the rail, it itself had an offset portion of M-LOK slots that moved whatever you were attaching to it up and AWAY from the top rail just a smidge to provide clearance to mount stuff to the top rail.
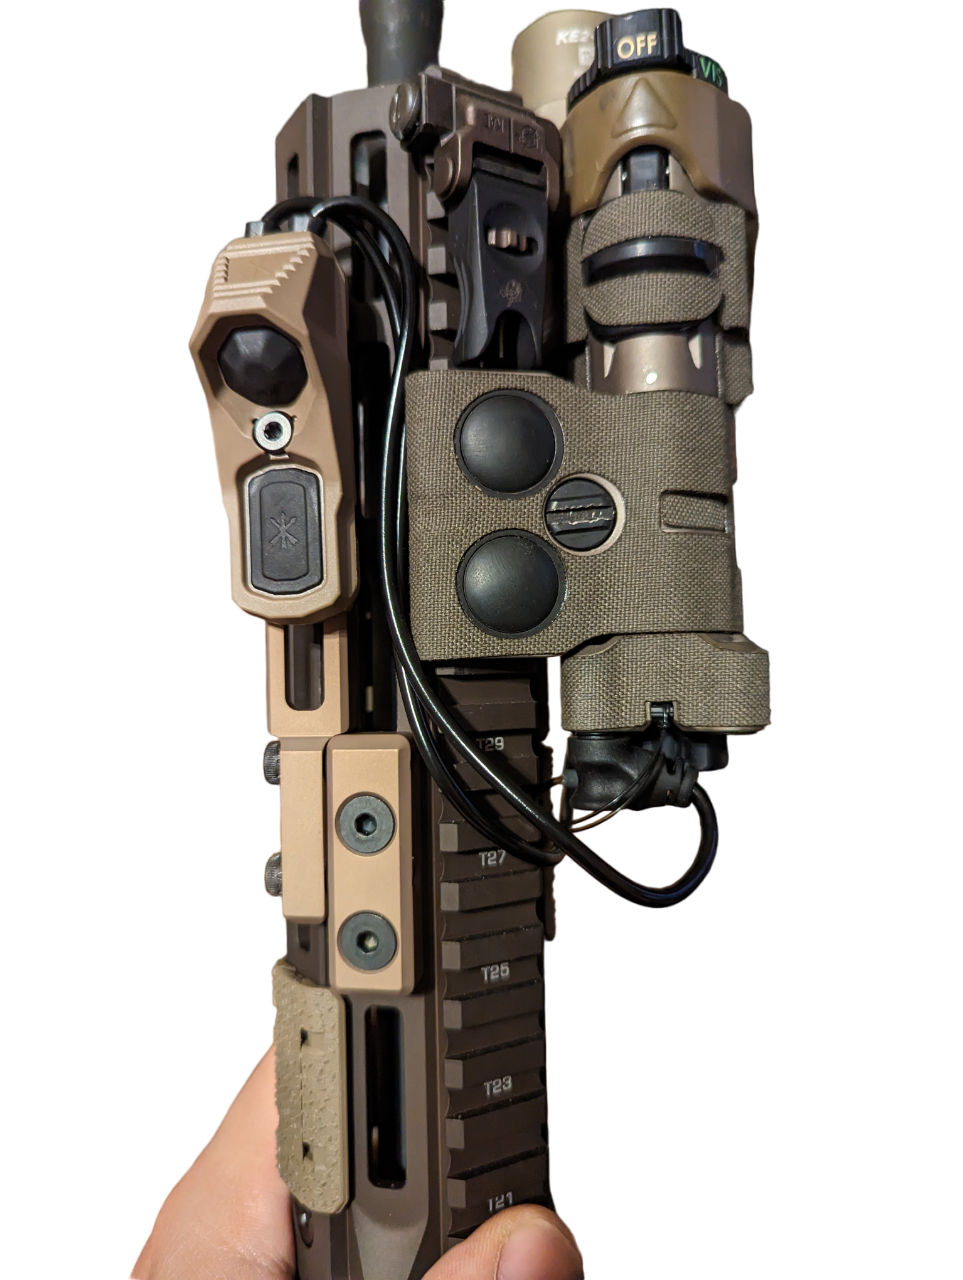
First attempt: OHM2
I said you know what, I’ll have to mount it backwards to use it the way I want to but that might work. I ordered the OHM2 and set it up when it arrived, and… it worked, but it wasn’t perfect. Because the OHM2 was engineered to be reversible, it was made from multiple pieces, and the part that anchored to part that mounted to the handguard rail itself had a hard corner that dug into my hand. Plus, the standoff from the top rail was a little too much and compromised my ability to grip the rifle AND use the AXON & MAWL switches. What to do?
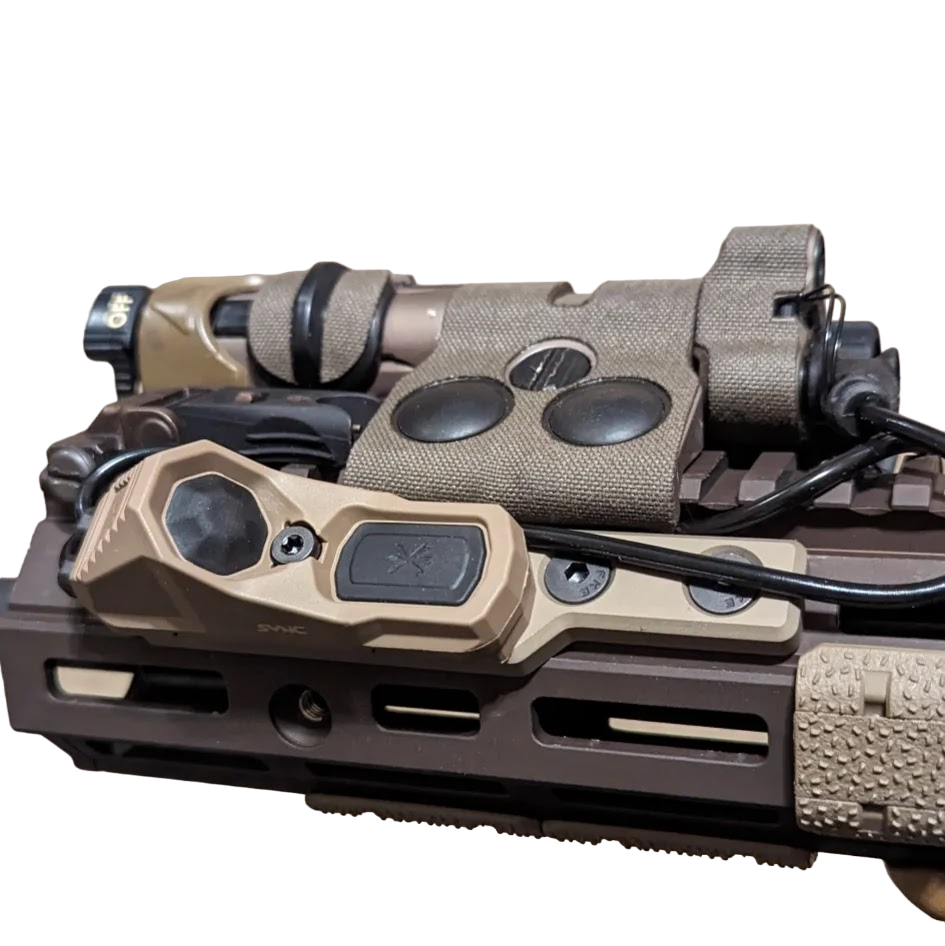
Second attempt: OHM1
I looked again at the Fernilab site, and then I noticed the OHM1. This one wasn’t reversible, so you had to pick left hand or right hand shape (while the OHM2 could be either-or). However, the hard corner from the OHM2 wasn’t there; with its slimmer profile, there was an angled portion in its place. Also, being of slimmer profile meant the standoff distance between the offset portion of the mount and the top rail of the handguard was lesser. I bought a right handed one to try out, hoping it would solve the problem.
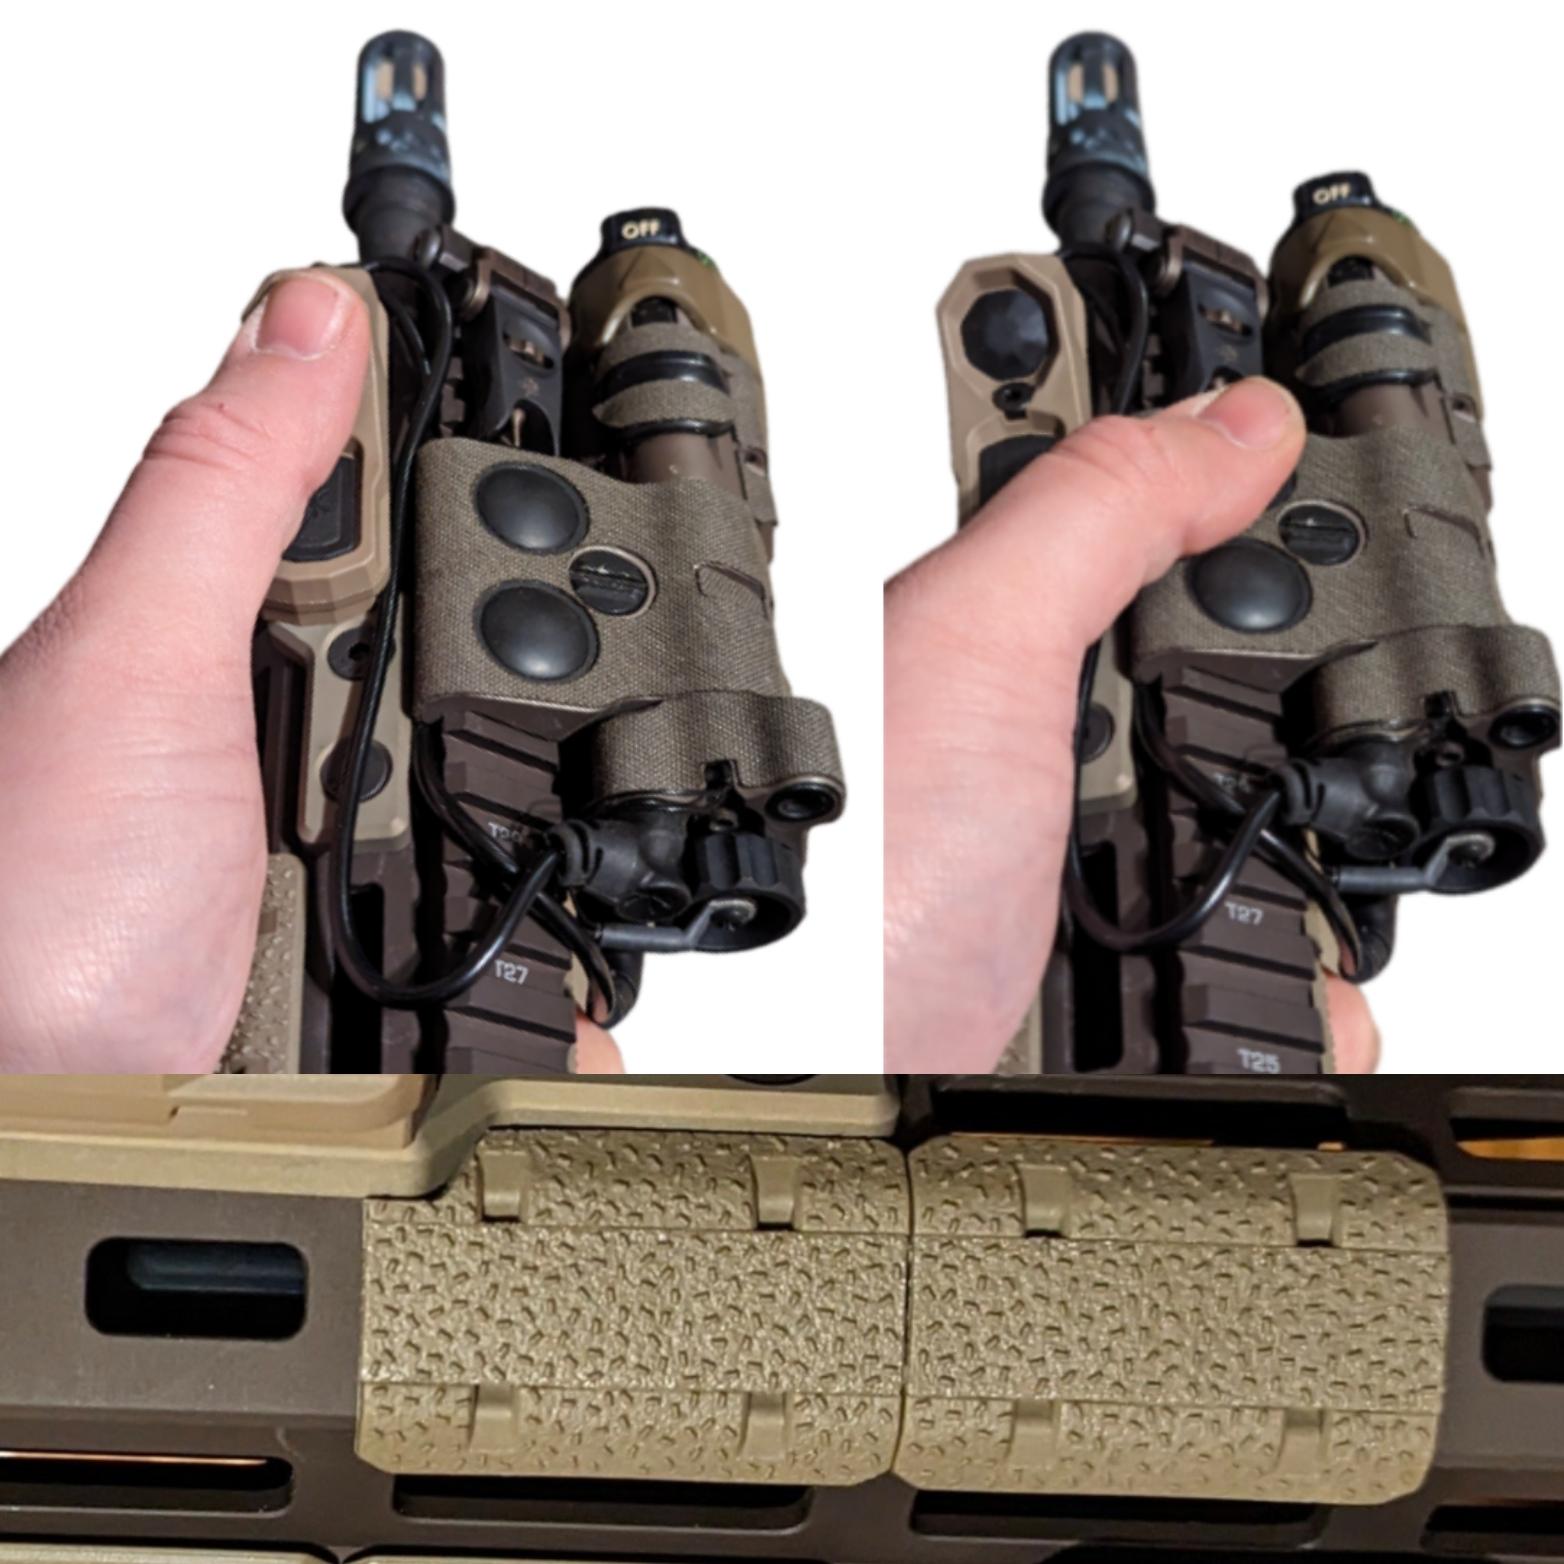
I had to shave a chunk of the corner off of the Type 2 rail cover panel directly under the OHM1 to make clearance for the offset section of the mount, and I was worried the offset of the angled rail on the RIS III would prevent proper flat mounting; thankfully it did not. Once it was all said and done, everything fit together nice and tight and was right where it needed to be. Perfect. Fernando did a great job, props to him for having the idea and moving on it, it needed to be done.
The cables from the AXON SYNC are tucked up against the RIS III between the MAWL and the PLHV2 on the right side of the rail, although I think once Magpul releases those M-LOK cable management joints they revealed for SHOT 2023, I’ll try them out on the 1:00 side offset rail under the MAWL to fully ensure the cables don’t wander out and become a snag hazard.
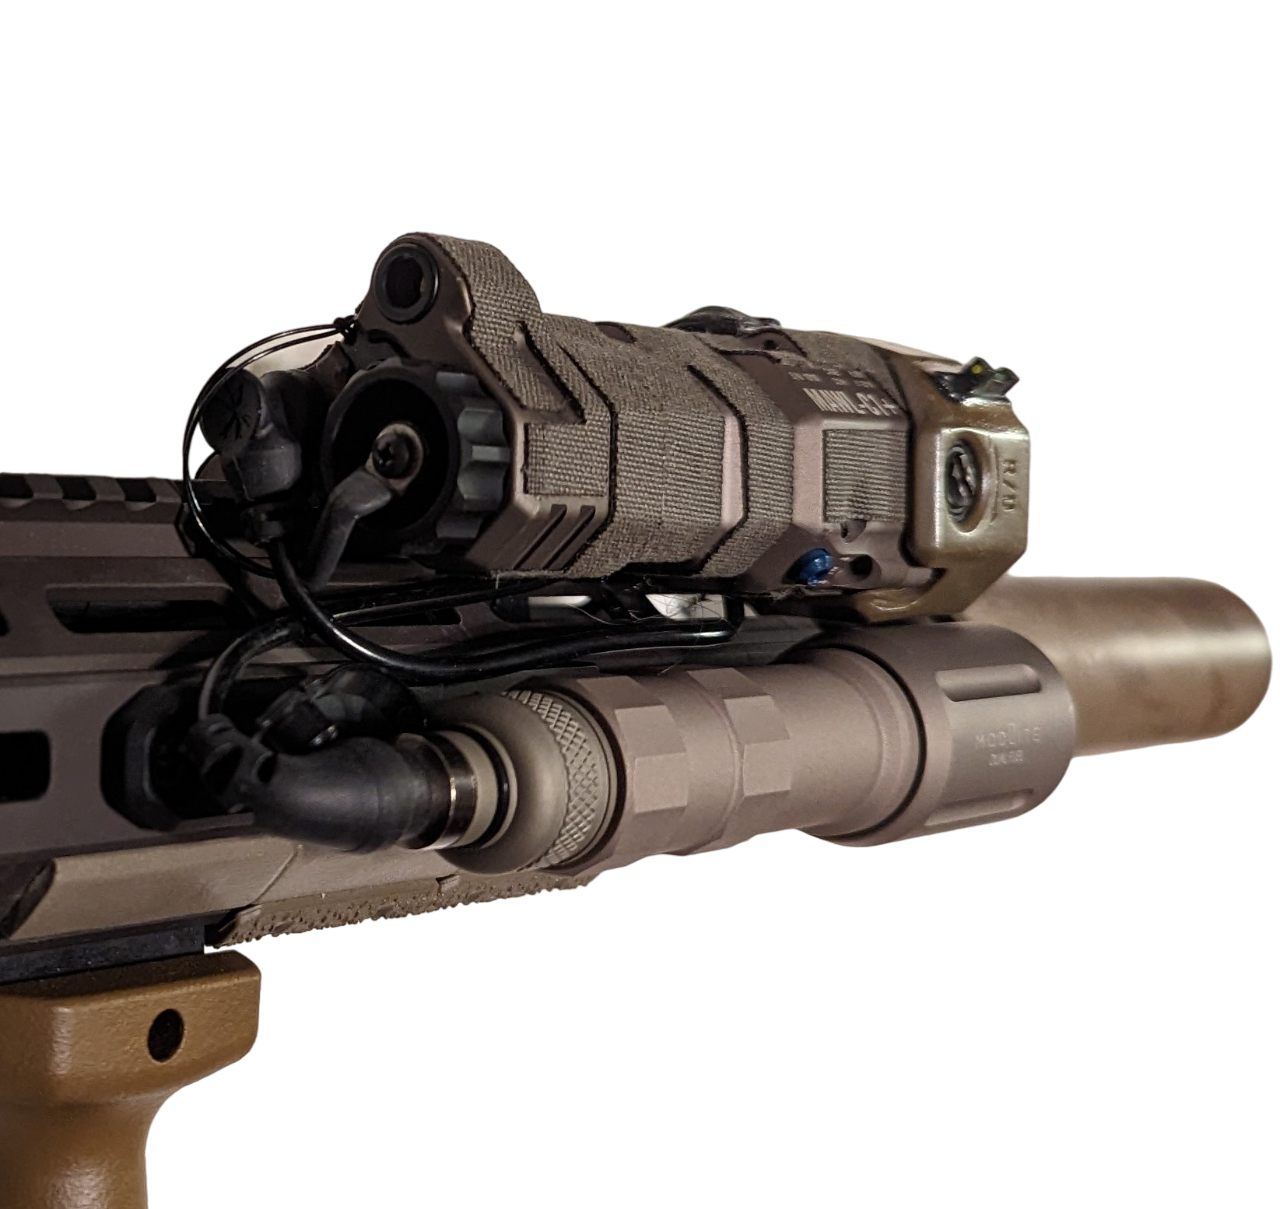
Now, this whole time I’ve been saying MAWL, MAWL, MAWL, without details. It’s the tan MAWL C1+ I’ve had since 2017 that was originally mounted to my GPR. I put it on the GPR-K as a place holder to determine where everything around it needed to be situated on the RIS III rail. My MAWL-DA is a newer RPC & Triple click model; it lives on my HK416 upper and it’s staying there.
I might get another MAWL for the GPR-K to have its own, I’ll have to see what funds are available. I might leave it on there to lighten up the GPR since it’s still NV compatible via the passive aiming through the ACRO P-2 over the Razor III 1-10x. But while it was on the GPR-K, I remembered a modification idea I had a while back when I was at Chuck Pressburg’s place back in October 2022, and decided to act on it.
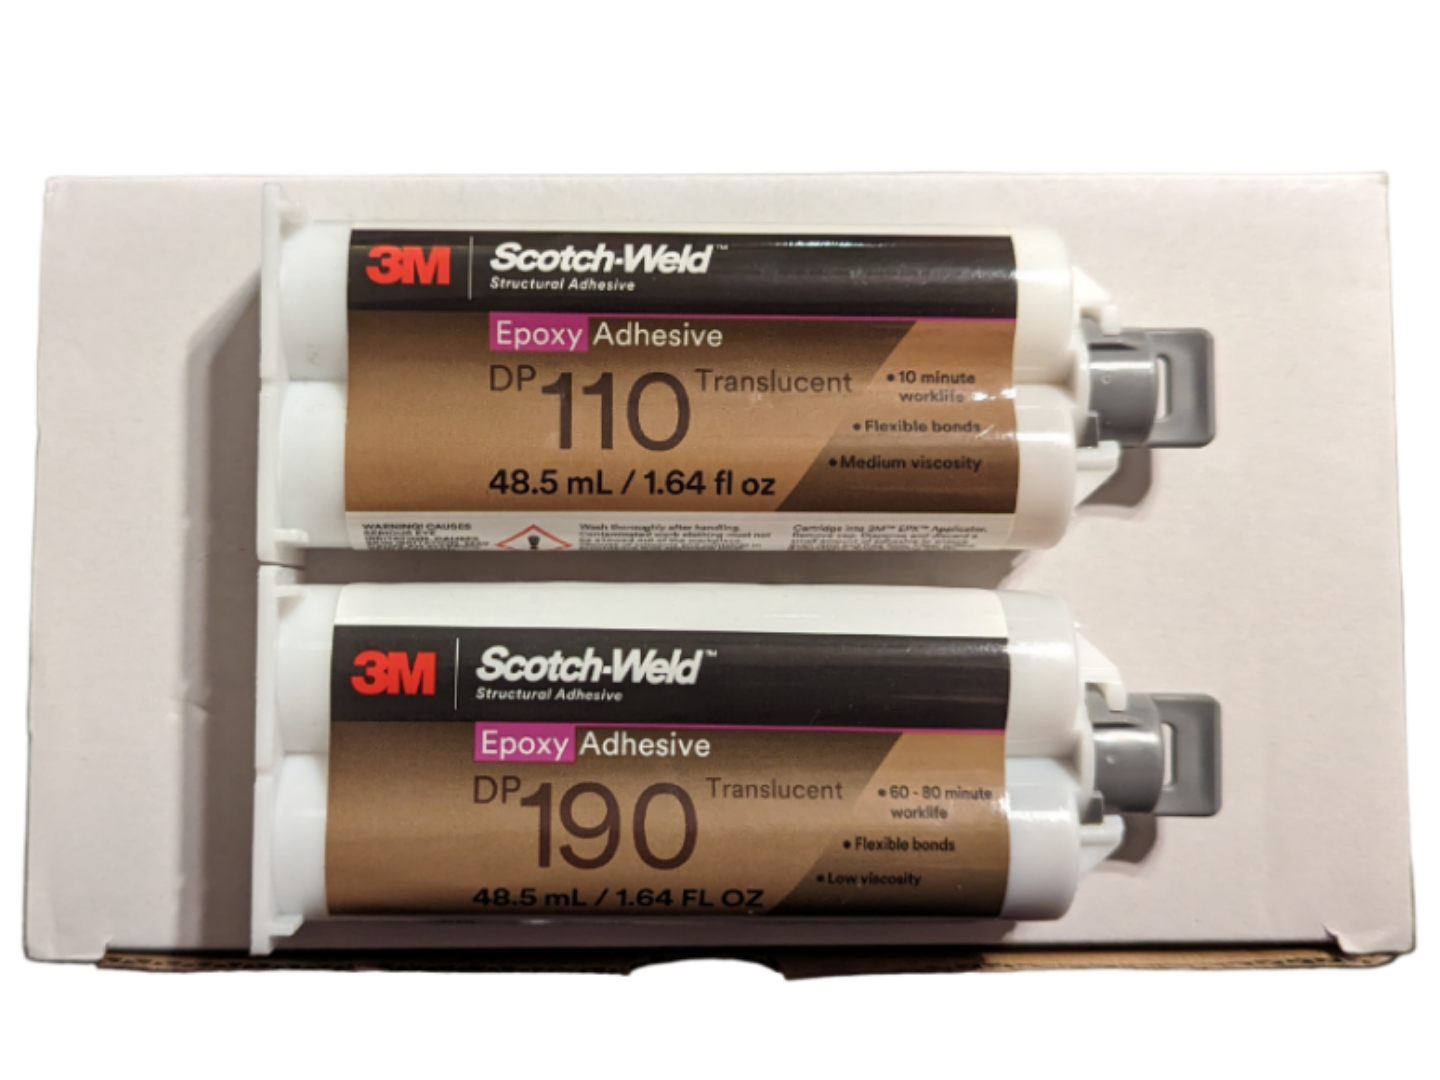
I acquired a green fiber optic pistol front sight. Once I had it, I asked my friends at BE Meyers, which two part epoxy do I want to use to permanently affix this piece of metal to the rubber bumper gasket thing around the head of the MAWL? They told me to use 3M DP110 directly between the two, and to seal it with 3M DP190 around the perimeter.
I ordered those plus an applicator gun, and did as instructed. I let it cure over a day or two, and that thing was cemented on there SOLID. So why the hell did I add a fiber optic front sight to the side of my MAWL?
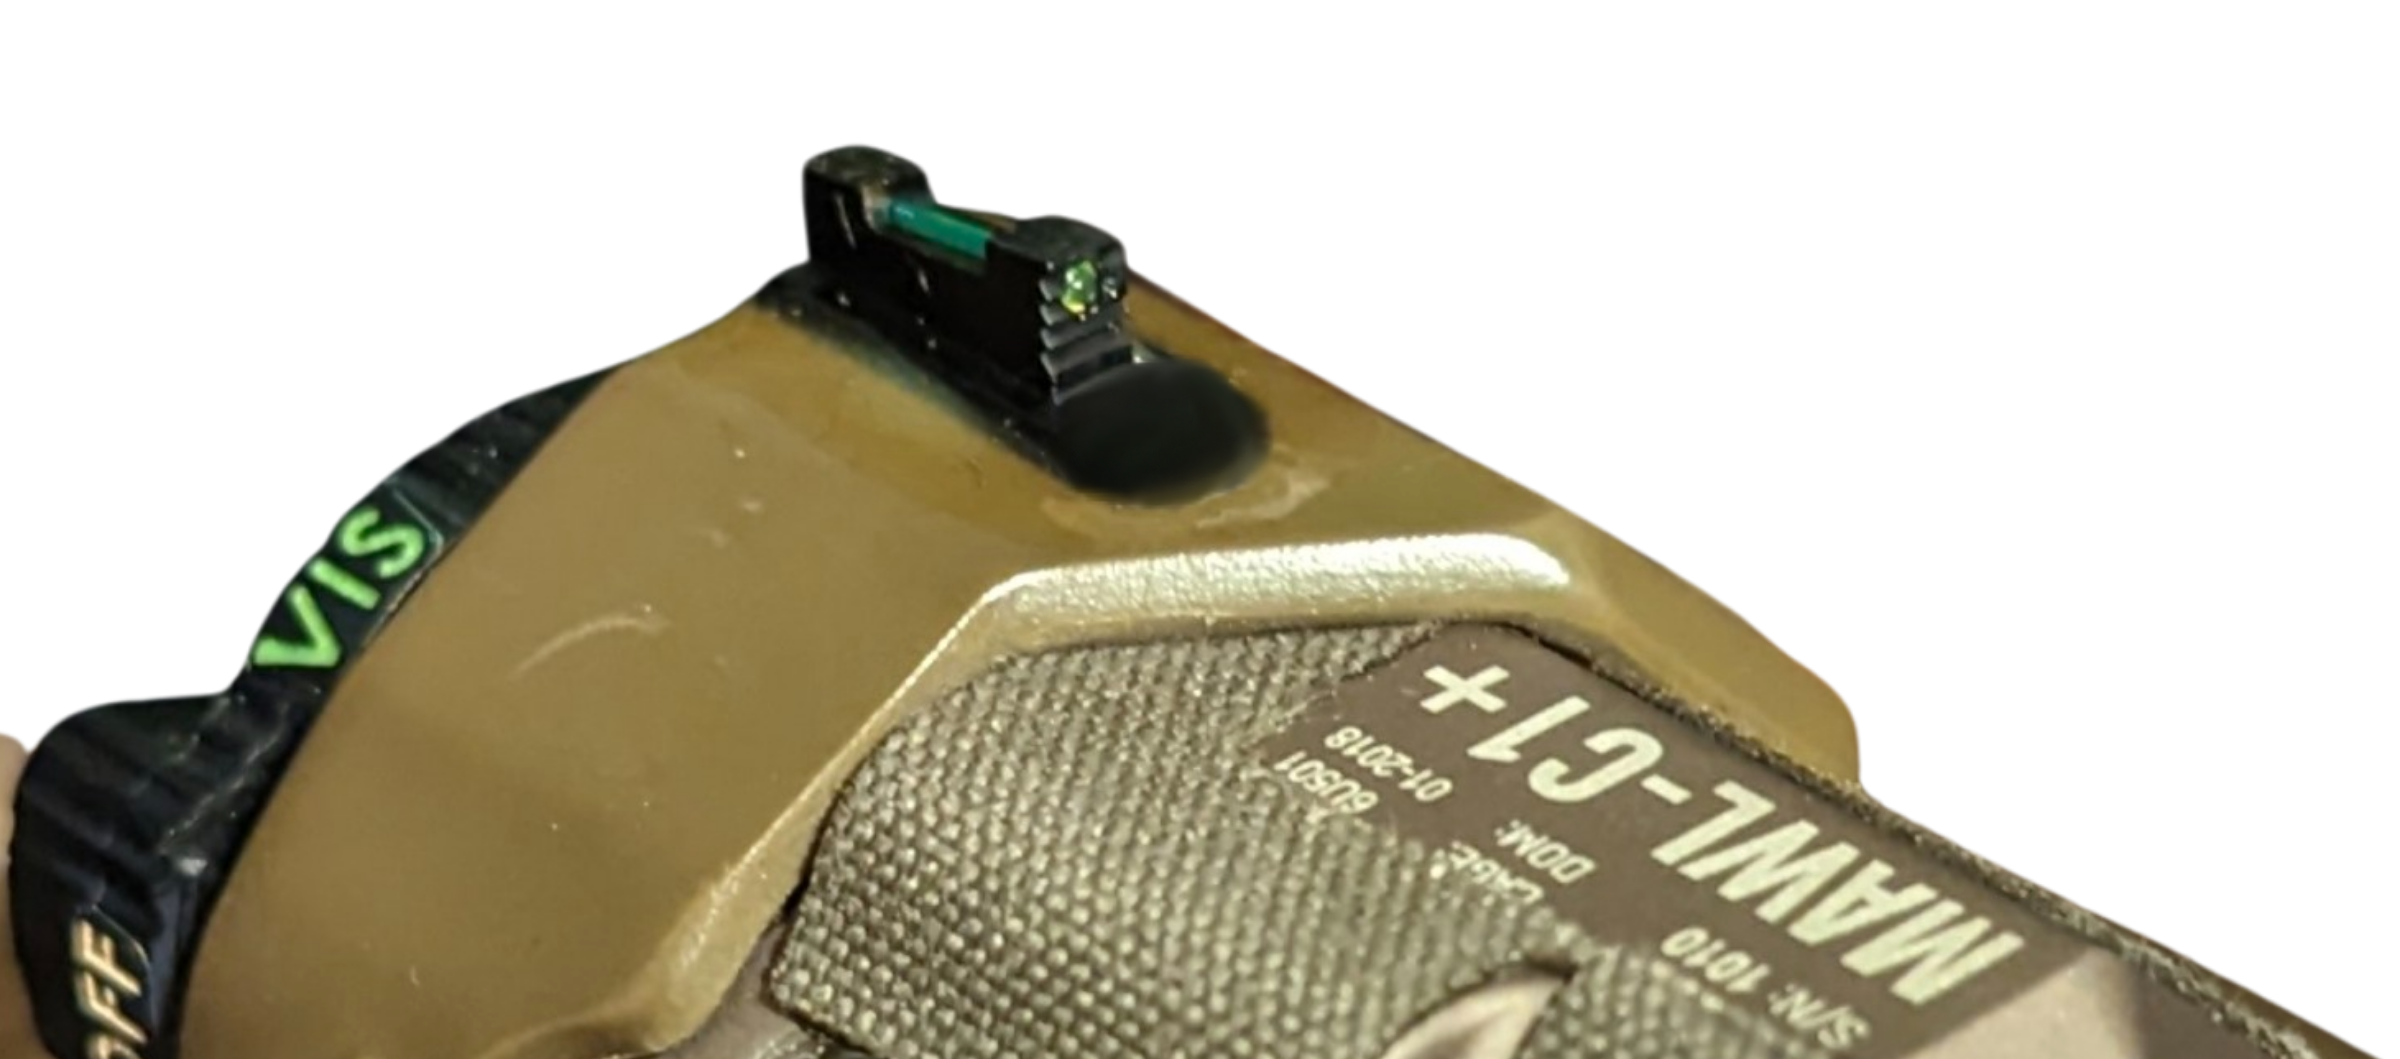
When I use my MAWL under NV, I rotate the gun 45° against my shoulder not unlike if I was using an offset MRDS. This places the VCSEL emitters at 1200 over the bore, with roughly the same height over bore as an optic in a standard height mount. What this does therefore is eliminates the windage offset, and leaves me with a mechanical offset comparable to that of an optic over the barrel.
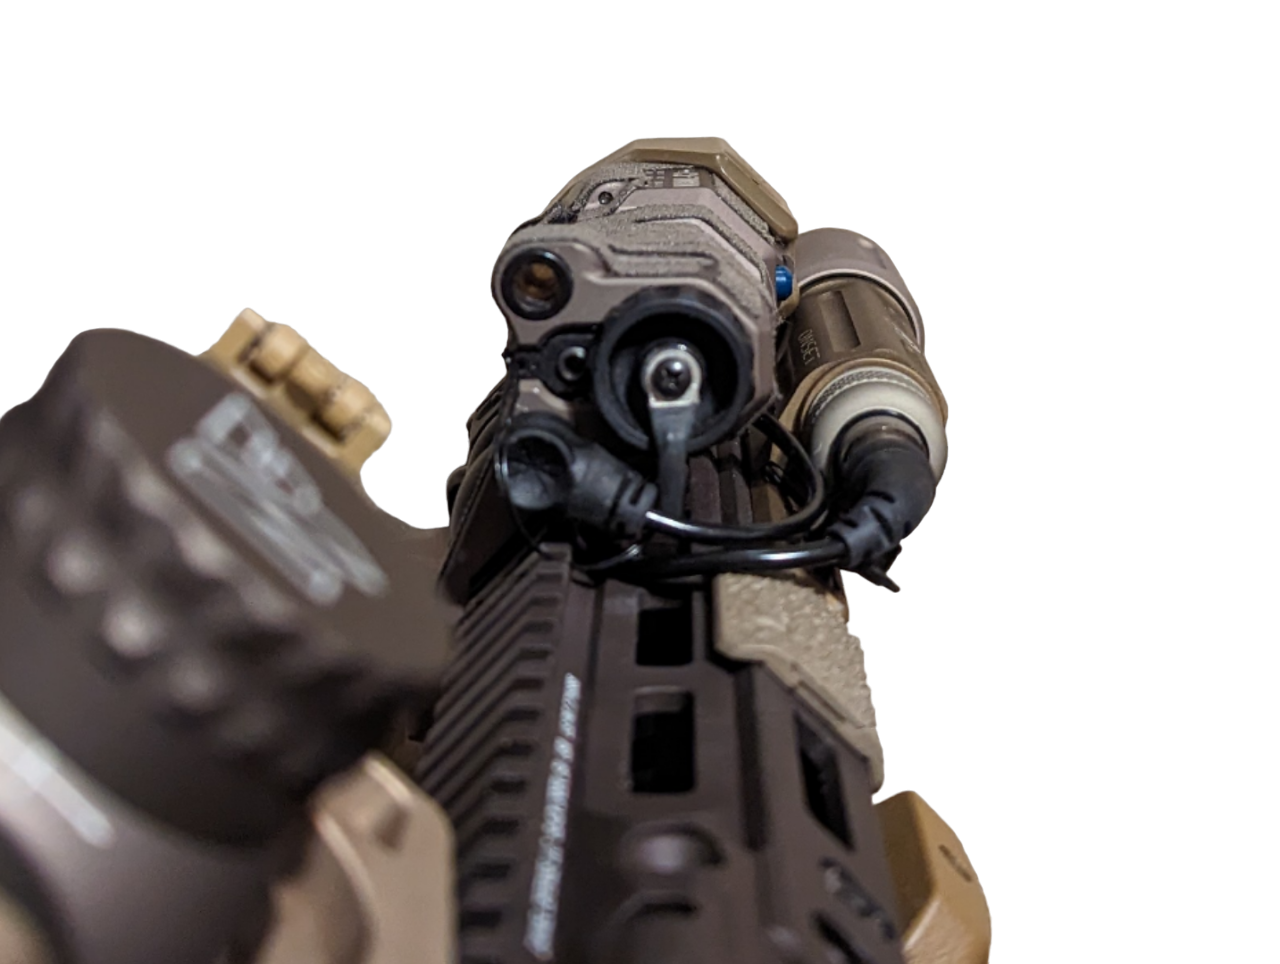
With a parallel zero, it’s only a matter of knowing your hold over or hold under at whatever distances. But what I noticed was under NV when everything right in front of my face is blurry, sometimes I had trouble determining if I had rotated the laser too much or too little and therefore still dealing with both a windage and elevation offset. This was because I couldn’t tell which flat surface of the rubber MAWL gasket was “up” after rotating due to the lack of focus.
I said man, if there was a notch or something to index off of and know when to stop twisting the rifle against my shoulder, that would’ve been cool. Then the lightbulb over my head lit up. I was careful to not use a tritium front sight, otherwise it would bloom in my night vision and fuck up my field of view. I asked Chuck if this was a problem with fiber optic sights; he confirmed it was not.
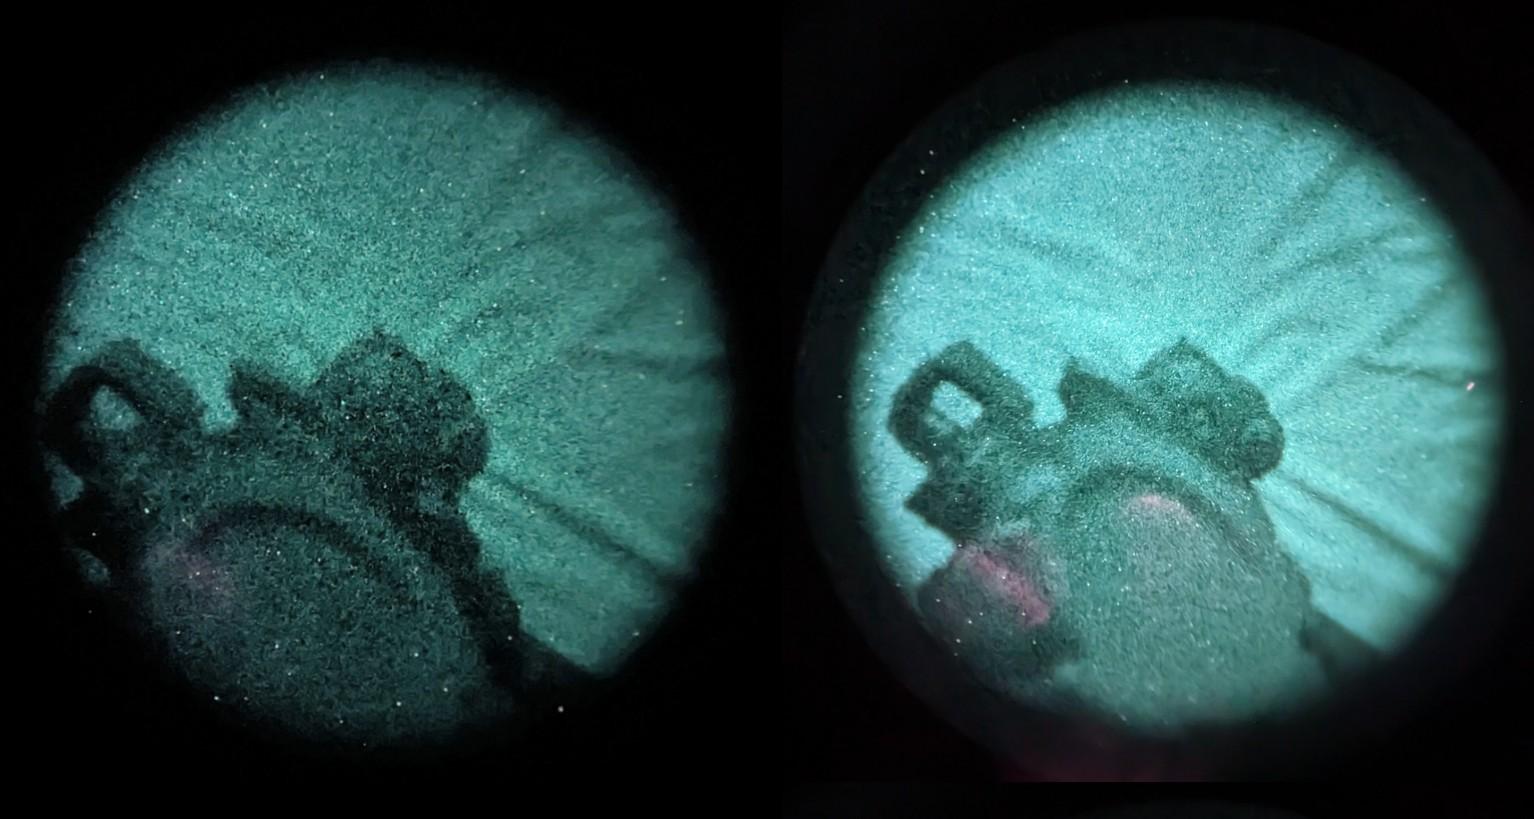
So of course I tested it with and without night vision. Under NV, the shit’s still blurry, but there’s a pronounced and noticeable bump where there was once a blurry flat surface with two adjacent flat surfaces. So you can see it well enough to know “okay stop rotating the rifle when the little notch is at 1200,” and the fiber optic rod won’t throw an unsightly amount of ambient light back at my NV kind of like an uncovered fiber optic rod on an ACOG will do on a bright day.
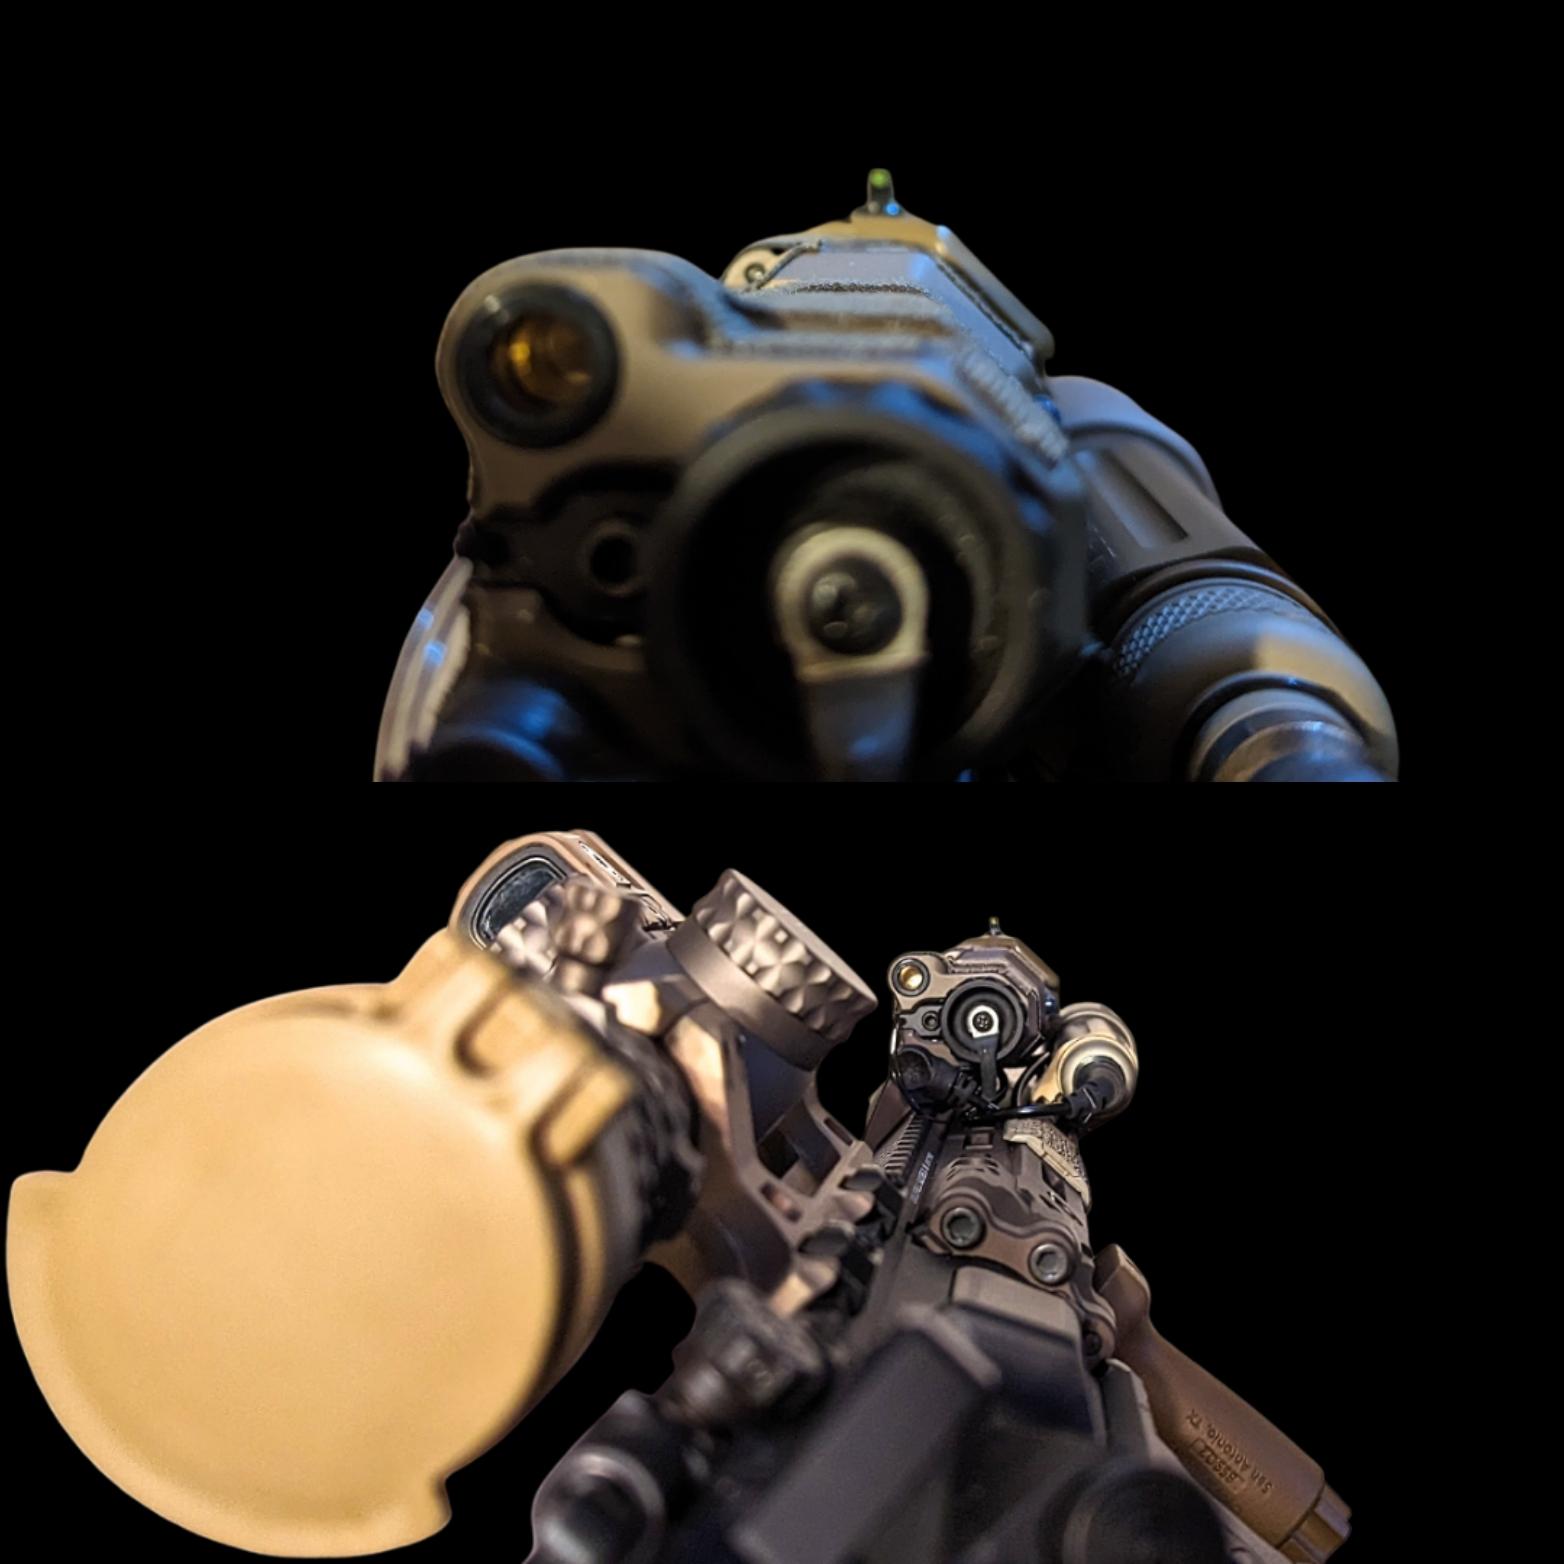
The bonus I hadn’t considered was in daylight without NV; given the height over the bore and the position, and being about the same distance away from my face as a pistol, it very much appears to be a backup front sight post for a hasty reference point to aim with. When I take this rifle to zero I’m gonna see how accurate it is out to 50m. At that point, I’d have redundant BUIS; one to use on the quick, one folded away for a worst case scenario. However, its primary purpose is not for daylight BUIS use.
As for the MAWL itself… it’s a MAWL. King of MFALs, no matter what the poors or the high rollers have to say about their lesser or higher priced lasers. Between output capability and switch ergonomics, it sits high on the throne.
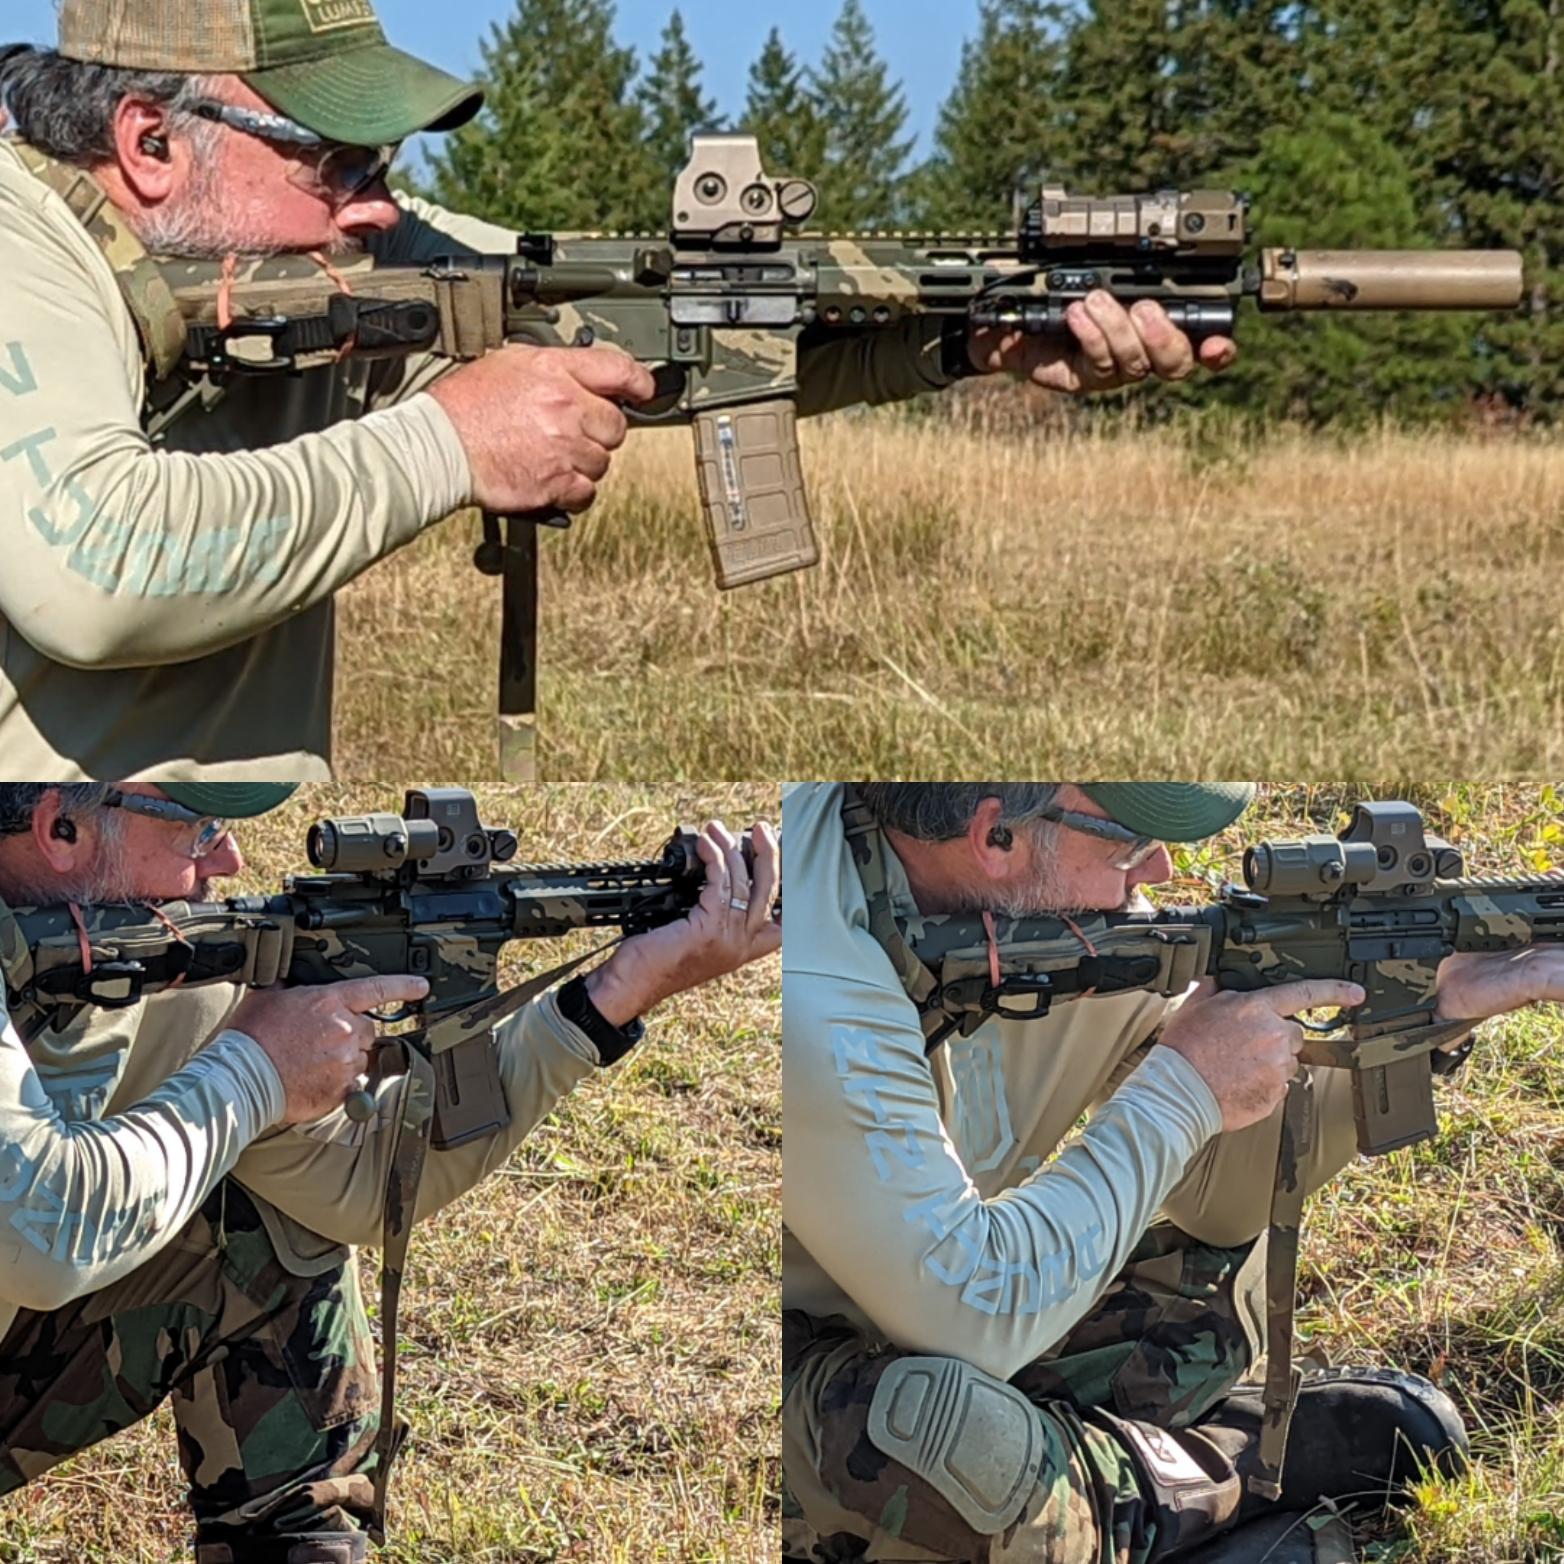
Chuck demoing the BFG GMT sling in various positions; I only just realized his magnifier wasn’t there the whole time.
Sling: Here’s where I deviated and tried some new
shit. Normally I’ve standardized on Magpul MS1 slings, for years now.
But back in October 2022 Chuck demo’d the sling he had suggested to Blue
Force Gear; not a Vickers, but a new model they chose to call GMT; “Get
More Tail.” A two point sling with an open tail (read: unsecured by a
tri-glide), it’s fast to adjust on the fly for a tight lockup in any
shooting position: Standing, Kneeling, Sitting, Prone, or securing the
rifle tight to your body across your front or back when you’re going
hands on or up/over an obstacle.
It looked a lot easier to reach the pull handle to adjust it compared
to the MS1 slider, and Chuck seemed very confident in it, so I said
fuck it I’ll give it a shot. I ordered it with two QD sling swivels and
attached it to the rifle and played with it for a bit. I don’t mind it,
it’s not too different from what I’m used to and once you get used to
the adjustment it’s rather intuitive.
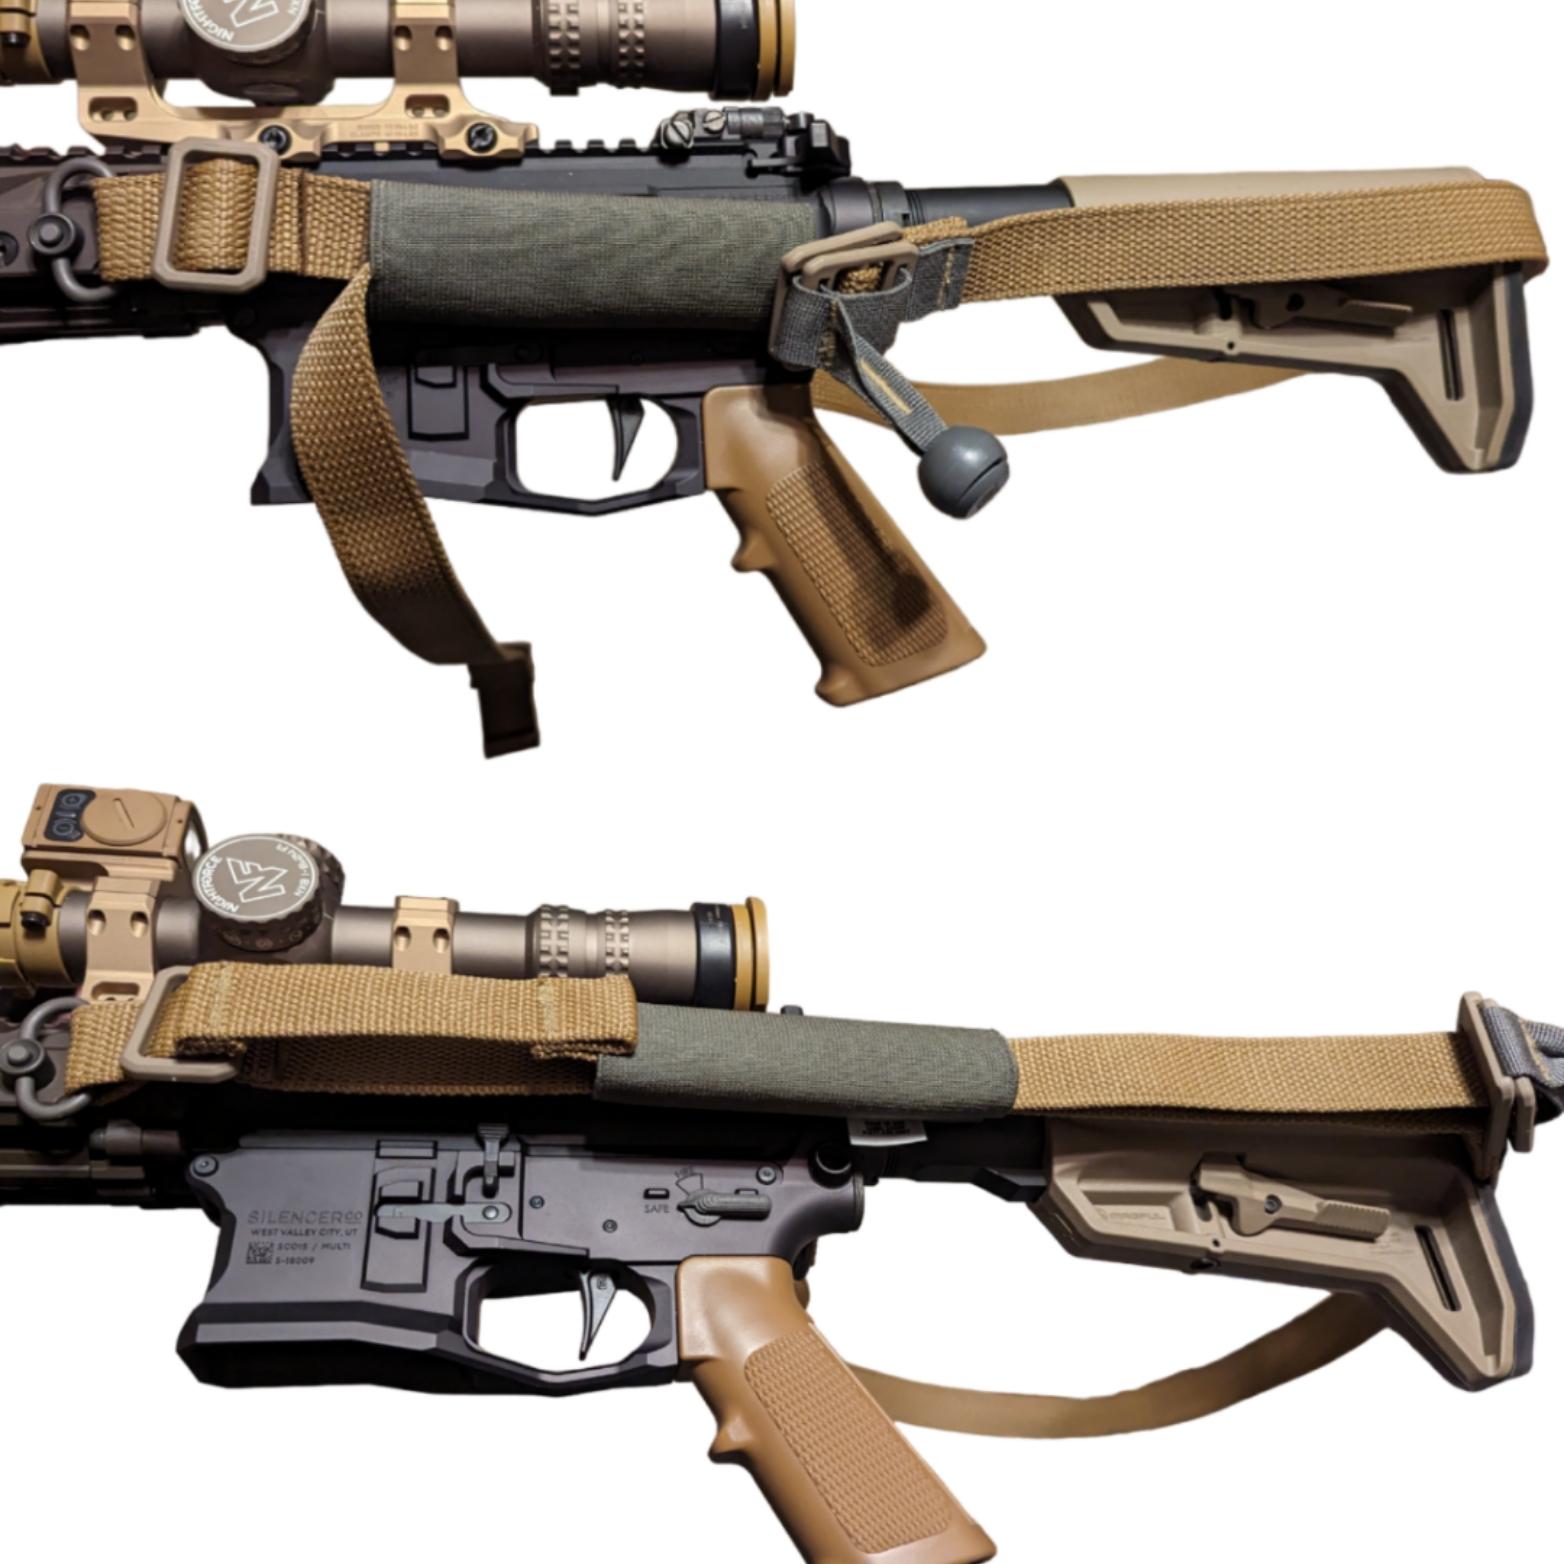
I did make one minor and reversible modification to it: I grabbed one
of those elastic sling retainer sleeves that BFG sells and slipped it
over the front end of the sling where the pull handle is, and hooked the
front under the sewn tab on the tail, and the back against the
tri-glide. The open tail slack of the sling is routed through it, so
instead of hanging down out in the open waiting to get caught on
something, it hangs forward and stays a little contained while having
all the freedom of movement it needs.

Thanks to the sleeve, the open end tail is just right there in
your work space in front of you, waiting for you to pull forward on it
to cinch it down. No having to reach down and search for it.
If I cinch the slack all the way out of the sling, the elastic sleeve
thing might crush between the rest of the sling and tri-glide rather
than obstructing the adjustment range of the sling. This is harmless
though, and once I let some slack out, it uncrumples and sits there
doing its thing.
•••
That’s all I’ve got on why I went with every part the GPR-K is made
of, and it ended up being a lot more than I thought it would be; I
didn’t even get to the live fire portion yet (but that’s fine since as
of this writing it hasn’t happened yet). I’ll cover that in a follow-up
piece, which will actually cover that and a second rifle (another GPR) I
bought on impulse between the GPR-K’s stamp clearing and writing this
article, since I’ll be bringing those out to zero together. So you’ll
have a double feature to look forward to. In the meantime…
Stay Dangerous.
Stay in this L.A.N.E.


